User Guide
Copyright Copyright © 2008 by Roku, Inc. All rights reserved. Roku and the Roku logo are trademarks of Roku, Inc. Other brand and product names are trademarks or registered trademarks of their respective holders.
Contents •••••• Chapter 1 Welcome . . . . . . . . . . . . . . . . . . . . . . . . . . . . . . . . . . . . . . . . . . . . . . . . . . . . . . . . . . . .1 What’s in the box? ........................................................ Overview ................................................................. Netflix Player inputs .................................................. Remote control ....................................................... Inserting the batteries in the remote control ...........
Chapter 4 Using Your Netflix Player . . . . . . . . . . . . . . . . . . . . . . . . . . . . . . . . . . . . . . . . . . . 21 Filling your instant Queue . . . . . . . . . . . . . . . . . . . . . . . . . . . . . . . . . . . . . . . . . . . . . . . . 21 Selecting a movie to watch on your TV . . . . . . . . . . . . . . . . . . . . . . . . . . . . . . . . . . . 24 Playing a movie . . . . . . . . . . . . . . . . . . . . . . . . . . . . . . . . . . . . . . . . . . . . . . . . . . . . . . . . . .
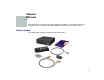
Chapter 1 Welcome •••••• Congratulations on your purchase of The Netflix Player by Roku™. In just a few minutes you’ll be ready to select movies from the Netflix website and watch them instantly on your TV.
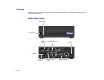
Overview Before you set up your Netflix Player, get familiar with the inputs on the Player and the buttons on the remote control.
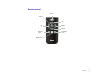
Remote control Home Select Up Up Right Down Reverse scan Forward scan Play/Pause Welcome • • • • 3 • •
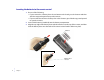
Inserting the batteries in the remote control Do one of the following: • If your remote has a battery door release button on the back, press the button and then slide the top panel upward to open the remote. • If your remote doesn’t have a battery door release button, just slide the top panel upward to open the remote. 2 Insert 2 AAA batteries (included) into the battery compartment.
Chapter 2 Connecting Your Netflix Player •••••• To use your Netflix Player, you need to connect it to your TV, your network, and a power source. Connecting your Player to your TV There are several ways to connect your Player to your TV. The method you choose depends on the inputs supported by your TV and the cables you have available. Your Player includes a combination cable that has both composite video and stereo audio connectors.
The following chart ranks the audio and video resolution for each setup option, assuming that the resolution is not compromised by your Internet connection: Video Composite S-Video Component HDMI Audio * ** *** **** Stereo Optical HDMI *** **** **** NOTE: Even if you use a high-resolution setup, audio/video quality may be compromised based on the speed of your broadband Internet connection.
Video connections NOTE: Connecting your TV directly to the audio/video output of your Set-Top Box will assure a more vivid picture and enhance your viewing enjoyment. Connecting a composite video cable Insert the yellow connector on the standard A/V cable into the yellow composite video jack on your Player. 2 Insert the yellow connector on the other end of the standard A/V cable into the yellow composite video jack on your TV or A/V receiver.
Connecting a component video cable 1 Insert one end of the green, blue, and red video cable into the jacks with the matching colors on your Player. 2 Insert the other end of the green, blue, and red cable into the corresponding component video jacks on your TV or A/V receiver. Connecting an HDMI cable Insert one end of the HDMI cable into the HDMI jack on your Player. 2 Insert the other end of the HDMI cable into the HDMI jack on your TV or A/V receiver.
Audio connections For standard stereo sound (2-channels, left/right), use the red and white connectors on the composite cable. For surround sound (5.1 audio), use either an HDMI or optical audio cable, if available. Connecting a stereo cable Insert the red and white connectors on the standard A/V cable into the red (Right) and white (Left) audio jacks on your Player. 2 Insert the other end of the stereo cable into the red (Right) and white (Left) audio jacks on your TV or A/V receiver.
Connecting an HDMI cable 1 Insert one end of the HDMI cable into the HDMI jack on your Player. 2 Insert the other end of the HDMI cable into the HDMI jack on your TV or A/V receiver. NOTE: If you use an HDMI cable, you don’t need separate audio and video cables.
Connecting your Player to your home network To view movies through your Netflix Player, you must connect your Player to your home network using either a wireless or wired connection. Your home network must have broadband Internet access, so that your Player can access the Internet when it is connected to your home network. A minimum connection speed of 1.5Mbps is required. However, we recommend using a connection that is 4.0Mbps or faster.
Connecting your Player to a power source Like most home entertainment products, your Player requires electricity to run. • • • 12 • • • Chapter 2 1 Connect the AC adapter to the back of your Player. 2 Insert the power plug into a power outlet.
Chapter 3 Setting Up Your Netflix Player •••••• After you connect your Player, as described in the previous chapter, you’re ready to access your Player and complete Guided Setup to set up your wireless network connection (if applicable), choose a display format for your TV, and activate your Player. Accessing your Player After you plug your Player into a power outlet, it is on all the time. There is no power button to turn on and off. You simply access your Player through your TV.
Selecting your network type If you’re setting up a wireless connection, make sure you have the following information handy: • Wireless network name (also known as the SSID) • Security key or passphrase (if your network is secured) • Security method (supported types are: WEP, WPA, and WPA2) 1 • • • 14 • • • Chapter 3 Do one of the following depending on your network type: • Wired: Make sure wired is highlighted, press select , and then skip ahead to “Activating your Player” to continue.
2 Do one of the following: • If your Player detects your home network, press left your home network, and then press select . or right on the remote to highlight NOTE: The waves radiating from the center of the icon indicate the strength of the wireless network connection. A weak network connection may impact the quality of the video you receive with your Player.
• If your Player doesn’t detect your network and your network broadcasts its name (also known as the SSID), press left or right on the remote to highlight not shown, and then press select . Make sure your Player is within range of your wireless router, highlight scan again, and then press select . • If your network doesn’t broadcast its name (it has a hidden SSID), press left or right on the remote to highlight not shown, and then press select .
3 If your network requires a security key or passphrase, use the remote to highlight the first character of the key or passphrase and then press select to enter it in the box at the top of the screen. Repeat this process to enter the rest of the characters in the key or passphrase. 4 After you enter the security key or passphrase, press down press select .
Activating your Player Activating your Player establishes a connection between your Player and your Netflix account. You must activate your Player before you can use it watch movies. 1 Wait for the activation screen to appear on your TV screen. You’re now ready to complete activation on the Netflix website. On your computer, go to: www.netflix.com/activate. 3 If necessary, enter your Sign in Name and Password to log into your account.
4 Enter the activation code that appears on your TV screen. 5 When the Congratulations screen appears on your TV, you’re ready to add movies to your instant Queue. See “Filling your instant Queue” for instructions.
• • • 20 • • • Chapter 3
Chapter 4 Using Your Netflix Player •••••• After you activate your Player, you’re ready to add movies and shows to your instant Queue. You can then use your Player’s remote to browse your instant Queue and to select and watch titles on your TV. You’ll be amazed at how quick and easy it is! Filling your instant Queue Your instant Queue works just like your DVD queue. You add and manage the movies and shows in your instant Queue from the Netflix website on your computer.
• • • 22 • • • Chapter 4 3 Click the Watch Instantly tab. 4 When you find a movie or show you want to watch, point your cursor at the Add/Play button to reveal additional options, and then click Add to Instant Queue. 5 Repeat step 4 to add more movies and shows to your instant Queue.
6 (Optional) Arrange your instant Queue by clicking the Your Queue tab, and then clicking the Instant subtab. • To rearrange your instant Queue, drag and drop the titles in the order you want them, or change the numbers to the left of the titles and then click Update Instant Queue to apply your changes. • To remove a title from your instant Queue, click the Remove check box to the right of the title and then click Update Instant Queue to apply your changes.
Selecting a movie to watch on your TV After you set up your Player and add movies and shows, you can browse and watch them on your TV. Turn on your TV, and if necessary, select the input on your TV that displays the Player. 2 On the Player remote, press home to view your instant Queue. 1 Press left or right to scroll through your instant Queue. 4 Highlight a movie and then do either of the following: • Press play to begin viewing the selected title.
Choose a Different Episode (TV series only) Enables you to select a specific show of a TV series. Press left or right to highlight the show you want to view, and then press select to choose it. Rate Enables you to rate a movie or show. The more stars, the higher the rating. Press select to access the rating feature, and then press left or right to increase or decrease the rating. Press select again to confirm the selected rating. Remove Deletes the selected movie from your instant Queue.
Playing a movie While watching a movie or show via your Player, you have full control over your viewing experience. You can use the buttons on the remote to pause and resume viewing and to scan forward and backward, just like when you watch a DVD. While playing a movie, the buttons on the remote do the following: • • • 26 • • • Chapter 4 Button Action play Starts playing the movie. To pause a movie while it’s playing or to resume playing a paused movie, press the button again. up Stops the movie.
Chapter 5 Adjusting Settings on Your Netflix Player •••••• Settings enable you to access your network, display, sound, and screensaver settings. You can also view information about your Player and reset your Player to the original factory settings. Changing your network settings If you install a new network router or change to a different Internet Service Provider (ISP), you need to update your network settings.
• • • 28 • • • Chapter 5 3 Highlight network settings, and then press select . 4 Highlight repeat guided setup and then press select 5 Follow the onscreen instructions to enter your new network settings. See “Selecting your network type” for details. .
Changing your display setting If you purchase a new TV or connect your Player to a different TV you already have, you can change your display type selection between standard and widescreen format. 1 Press home to go to the Home screen, and then press up 2 Highlight settings, and then press select to activate the menu bar. to display the Settings screen.
3 Highlight display type, and then press select 4 Press left or right press select . . on the remote to highlight standard or widescreen, and then NOTE: For widescreen TVs, select 16 : 9 widescreen mode (also known as “full” or “stretch” mode).
Setting the volume for sound effects You can adjust the volume level of the sound effects produced by your Player, or you can turn off the sound effects completely. 1 Press home to go to the Home screen, and then press up 2 Highlight settings, and then press select to activate the menu bar. to display the Settings screen.
• • • 32 • • • Chapter 5 3 Highlight sound effects, and then press select 4 Press up or down select . .
Changing your screensaver settings When your Player remains inactive for five minutes, the screensaver appears. You can, however, adjust this setting and choose how much time must pass before the screensaver appears, or disable the screensaver completely. 1 Press home to go to the Home screen, and then press up 2 Highlight settings, and then press select to activate the menu bar. to display the Settings screen.
• • • 34 • • • Chapter 5 3 Highlight screensaver, and then press select 4 Press up or down . to highlight the option you want to use, and then press select .
Viewing and updating your Player info You can view information about your Player, such as the hardware and software version and the serial number, as well as your current network settings. You can also check for software updates to keep your Player up-to-date. 1 Press home to go to the Home screen, and then press up 2 Highlight settings, and then press select to activate the menu bar. to display the Settings screen.
• • • 36 • • • Chapter 5 3 Highlight player info, and then press select . 4 Highlight check for update and then press select .
5 Highlight yes and then press select to begin the update. 6 When you’re Player finishes updating, it restarts and displays the Home screen.
Performing a factory reset Performing a factory reset erases all of your settings and account information and restores your Player’s original factory settings. If you plan on selling your Player, we recommend that you perform a factory reset before delivering the Player to the new owner. WARNING: Performing a factory reset deactivates your Player and erases all of your settings.
3 Highlight factory reset, and then press select . 4 To continue with the reset, select factory reset. To cancel the reset, select back.
5 • • • 40 • • • Chapter 5 When prompted, highlight yes to confirm that you want to reset your Player, and then press select .
Chapter 6 Additional Information •••••• This section contains more information about select topics in this guide. Manually entering your network’s name (SSID) If your network is setup as a hidden network that doesn’t broadcast its name, you can enter the name manually. 1 From the Choose Wireless Network screen in Guided Setup or the Network Settings screen, highlight not shown and press select .
• • • 42 • • • Chapter 6 2 Highlight enter wireless network name (SSID) manually, and then press select . 3 Use the remote to highlight the first character of the network name, and then press select to enter it in the box at the top of the screen. Repeat this process to enter the rest of the characters in the network name. 4 After you enter the network name, press down select .
Using the Reset button You can use the Reset button to restart your Player or to perform a factory reset and restore the original factory settings. WARNING: Performing a factory reset deactivates your Player and erases all of your settings. If you want to keep your settings and keep your Player activated, do a restart instead. • To restart your Player, press the Reset button. • To do a factory reset, press and hold the Reset button for 15 seconds.
Understanding Player performance The quality of the video and audio you receive via your Player is dependent on a combination of several factors: • Your audio/video connections. The type of audio and video connections you use to connect your Player and your TV may impact sound and picture quality. In general, HDMI and optical audio are superior to stereo audio. Similarly, HDMI and component video are superior to S-Video. Additionally, HDMI, component video, and S-Video are all better than composite video.
Notices •••••• Macrovision Statement This product incorporates copyright protection technology that is protected by U.S. patents and other intellectual property rights. Use of this copyright protection technology must be authorized by Macrovision, and is intended for home and other limited viewing uses only unless otherwise authorized by Macrovision. Reverse engineering or disassembly is prohibited. U.S. Patent Nos. 5,583,936; 6,836,549; 5,315,448; 6,381,747; 6,501,842; and 7,050,698.
Netflix Player by Roku License Agreement and Warranty Statement IMPORTANT: READ THIS AGREEMENT CAREFULLY AND REVIEW THIS PRODUCT MANUAL AND SAFETY INFORMATION BEFORE POWERING UP YOUR ROKU PRODUCT FOR THE FIRST TIME. This license Agreement and Warranty Statement is the legal agreement (“Agreement”) between you (“you”) and Roku, Inc. (“Roku”) governing your use of the Netflix® Player by Roku (“Roku Product”), the software installed on the Roku Product (“Software”) and related documentation.
Netflix Account. In order to use the Roku Product, you must maintain a valid and active Netflix, Inc. account in good standing and must adhere to the Netflix, Inc. terms of service. Privacy. Our privacy policy explains our privacy policies regarding the collection, use, and disclosure of personally identifiable and anonymous information. Such policy may be accessed through our website at http://www.roku.com/privacy.php and may be modified by Roku at any time for any reason.
Important: When emailing for an RMA number, please provide the following information with your request: (a) model number, (b) serial number, (c) problem description, (d) software version (located in the System Configuration menu), (e) date of purchase, (f) place of purchase (dealer or online place of purchase), (g) return shipping address (P.O. boxes are not accepted), and (h) proof of purchase. Note: Proof of purchase will need to be included in the return shipment in order to ensure warranty coverage.
Convention on Contracts for the International Sale of Goods shall not apply to this Agreement. Should you have any question about this Agreement, or if you desire to contact Roku, please contact us by mail at Roku Inc., 12980 Saratoga Ave., Saratoga, CA 95070. Copyright © 2008 by Roku, Inc. All rights reserved. Roku and the Roku logo are trademarks of Roku, Inc. Other brand and product names are trademarks or registered trademarks of their respective holders.
13 Servicing. Do not attempt to service this product yourself as opening or removing covers may expose you to dangerous voltage or other hazards. Refer all servicing to qualified service personnel. 14 Damage Requiring Service.