
User Manual

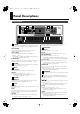

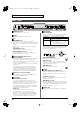
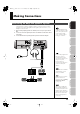
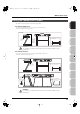

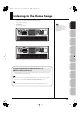
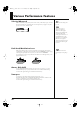
Table Of Contents
- USING THE UNIT SAFELY
- IMPORTANT NOTES
- Contents
- 01: Introduction (Overview and Basic Operation)
- 02: Sound Generator, Section 1 (Playing Sounds)
- Playing in Single Mode
- About the Single Play Screen
- Selecting a Patch
- Selecting the Tones That Will Sound (Tone On/Off)
- Playing Single Notes (Monophonic)
- Part Settings (Part View)
- Selecting the Parameter Controlled by the Realtime Controllers or D Beam Controller (Control Sett...
- Playing Percussion Instruments (Rhythm Set)
- Playing a Sample Set
- Creating a List of Frequently Used Sounds (Favorite)
- Registering a Sound (Regist)
- Recalling a Sound
- Specifying the Volume for Each Step (Favorite Level)
- Changing the Step in Which You Registered a Sound
- Removing a Sound You Registered (Remove)
- Removing All Sound Registrations from a Bank (Remove Bank)
- Registering a Song (Set Song)
- Importing a Text File (Import Text)
- Removing a Text File (Remove Text)
- Switching the Display Font (Font)
- Playing in Live Mode
- Displaying Live Play (Layer/ Split) Screen
- Functions in the Live Play (Layer/Split) Screen
- Selecting a Live Set
- Using the Live Play (Layer/ Split) Screen
- Using the Live Set Part Mixer Screen
- Using the Layer Edit Screen
- Performing with the Arpeggio
- Performing with the Realtime Controllers and D Beam Controller
- Setting Effects
- Adjusting the Master Level
- Making Detailed Settings for a Live Set
- Playing in Studio Mode
- Playing in Single Mode
- 03: Sound Generator, Section 2 (Controlling Sounds)
- 04: Sound Generator, Section 3 (Creating Sounds)
- Creating a Patch
- How to Make Patch Settings
- Saving Patches You’ve Created (Write)
- Functions of Patch Parameters
- Settings Common to the Entire Patch (General)
- Modifying Waveforms (Wave)
- Changing How a Tone Is Sounded (TMT)
- Modifying Pitch (Pitch/Pitch Env)
- Modifying the Brightness of a Sound with a Filter (TVF/TVF Env)
- Adjusting the Volume (TVA/TVA Env)
- Output
- Modulating Sounds (LFO1/2/Step LFO)
- Apply Portamento or Legato to the Sound (Solo/Porta)
- Miscellaneous Settings (Misc)
- Matrix Control Settings (Control 1–4)
- Setting Effects for a Patch (PFX)
- Creating a Rhythm Set
- How to Make Rhythm Set Settings
- Saving Rhythm Sets You’ve Created (Write)
- Functions of Rhythm Set Parameters
- Making Settings Common to the Entire Rhythm Set (General)
- Modifying Waveforms (Wave)
- Changing How a Rhythm Tone Is Sounded (WMT)
- Modifying Pitch (Pitch/Pitch Env)
- Modifying the Brightness of a Sound with a Filter (TVF/TVF Env)
- Adjusting the Volume (TVA/TVA Env)
- Output Settings (Output)
- Setting Effects for a Rhythm Set (PFX)
- Creating a Sample Set
- Creating a Live/Studio Set
- Adding Effects
- Where Effect Settings are Saved
- Turning Effects On and Off
- Making Effect Settings
- Applying Effects in Single Mode
- Applying Effects in Live Mode
- Applying Effects in Studio Mode
- Making Patch Multi-Effects Settings (PFX)
- Making Multi-Effects Settings (MFX1–2)
- Making Chorus Settings (Chorus)
- Making Reverb Settings (Reverb)
- Mastering Effect
- Effects List
- Creating a Patch
- 05: Pads (Using the Pads)
- Using the Pads
- Common Operations for Pads
- 1 SAMPLE PAD (Using the Pads to Play Samples)
- 2 RHYTHM (Using the Pads to Play a Rhythm Set)
- 3 CHORD MEMORY (Using the Pads to Switch Chord Forms)
- 4 ARPEGGIO (Using the Pads to Switch Arpeggio Styles)
- 5 RPS (Using the Pads to Play Phrases)
- 6 RHYTHM PTN (Using the Pads to Play Rhythm Patterns)
- 7 TONE SEL/SW (Using the Pads to Select Tones or Switch Them On/Off)
- 8 TRACK MUTE (Using the Pads to Mute Tracks)
- 9 BOOKMARK (Using the Pads to Recall Frequently Used Screens)
- 10 MIDI TX SW (Using the Pads to Turn External MIDI Transmit Channels (1–16) On/Off)
- 11 EFFECT SW (Using the Pads to Switch the Effects)
- 12 PATCH MFX SW (Using the Pads to Switch Patch Multi-effects)
- 13 PART SELECT (Using the Pads to Select Parts)
- 14 PART MUTE (Using the Pads to Mute Parts)
- 15 USER GROUP (Using the Pads to Register/Recall User Groups)
- 16 FAVORITE (Using the Pads to Register/Recall Favorite Settings)
- Using the Pads
- 06: Sequencer (Creating a Song)
- Playing Back a Song
- Three Ways to Play Back
- Playing a Song (Song Play)
- Loading a Song (Song List)
- Playing a Song (Song Play)
- Operations in the Song Play Screen
- Fast-forwarding or Rewinding during Playback
- Muting the Playback of a Track (MUTE)
- Accessing the Mixer Screen
- Changing the Playback Tempo of the Song
- Playing a Song Repeatedly (Loop)
- Placing Markers in a Song (Marker)
- Changing the Track Display Zoom and Display Order (Zoom/Track Order)
- Naming a Track (Track Name)
- Specifying a Track’s Output Destination (Output Assign)
- Deleting a Song File (Song Delete)
- Song Automatically Loaded at Power-on (When Loading a Project)
- Erasing the Currently-open Song (Song Clear)
- Playing a Standard MIDI File (SMF)
- Playing Phrases (MIDI Phrase)
- Recording MIDI
- Recording Audio
- Editing Songs
- Three Ways to Edit
- Editing a Song (Song Edit)
- Song Utility (Song Util)
- Editing a Phrase (Phrase Edit)
- Phrase Modify Menu
- Aligning a Phrase’s Timing (Quantize)
- Erasing Unwanted Performance Data (Erase)
- Deleting Unwanted Measures (Delete)
- Copying Phrases (Copy)
- Inserting a Blank Measure (Insert)
- Transpose the Key (Transpose)
- Changing the Velocity (Change Velocity)
- Changing the MIDI Channel (Change Channel)
- Modifying the Length of Notes (Change Duration)
- Shifting Performance Data Forward and Back (Shift Clock)
- Thinning Out the Sequencer Data (Data Thin)
- Deleting Blank Measures (Truncate)
- Editing Individual Items of Sequencer Data (Microscope)
- Saving a Song (Song Save)
- Playing Back a Song
- 07: Sampler
- Sampling
- Editing a Sample
- Selecting a Sample (Sample List)
- Displaying Sample Edit Screen (Sample Edit)
- Setting the Start/End Points of the Sample
- Making Settings for Sample (Sample Parameters)
- Removing Unwanted Portions of a Sample (Truncate)
- Boosting or Limiting the High-frequency Range of the Sample (Emphasis)
- Maximizing the Volume of a Sample (Normalize)
- Amp
- Stretching or Shrinking a Sample (Time Stretch)
- Dividing a Sample into Notes (Chop)
- Saving a Sample (Save)
- Saving all samples (Save All)
- 08: Various Settings (Menu and System)
- Menu Reference
- System Settings (Settings Common to All Modes)
- About V-LINK
- 09: Appendix

Overview Sound 1 Sound 2 Sound 3 Pad Sampler
Menu/System
AppendixSequencer
23
Panel Descriptions
[PLAY]
This plays back the song.
→
(p. 204)
It will blink in time with the tempo and time signature.
→
(p. 293)
[STOP]
This stops playback.
[REC]
This accesses the Recording Standby screen.
→
(p. 222)
Pressing this during recording will activate the Rehearsal function.
→
(p. 225)
CONTROL
Control Knobs 1–4
Control Sliders 1–8
These provide realtime control of the parameters or functions
assigned to them.
→
(p. 75)
* By holding down [SHIFT] and moving one of the above knobs
(sliders), you can access the setting screen for that control.
→
(p. 76)
MAGIC CTRL (Magic Control)
Magic Control is a function that automatically changes the role of knob
4 and slider 8 according to the screen. For example, in the Patch List
screen (p. 49), knob 4 selects the category and slider 8 scrolls the list.
TEMPO/VALUE
This indicates the tempo. When you move a control knob or slider,
this will indicate its value.
[TEMPO]
You can adjust the tempo by pressing this button and turning the
VALUE dial.
→
(p. 78, p. 207)
LIST/EDIT
[PATCH]
Press this to edit a patch. Press it once to access the Patch Zoom Edit
screen (p. 84), or twice in succession to access the Patch Pro Edit
screen
(p. 86).
[SONG]
Press this to edit a song. Press it once to access the Song Play screen
(p. 205), or twice in succession to access the Song Edit screen (p. 232).
[SAMPLE]
Press this to edit a sample. Press it once to access the Sample Edit
screen (p. 266), or twice in succession to access the Sample List (p.
263).
[EFFECTS (ROUTING)]
Press this to make effect-related settings.
→
(p. 150)
DISPLAY
A variety of information is shown here according to the operations
you perform.
[MENU]
Opens the MENU.
→
(p. 276)
Function buttons ([F1]–[F8])
When you’re editing, these buttons execute various functions that
will differ depending on the screen.
[DISPLAY]
Displays the shortcut menu.
→
(p. 44)
VALUE
[WRITE]
Writes the modified content into memory.
→
(p. 79, p. 82, p. 88, p. 116, p. 148, p. 254, p. 274, p. 286)
VALUE Dial
Modifies a value. By holding down [SHIFT] and turning the VALUE
dial, you can modify the value in larger steps.
[CURSOR] Buttons
These move the cursor up/down/left/right.
[EXIT]
This returns you to the previous screen or closes an opened window.
In some screens, it cancels the currently executing function.
[ENTER]
Use this to finalize a value or to execute an operation.
[DEC], [INC]
These modify a value. The value will change more rapidly if you
hold down one button and press the other. If you hold down
[SHIFT] while pressing these buttons, the value will change more
rapidly.
[SHIFT]
This button is used in conjunction with other buttons to execute
various functions.
EXPANSION
[EXP 1], [EXP 2]
These access the screens for expansion boards installed in the
Fantom-G.
* For details on operation, refer to the owner’s manual of the
expansion board you’ve installed.
SAMPLING
[SKIPBACK]
This retroactively samples your performance for a specified period
of time prior to when you pressed the button.
→
(p. 262)
[SAMPLING]
This accesses the Sampling menu screen.
→
(p. 260)
DYNAMIC PAD
[PAD SETTING]
This accesses the setting and information screen for the currently
selected Pad mode.
→
(p. 190)
[NUMERIC]
Lets you use the pads as numeric keys.
→
(p. 41)
[PAD MODE]
Switches the pad mode.
→
(p. 188)
[ROLL]
Turns the Roll function on/off.
→
(p. 189)
* Depending on the Pad mode, this will switch banks.
[HOLD]
Turns the Hold function (which causes the pad to continue sounding
even after it’s released) on/off.
→
(p. 188)
[PAD 1–16]
You can use these to play sounds just like the keyboard. They will also
perform various functions depending on the Pad mode.
→
(p. 188)
[S1] [S2] (Assignable Switches)
You can assign various parameters or functions to these buttons.
They will turn on/off the assigned parameter or function in real time
to modify the sound.
→
(p. 77)
* By holding down [SHIFT] and pressing one of the above buttons,
you can access the corresponding setting screen.
→
(p. 77)
Pitch Bend/Modulation Lever
You can use this to modify the pitch or apply vibrato.
8
9
10
11
12
13
14
15
16
17
Fantom-G_r_e.book 23 ページ 2008年1月31日 木曜日 午後12時15分