
User Manual
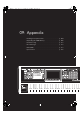

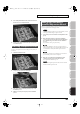
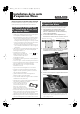

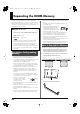
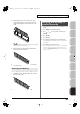
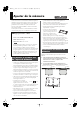
Table Of Contents
- USING THE UNIT SAFELY
- IMPORTANT NOTES
- Contents
- 01: Introduction (Overview and Basic Operation)
- 02: Sound Generator, Section 1 (Playing Sounds)
- Playing in Single Mode
- About the Single Play Screen
- Selecting a Patch
- Selecting the Tones That Will Sound (Tone On/Off)
- Playing Single Notes (Monophonic)
- Part Settings (Part View)
- Selecting the Parameter Controlled by the Realtime Controllers or D Beam Controller (Control Sett...
- Playing Percussion Instruments (Rhythm Set)
- Playing a Sample Set
- Creating a List of Frequently Used Sounds (Favorite)
- Registering a Sound (Regist)
- Recalling a Sound
- Specifying the Volume for Each Step (Favorite Level)
- Changing the Step in Which You Registered a Sound
- Removing a Sound You Registered (Remove)
- Removing All Sound Registrations from a Bank (Remove Bank)
- Registering a Song (Set Song)
- Importing a Text File (Import Text)
- Removing a Text File (Remove Text)
- Switching the Display Font (Font)
- Playing in Live Mode
- Displaying Live Play (Layer/ Split) Screen
- Functions in the Live Play (Layer/Split) Screen
- Selecting a Live Set
- Using the Live Play (Layer/ Split) Screen
- Using the Live Set Part Mixer Screen
- Using the Layer Edit Screen
- Performing with the Arpeggio
- Performing with the Realtime Controllers and D Beam Controller
- Setting Effects
- Adjusting the Master Level
- Making Detailed Settings for a Live Set
- Playing in Studio Mode
- Playing in Single Mode
- 03: Sound Generator, Section 2 (Controlling Sounds)
- 04: Sound Generator, Section 3 (Creating Sounds)
- Creating a Patch
- How to Make Patch Settings
- Saving Patches You’ve Created (Write)
- Functions of Patch Parameters
- Settings Common to the Entire Patch (General)
- Modifying Waveforms (Wave)
- Changing How a Tone Is Sounded (TMT)
- Modifying Pitch (Pitch/Pitch Env)
- Modifying the Brightness of a Sound with a Filter (TVF/TVF Env)
- Adjusting the Volume (TVA/TVA Env)
- Output
- Modulating Sounds (LFO1/2/Step LFO)
- Apply Portamento or Legato to the Sound (Solo/Porta)
- Miscellaneous Settings (Misc)
- Matrix Control Settings (Control 1–4)
- Setting Effects for a Patch (PFX)
- Creating a Rhythm Set
- How to Make Rhythm Set Settings
- Saving Rhythm Sets You’ve Created (Write)
- Functions of Rhythm Set Parameters
- Making Settings Common to the Entire Rhythm Set (General)
- Modifying Waveforms (Wave)
- Changing How a Rhythm Tone Is Sounded (WMT)
- Modifying Pitch (Pitch/Pitch Env)
- Modifying the Brightness of a Sound with a Filter (TVF/TVF Env)
- Adjusting the Volume (TVA/TVA Env)
- Output Settings (Output)
- Setting Effects for a Rhythm Set (PFX)
- Creating a Sample Set
- Creating a Live/Studio Set
- Adding Effects
- Where Effect Settings are Saved
- Turning Effects On and Off
- Making Effect Settings
- Applying Effects in Single Mode
- Applying Effects in Live Mode
- Applying Effects in Studio Mode
- Making Patch Multi-Effects Settings (PFX)
- Making Multi-Effects Settings (MFX1–2)
- Making Chorus Settings (Chorus)
- Making Reverb Settings (Reverb)
- Mastering Effect
- Effects List
- Creating a Patch
- 05: Pads (Using the Pads)
- Using the Pads
- Common Operations for Pads
- 1 SAMPLE PAD (Using the Pads to Play Samples)
- 2 RHYTHM (Using the Pads to Play a Rhythm Set)
- 3 CHORD MEMORY (Using the Pads to Switch Chord Forms)
- 4 ARPEGGIO (Using the Pads to Switch Arpeggio Styles)
- 5 RPS (Using the Pads to Play Phrases)
- 6 RHYTHM PTN (Using the Pads to Play Rhythm Patterns)
- 7 TONE SEL/SW (Using the Pads to Select Tones or Switch Them On/Off)
- 8 TRACK MUTE (Using the Pads to Mute Tracks)
- 9 BOOKMARK (Using the Pads to Recall Frequently Used Screens)
- 10 MIDI TX SW (Using the Pads to Turn External MIDI Transmit Channels (1–16) On/Off)
- 11 EFFECT SW (Using the Pads to Switch the Effects)
- 12 PATCH MFX SW (Using the Pads to Switch Patch Multi-effects)
- 13 PART SELECT (Using the Pads to Select Parts)
- 14 PART MUTE (Using the Pads to Mute Parts)
- 15 USER GROUP (Using the Pads to Register/Recall User Groups)
- 16 FAVORITE (Using the Pads to Register/Recall Favorite Settings)
- Using the Pads
- 06: Sequencer (Creating a Song)
- Playing Back a Song
- Three Ways to Play Back
- Playing a Song (Song Play)
- Loading a Song (Song List)
- Playing a Song (Song Play)
- Operations in the Song Play Screen
- Fast-forwarding or Rewinding during Playback
- Muting the Playback of a Track (MUTE)
- Accessing the Mixer Screen
- Changing the Playback Tempo of the Song
- Playing a Song Repeatedly (Loop)
- Placing Markers in a Song (Marker)
- Changing the Track Display Zoom and Display Order (Zoom/Track Order)
- Naming a Track (Track Name)
- Specifying a Track’s Output Destination (Output Assign)
- Deleting a Song File (Song Delete)
- Song Automatically Loaded at Power-on (When Loading a Project)
- Erasing the Currently-open Song (Song Clear)
- Playing a Standard MIDI File (SMF)
- Playing Phrases (MIDI Phrase)
- Recording MIDI
- Recording Audio
- Editing Songs
- Three Ways to Edit
- Editing a Song (Song Edit)
- Song Utility (Song Util)
- Editing a Phrase (Phrase Edit)
- Phrase Modify Menu
- Aligning a Phrase’s Timing (Quantize)
- Erasing Unwanted Performance Data (Erase)
- Deleting Unwanted Measures (Delete)
- Copying Phrases (Copy)
- Inserting a Blank Measure (Insert)
- Transpose the Key (Transpose)
- Changing the Velocity (Change Velocity)
- Changing the MIDI Channel (Change Channel)
- Modifying the Length of Notes (Change Duration)
- Shifting Performance Data Forward and Back (Shift Clock)
- Thinning Out the Sequencer Data (Data Thin)
- Deleting Blank Measures (Truncate)
- Editing Individual Items of Sequencer Data (Microscope)
- Saving a Song (Song Save)
- Playing Back a Song
- 07: Sampler
- Sampling
- Editing a Sample
- Selecting a Sample (Sample List)
- Displaying Sample Edit Screen (Sample Edit)
- Setting the Start/End Points of the Sample
- Making Settings for Sample (Sample Parameters)
- Removing Unwanted Portions of a Sample (Truncate)
- Boosting or Limiting the High-frequency Range of the Sample (Emphasis)
- Maximizing the Volume of a Sample (Normalize)
- Amp
- Stretching or Shrinking a Sample (Time Stretch)
- Dividing a Sample into Notes (Chop)
- Saving a Sample (Save)
- Saving all samples (Save All)
- 08: Various Settings (Menu and System)
- Menu Reference
- System Settings (Settings Common to All Modes)
- About V-LINK
- 09: Appendix

310
Ajouter de la mémoire
Le Fantom-G est livré avec une mémoire de 32 Mo dans laquelle les
échantillons audio peuvent être chargés. Toutefois, dans certains cas,
une mémoire de 32 Mo sera insuffisante pour charger de grandes
quantités de données. Il faudra alors ajouter des modules de
mémoire vendus séparément (DIMM). La mémoire est extensible
jusqu’à 128/256/512 Mo.
Avant d’ajouter de la mémoire, consulter le détaillant, le centre de
service Roland le plus proche ou un distributeur autorisé Roland.
Spécifications des modules de mémoire
(DIMM) qui peuvent être utilisés
PC133, CL=2/3, 128 MB, 256 MB, 512 MB (3.3 V)
Nombre de broches:
168-pin
Hauteur de la carte:
40 mm ou moins
Il a été confirmé que le Fantom-G fonctionne avec la mémoire
standard possédant les spécifications ci-dessus. Nous ne
pouvons toutefois pas certifier que toutes les mémoires
possédant ces spécifications fonctionneront correctement. Il faut
se rappeler que même si les spécifications sont identiques, des
différences dans la conception du module de mémoire ou les
conditions d’utilisation peuvent faire en sorte qu’il n’est pas
possible d’utiliser le module de mémoire.
901 (F)
• Veuillez suivre attentivement les instructions suivantes quand
vous manipulez la carte afin d’éviter tout risque
d’endommagement des pièces internes par l’électricité statique.
1
• Toujours toucher un objet métallique relié à la terre (comme un
tuyau par exemple) avant de manipuler la carte pour vous
décharger de l’électricité statique que vous auriez pu accumuler.
2
• Lorsque vous manipulez la carte, la tenir par les côtés. Évitez de
toucher aux composants ou aux connecteurs.
5
• Conservez le sachet d’origine dans lequel était la carte lors de l’envoi
et remettez la carte dedans si vous devez la ranger ou la transporter.
• Utilisez un tournevis de type Phillips de la taille adaptée à celle
des vis (tournevis numéro 2). Un tournevis inadéquat peut
endommager la tête de la vis.
• Pour retirer une vis, tourner le
tournevis dans le sens contraire des
aiguilles d’une montre. Pour serrer les
vis, tourner le tournevis dans le sens des aiguilles d’une montre.
• Assurez-vous que les vis que vous retirez ne tombent pas à
l’intérieur du Fantom-G.
• Faites attention de ne pas vous couper sur le bord du couvercle
ou de l’ouverture lorsque vous retirez le couvercle.
911(F)
• Ne pas toucher aux circuits imprimés ou aux connecteurs.
912(F)
• Ne jamais forcer lors de l’installation de la carte de circuits
imprimés. Si la carte s’ajuste mal au premier essai, enlevez la
carte et recommencez l’installation.
913(F)
• Quand l’installation de la carte de circuits imprimés est
terminée, revérifiez si tout est bien installé.
914(F-Modified)
• Avant de procéder à l’installation d’un module DIMM, il faut toujours
mettre l’unité hors tension et débrancher le câble d’alimentation.
915(F-Modified)
• Installez uniquement le module DIMM spécifié. Retirez
uniquement les vis spécifiées.
928(F)
• Lorsque vous déposez le Fantom-G
face vers le bas, placez des piles de
journaux ou de magazines sous les
quatre coins (ou des deux côtés)
pour le soutenir. Ainsi, les boutons,
manettes et autres pièces ne seront pas endommagés.
• Il faut au moins deux personnes pour soulever et tourner le
Fantom-G8 sens dessus-dessous de manière sécuritaire. Il faut
s’assurer d’avoir une bonne prise et de tenir fermement
l’appareil pour éviter les blessures et les dommages à l’appareil.
929(F)
• En plaçant l’appareil sens dessus dessous, manipulez-le avec soin
pour éviter de l’échapper, de le laisser tomber ou de se renverser.
• Une fois l’installation du module terminée, remettez le
couvercle en place.
Installez le module de mémoire après avoir retiré le couvercle
inférieur.
1.
Avant d’installer la mémoire additionnelle, mettez hors
tension le Fantom-G et tous les périphériques connectés et
débranchez tous les câbles, y compris le câble
d’alimentation du Fantom-G.
2.
Sur les modèles Fantom-G, retirer uniquement les vis
illustrées dans le schéma ci-dessous et retirer le couvercle.
fig.30-002.f
Précautions à prendre lors
de l’ajout de mémoire
resserrerdesserrer
Installation du module de
mémoire
Vis à enlever Vis à enlever
Fantom-G6/G7 : Panneau inférieur Fantom-G8 : Panneau inférieur
Fantom-G_r_e.book 310 ページ 2008年1月31日 木曜日 午後12時15分