
User Manual


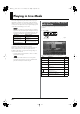
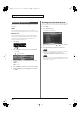
Table Of Contents
- USING THE UNIT SAFELY
- IMPORTANT NOTES
- Contents
- 01: Introduction (Overview and Basic Operation)
- 02: Sound Generator, Section 1 (Playing Sounds)
- Playing in Single Mode
- About the Single Play Screen
- Selecting a Patch
- Selecting the Tones That Will Sound (Tone On/Off)
- Playing Single Notes (Monophonic)
- Part Settings (Part View)
- Selecting the Parameter Controlled by the Realtime Controllers or D Beam Controller (Control Sett...
- Playing Percussion Instruments (Rhythm Set)
- Playing a Sample Set
- Creating a List of Frequently Used Sounds (Favorite)
- Registering a Sound (Regist)
- Recalling a Sound
- Specifying the Volume for Each Step (Favorite Level)
- Changing the Step in Which You Registered a Sound
- Removing a Sound You Registered (Remove)
- Removing All Sound Registrations from a Bank (Remove Bank)
- Registering a Song (Set Song)
- Importing a Text File (Import Text)
- Removing a Text File (Remove Text)
- Switching the Display Font (Font)
- Playing in Live Mode
- Displaying Live Play (Layer/ Split) Screen
- Functions in the Live Play (Layer/Split) Screen
- Selecting a Live Set
- Using the Live Play (Layer/ Split) Screen
- Using the Live Set Part Mixer Screen
- Using the Layer Edit Screen
- Performing with the Arpeggio
- Performing with the Realtime Controllers and D Beam Controller
- Setting Effects
- Adjusting the Master Level
- Making Detailed Settings for a Live Set
- Playing in Studio Mode
- Playing in Single Mode
- 03: Sound Generator, Section 2 (Controlling Sounds)
- 04: Sound Generator, Section 3 (Creating Sounds)
- Creating a Patch
- How to Make Patch Settings
- Saving Patches You’ve Created (Write)
- Functions of Patch Parameters
- Settings Common to the Entire Patch (General)
- Modifying Waveforms (Wave)
- Changing How a Tone Is Sounded (TMT)
- Modifying Pitch (Pitch/Pitch Env)
- Modifying the Brightness of a Sound with a Filter (TVF/TVF Env)
- Adjusting the Volume (TVA/TVA Env)
- Output
- Modulating Sounds (LFO1/2/Step LFO)
- Apply Portamento or Legato to the Sound (Solo/Porta)
- Miscellaneous Settings (Misc)
- Matrix Control Settings (Control 1–4)
- Setting Effects for a Patch (PFX)
- Creating a Rhythm Set
- How to Make Rhythm Set Settings
- Saving Rhythm Sets You’ve Created (Write)
- Functions of Rhythm Set Parameters
- Making Settings Common to the Entire Rhythm Set (General)
- Modifying Waveforms (Wave)
- Changing How a Rhythm Tone Is Sounded (WMT)
- Modifying Pitch (Pitch/Pitch Env)
- Modifying the Brightness of a Sound with a Filter (TVF/TVF Env)
- Adjusting the Volume (TVA/TVA Env)
- Output Settings (Output)
- Setting Effects for a Rhythm Set (PFX)
- Creating a Sample Set
- Creating a Live/Studio Set
- Adding Effects
- Where Effect Settings are Saved
- Turning Effects On and Off
- Making Effect Settings
- Applying Effects in Single Mode
- Applying Effects in Live Mode
- Applying Effects in Studio Mode
- Making Patch Multi-Effects Settings (PFX)
- Making Multi-Effects Settings (MFX1–2)
- Making Chorus Settings (Chorus)
- Making Reverb Settings (Reverb)
- Mastering Effect
- Effects List
- Creating a Patch
- 05: Pads (Using the Pads)
- Using the Pads
- Common Operations for Pads
- 1 SAMPLE PAD (Using the Pads to Play Samples)
- 2 RHYTHM (Using the Pads to Play a Rhythm Set)
- 3 CHORD MEMORY (Using the Pads to Switch Chord Forms)
- 4 ARPEGGIO (Using the Pads to Switch Arpeggio Styles)
- 5 RPS (Using the Pads to Play Phrases)
- 6 RHYTHM PTN (Using the Pads to Play Rhythm Patterns)
- 7 TONE SEL/SW (Using the Pads to Select Tones or Switch Them On/Off)
- 8 TRACK MUTE (Using the Pads to Mute Tracks)
- 9 BOOKMARK (Using the Pads to Recall Frequently Used Screens)
- 10 MIDI TX SW (Using the Pads to Turn External MIDI Transmit Channels (1–16) On/Off)
- 11 EFFECT SW (Using the Pads to Switch the Effects)
- 12 PATCH MFX SW (Using the Pads to Switch Patch Multi-effects)
- 13 PART SELECT (Using the Pads to Select Parts)
- 14 PART MUTE (Using the Pads to Mute Parts)
- 15 USER GROUP (Using the Pads to Register/Recall User Groups)
- 16 FAVORITE (Using the Pads to Register/Recall Favorite Settings)
- Using the Pads
- 06: Sequencer (Creating a Song)
- Playing Back a Song
- Three Ways to Play Back
- Playing a Song (Song Play)
- Loading a Song (Song List)
- Playing a Song (Song Play)
- Operations in the Song Play Screen
- Fast-forwarding or Rewinding during Playback
- Muting the Playback of a Track (MUTE)
- Accessing the Mixer Screen
- Changing the Playback Tempo of the Song
- Playing a Song Repeatedly (Loop)
- Placing Markers in a Song (Marker)
- Changing the Track Display Zoom and Display Order (Zoom/Track Order)
- Naming a Track (Track Name)
- Specifying a Track’s Output Destination (Output Assign)
- Deleting a Song File (Song Delete)
- Song Automatically Loaded at Power-on (When Loading a Project)
- Erasing the Currently-open Song (Song Clear)
- Playing a Standard MIDI File (SMF)
- Playing Phrases (MIDI Phrase)
- Recording MIDI
- Recording Audio
- Editing Songs
- Three Ways to Edit
- Editing a Song (Song Edit)
- Song Utility (Song Util)
- Editing a Phrase (Phrase Edit)
- Phrase Modify Menu
- Aligning a Phrase’s Timing (Quantize)
- Erasing Unwanted Performance Data (Erase)
- Deleting Unwanted Measures (Delete)
- Copying Phrases (Copy)
- Inserting a Blank Measure (Insert)
- Transpose the Key (Transpose)
- Changing the Velocity (Change Velocity)
- Changing the MIDI Channel (Change Channel)
- Modifying the Length of Notes (Change Duration)
- Shifting Performance Data Forward and Back (Shift Clock)
- Thinning Out the Sequencer Data (Data Thin)
- Deleting Blank Measures (Truncate)
- Editing Individual Items of Sequencer Data (Microscope)
- Saving a Song (Song Save)
- Playing Back a Song
- 07: Sampler
- Sampling
- Editing a Sample
- Selecting a Sample (Sample List)
- Displaying Sample Edit Screen (Sample Edit)
- Setting the Start/End Points of the Sample
- Making Settings for Sample (Sample Parameters)
- Removing Unwanted Portions of a Sample (Truncate)
- Boosting or Limiting the High-frequency Range of the Sample (Emphasis)
- Maximizing the Volume of a Sample (Normalize)
- Amp
- Stretching or Shrinking a Sample (Time Stretch)
- Dividing a Sample into Notes (Chop)
- Saving a Sample (Save)
- Saving all samples (Save All)
- 08: Various Settings (Menu and System)
- Menu Reference
- System Settings (Settings Common to All Modes)
- About V-LINK
- 09: Appendix

53
Playing in Single Mode
Overview Sound 1 Sound 2 Sound 3 Pad Sampler
Menu/System
AppendixSequencer
In Single mode you can select a sample set and play the samples
from the keyboard.
You can also use the pads to play a sample set.
→
p. 191
1.
Press [SINGLE] to access the Single Play screen.
fig.05-023.e
* Make sure that the Patch Type is set to “Sample.” If this is set to
“Patch” or “Rhythm,” use [CURSOR] to move the cursor to the patch
type, and turn the VALUE dial or press [INC] [DEC] to select
“Sample.”
2.
Press [CURSOR] to move the cursor to the sample set
number.
3.
Turn the VALUE dial or press [INC] [DEC] to select the
sample set number.
4.
Play the keyboard to hear the sound.
* For a sample set, the sixteen sample tones are mapped to keys B3–D5.
Playing a Sample Set
Selecting a Sample Set
Sample set number
Pad Mode (Sample Pad)
Sample set number
Patch Type
Fantom-G_r_e.book 53 ページ 2008年1月31日 木曜日 午後12時15分