
User Manual
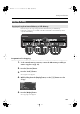
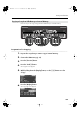
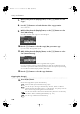


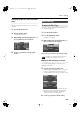
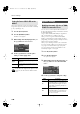
Table Of Contents
- Introduction
- Contents
- Main Features
- USING THE UNIT SAFELY
- Important Notes
- Names of Things and What They Do
- Before You Play
- Listening to Songs
- Performing
- Performing with a Variety of Sounds
- Simulating the Way that Sounds are Created on an Organ (Tone Wheel)
- Performing with Two Layered Tones (Dual Play)
- Performing with Different Tones in the Left and Right Sides of the Keyboard (Split Play)
- Changing the Volume Balance for Dual Play and Split Play
- Adjusting the Keyboard Sensitivity (Key Touch)
- Adding Reverberation to Sounds (Reverb Effect)
- Adding a Variety Effects to the Sound (Effects)
- Adding a Spinning Sound to Organ Tones (Rotary Effect)
- Transposing the Key of the Keyboard or Song Playback (Transpose)
- Performing with the Metronome
- Adding Liveliness to the Sound (Sound Control)
- Changing the Tonal Quality (Equalizer)
- Performing with Audio Files (Audio Key)
- Creating a Piano Sound to Your Taste (Piano Designer)
- Playing Along with Rhythms
- What is Session Partner?
- Performing Along with Session Partner
- Selecting a Rhythm
- Changing a Rhythm’s Tempo
- Selecting a Rhythm’s Chord Progression
- Performing with the Chord Progression Specified in the Left Hand (Chord Progression Off)
- Changing the Rhythm Pattern (Original/Variation)
- Recording the Chord Progression
- Saving Your Favorite Performance Settings
- Recording
- Saving a Performance
- Various Settings
- Connecting Other Equipment
- Appendices

112
Saving a Performance
6.
While holding down the [Display] button, use the [-] [+] buttons to select
“Type.”
7.
Use the [-] [+] buttons to select the direction of the copy operation.
Choose “Int -> Ext.”
8.
While holding down the [Display] button, use the [-] [+] buttons to select
“Int” (internal memory).
The number and name of the song to be saved will appear.
9.
Use the [-] [+] buttons to select the song(s) that you want to copy.
If you select “All,” all songs will be copied.
10.
While holding down the [Display] button, use the [-] [+] buttons to select
“Ext” (USB memory).
The screen will show the save-destination song number and song name.
If you select a number in which a song has already been saved, the song that was previously
saved at the copy destination will be erased. If you don’t want to erase a previously saved song,
select a number for which the display indicates “(Not Used).”
11.
Use the [-] [+] buttons to select the copy destination.
Copying the Song(s)
12.
Press the [Rec] button.
The selected song(s) will be copied to USB memory.
FP-7-e.book 112 ページ 2007年7月12日 木曜日 午後3時47分