
User Manual


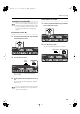

Table Of Contents
- Introduction
- Contents
- Main Features
- USING THE UNIT SAFELY
- Important Notes
- Names of Things and What They Do
- Before You Play
- Listening to Songs
- Performing
- Performing with a Variety of Sounds
- Simulating the Way that Sounds are Created on an Organ (Tone Wheel)
- Performing with Two Layered Tones (Dual Play)
- Performing with Different Tones in the Left and Right Sides of the Keyboard (Split Play)
- Changing the Volume Balance for Dual Play and Split Play
- Adjusting the Keyboard Sensitivity (Key Touch)
- Adding Reverberation to Sounds (Reverb Effect)
- Adding a Variety Effects to the Sound (Effects)
- Adding a Spinning Sound to Organ Tones (Rotary Effect)
- Transposing the Key of the Keyboard or Song Playback (Transpose)
- Performing with the Metronome
- Adding Liveliness to the Sound (Sound Control)
- Changing the Tonal Quality (Equalizer)
- Performing with Audio Files (Audio Key)
- Creating a Piano Sound to Your Taste (Piano Designer)
- Playing Along with Rhythms
- What is Session Partner?
- Performing Along with Session Partner
- Selecting a Rhythm
- Changing a Rhythm’s Tempo
- Selecting a Rhythm’s Chord Progression
- Performing with the Chord Progression Specified in the Left Hand (Chord Progression Off)
- Changing the Rhythm Pattern (Original/Variation)
- Recording the Chord Progression
- Saving Your Favorite Performance Settings
- Recording
- Saving a Performance
- Various Settings
- Connecting Other Equipment
- Appendices

18
Before You Play
1.
Make sure that the [Power] switch located at
the right side of the keyboard is off (in the
upward position).
fig.PowerOn.eps
2.
Turn the [Volume] knob all the way toward the
left to minimize the volume.
3.
Connect the supplied Power Cord to the
supplied AC adaptor.
Place the AC adaptor so the side with the indicator
(see illustration) faces upwards and the side with
textual information faces downwards.
The indicator will light when you plug the AC
adaptor into an AC outlet.
4.
Connect the AC adaptor to the FP-7’s DC In
jack, and plug the power cord into an
electrical outlet.
5.
Loop the AC adaptor cord around the cord
hook to fasten it in place.
To prevent the inadvertent disruption of power to your
unit (should the plug be pulled out accidentally), and to
avoid applying undue stress to the AC adaptor jack,
anchor the power cord using the cord hook, as shown in
the illustration.
Even if the cord is fastened, strong tension applied to the
cord may cause it to be damaged or broken. Be careful
not to pull the cord accidentally, or to apply strong
pressure to it.
Depending on the circumstances of a particular setup,
you may experience a discomforting sensation, or
perceive that the surface feels gritty to the touch when
you touch this device. This is due to an infinitesimal
electrical charge, which is absolutely harmless.
However, if you are concerned about this, connect the
ground terminal (see figure) with an external ground.
When the unit is grounded, a slight hum may occur,
depending on the particulars of your installation. If you
are unsure of the connection method, contact the nearest
Roland Service Center, or an authorized Roland
distributor, as listed on the “Information” page.
Unsuitable places for connection
• Water pipes (may result in shock or electrocution)
• Gas pipes (may result in fire or explosion)
• Telephone-line ground or lightning rod (may be
dangerous in the event of lightning)
Getting Ready to Play
Connecting the AC Adaptor
Power
Off
Upper Position
Indicator
AC Outlet
AC adaptor Power Cord
NOTE
Cord Hook
(AC Adaptor)
Power Cord
Ground Terminal
FP-7-e.book 18 ページ 2007年7月12日 木曜日 午後3時47分