
User Manual

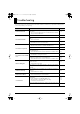
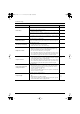


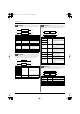
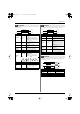
Table Of Contents
- USING THE UNIT SAFELY
- IMPORTANT NOTES
- Main Features
- Contents
- Panel Descriptions
- Introduction
- Keyboard Mode Functions
- Playing Sounds from the Keyboard (Keyboard Mode)
- Selecting a Tone ([TONE])
- Registering Frequently Used Tones or Performances in a Button (FAVORITE Buttons)
- Switching to an Arabian Scale or Other Temperament ([KEY SCALE])
- Changing the Key Touch ([KEY TOUCH])
- Shifting the Keyboard Pitch in Octave Steps (OCTAVE Buttons)
- Transposing Keyboard Sounds and Songs Played Back ([TRANSPOSE])
- Adding Harmony to the Upper Tone ([MELODY INTELLIGENCE])
- Using the Metronome
- Other Functions
- Backing Track Functions
- Selecting the Backing Types (Style/Song/USB Memory Player)
- Adjusting the Volume Balance between Backing and Keyboard (BALANCE buttons)
- Adjusting the Tempo ([TAP TEMPO])
- Style (Playing with an Accompaniment)
- Song
- USB Memory Player (SMF/Audio File Player)
- Performance Functions and Effects
- Using MIDI
- System Settings
- Using USB Memory
- About V-LINK
- Appendices
- Index

51
About V-LINK
Connecting the GW-8 to a V-LINK compatible image device
allows you to control the images with the GW-8.
To prevent malfunction and/or damage to speakers or other
devices, always turn down the volume, and turn off the power
on all devices before making any connections.
V-LINK
V-LINK ( ) is a function that allows music and
images to be performed together. By using MIDI to connect
two or more V-LINK compatible devices, you can easily enjoy
performing a wide range of visual effects that are linked to the
expressive elements of a music performance.
1.
Press [V-LINK] so the indicator is lit.
The V-LINK screen will appear, and the V-LINK setting will
be on.
Operations on the GW-8
By operating the GW-8’s keyboard and knobs, you can
control the image along with your performance on the
GW-8.
• [0] (Clip Reset): Turns the image off (solid black).
• [1] (All Reset): Resets the effect applied to the image, and
restores all settings such as brightness and hue to their
default values.
• [2] (Setup): Accesses the V-LINK SETUP screen.
• Black keys: Switch tabs.
• White keys: Switch clips.
• ANALOG MODIFY knobs: Transmit the following control
changes.
For details on the content that can be controlled by these
control changes, refer to the “D BEAM” settings in “V-LINK
SETUP Parameters,” below.
• D Beam controller: Controls the parameter specified in V-
LINK setup.
* When you turn V-LINK on, the settings in V-LINK setup will
take priority for D Beam operation.
2.
With the V-LINK screen shown, press [V-LINK] again.
The V-LINK button will go dark, and the V-LINK setting will
be off.
1.
Press [V-LINK] to access the V-LINK screen.
2.
Press [2] (Setup).
The V-LINK SETUP screen will appear.
3.
Use [ ] [ ] to move the cursor to the parameter you
want to edit.
4.
Use the VALUE dial to set the value.
5.
Press [EXIT] to return to the previous screen.
V-LINK SETUP Parameters
How to Use the V-LINK ([V-LINK])
[SELECT] indicator
Knob
Control Change No.
EFFECT
REVERB
CC91
CHORUS
CC93
FILTER
CUTOFF
CC74
RESONANCE
CC71
ENVELOPE
ATTACK
CC73
RELEASE
CC72
V-LINK Settings (V-LINK SETUP)
Parameter
Value Explanation
Note Tx
Channel A
1–16
Controls the V-
LINK device.
Specify the MIDI
channel. (*)
Note Tx
Channel B
Note Tx
Channel C
D BEAM
Assigns a V-LINK function to the
D Beam controller.
OFF
The operation
selected by D
BEAM buttons will
occur regardless
of whether V-LINK
is on or off.
ColorEQ
Fore
CC01
(Modulation)
Used with
motion
dive .tokyo
Performanc
e Package
ColorEQ
Back
CC71
(Resonance)
Scratch
SW
CC03
Speed
Knob
CC08 (Balance)
Total
Fader
CC10 (Panpot)
Cross
Fader
CC11 (Expression)
GW-8_e.book 51 ページ 2008年7月30日 水曜日 午後2時4分