
User Manual


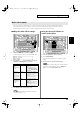
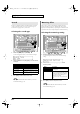

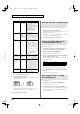
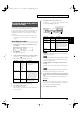

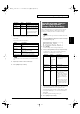
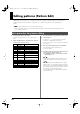
Table Of Contents
- Main features
- Contents
- USING THE UNIT SAFELY
- IMPORTANT NOTES
- Panel descriptions
- Getting ready
- An overview of the MC-808
- Basic operation of the MC-808
- Quick Start
- 1. Listening to patterns
- 2. Creating an original pattern
- 2-0 Preparing an empty pattern
- 2-1 Selecting a sound (patch)
- 2-2 Using the MC-808’s sounds to create a pattern
- 2-3 Making effect settings for each part
- 2-4 Adjusting the volume balance and pan of the parts
- 2-5 Adding a final polish to the pattern (Mastering)
- 2-6 Connecting patterns to create a song
- Other: Using audio phrases to create patterns
- Other: Creating original sounds
- 3. Playing patterns
- Pattern Mode
- Playing patterns
- Selecting and playing a pattern
- Muting a pattern
- Using the motorized faders to edit the pattern settings
- Transposing during playback (Realtime Transpose)
- Using the keyboard pads to play sounds
- Various ways to use the keyboard pads
- Mix In
- Moving your hand above the D Beam to change the tone (D Beam controller)
- Synchronizing the tempo of a sample with the pattern tempo (Auto Sync)
- Applying effects
- Creating an original pattern
- Editing patterns (Pattern Edit)
- Basic procedure for pattern editing
- Copying a portion of a pattern (COPY)
- Erasing unwanted performance data (ERASE)
- Deleting unwanted measures (DELETE)
- Inserting blank measures (INSERT)
- Transposing the pitch (TRANSPOSE)
- Modifying the velocity of notes (VELOCITY)
- Modifying the note length (DURATION)
- Making slight shifts in the timing (SHIFT CLOCK)
- Thinning out unneeded data (DATA THIN)
- Correcting the timing of a pattern (QUANTIZE)
- Converting the Note Timing of a Pattern (RECLOCK)
- Moving data of a specific note number to another part (EXTRACT RHY)
- Setting the part parameters (PART PARAM)
- Initializing a pattern (INITIALIZE)
- Editing a pattern in detail (Microscope)
- Microscope Utilities
- Basic procedure for pattern editing
- Saving a pattern
- Playing patterns
- Patch/Sample Mode
- Editing patches (Patch Edit)
- Editing rhythm sounds (Rhythm Edit)
- Editing samples (Sample Edit)
- Selecting a sample patch
- Setting the start/end points of the sample
- Removing unwanted portions of a sample (Truncate)
- Sample settings (SAMPLE PARAM)
- Loading a sample (LOAD)
- Unloading a sample (UNLOAD)
- Deleting a sample (DELETE)
- Deleting all samples (DELETE ALL)
- Importing WAV/AIFF data (IMPORT)
- Loading all samples (LOAD ALL)
- Erasing all samples (UNLOAD ALL)
- Saving all samples (SAVE ALL)
- Saving a sample
- Song Mode
- Sampling
- System Mode
- System mode
- How to make the system function settings
- Settings for the panel controllers and the screen (PANEL)
- Settings related to sequencer operation (SEQUENCER)
- Settings related to MIDI transmission (Tx MIDI)
- Settings related to MIDI reception (Rx MIDI)
- Settings related to tuning and how the sound is produced (SOUND)
- Settings related to sampling (SAMPLING)
- Settings related to the input source (INPUT SETTING)
- Settings related to USB mode (USB)
- Settings related to V-LINK (V-LINK)
- Viewing the system information (INFO)
- Settings related to the CompactFlash card (CARD)
- Performing a factory reset (UTILITY)
- Protecting individual patch banks (UTILITY)
- How to make the system function settings
- System mode
- V-LINK
- Connecting the MC-808 to a computer
- Appendices

68
Creating an original pattern
About the Timing Scale
Each time you press [SCALE MEASURE], the scale will change in
the following order, letting you select the type of note values to be
entered.
16th notes
fig.03-086.e_70
32nd notes
fig.03-087_70
8th note triplets
fig.03-088_70
16th note triplets
fig.03-089_70
This method lets you enter note messages one at a time.
* You can’t use this method to record data other than note messages,
such as control changes from the motorized faders.
1.
Select Step Recording (Step Rec) as described in
“Selecting a recording method” (p. 65).
fig.03-090
2.
Press [ENTER].
You’ll be in step recording standby mode.
3.
Set the recording parameters before you begin recording.
Use [CURSOR ] to select a parameter, and turn the
VALUE dial or use [INC] [DEC] to set the value.
4.
Select the part that you want to record (p. 65).
5.
Press [PLAY] to begin recording.
Now you can record.
6.
Specify the note message that you want to enter.
Use [CURSOR ] to move the cursor, and use the VALUE
dial or [INC] [DEC] to specify the value.
fig.03-091.e
one measure
Keyboard pads [1]–[16] will correspond to a recording input
region of one measure, and you will be able to input notes at
16th note intervals.
one beat one beat one beat one beat
Keyboard pads [1]–[16] will correspond to a recording input
region of two beats, and you will be able to input notes at
32nd note intervals.
one beat one beat
one beat one beat one beat one beat
one measure
Keyboard pads [1]–[12] will correspond to a recording input
region of one measure, and you will be able to input notes at
8th note triplet intervals.
one beat one beat
Keyboard pads [1]–[12] will correspond to a recording input
region of two beats, and you will be able to input notes at
16th note triplet intervals.
Consecutively recording notes
one at a time (Step Recording)
Recording procedure
Parameter
Range Description
Rec Beat
2/4–7/4,
5/8–7/8,
9/8, 12/8,
9/16, 11/16,
13/16,
15/16,
17/16,
19/16
Pattern time signature
* Can be specified only for an
empty pattern.
Rec Measure
Length
1–998 Pattern length
* An already-recorded pat-
tern can be made longer, but
not shorter. To shorten it,
use the pattern edit Delete
Measure (p. 72) to delete
one or more measures.
Rec Velocity
1–127 Volume (velocity) of the
notes that you input from
the keyboard pads.
Location of the note to enter
(measure - beat - tick)
Note Type
Velocity
Gate Time
MC-808_r_e.book 68 ページ 2006年2月10日 金曜日 午後7時25分