
User Manual
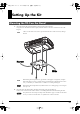
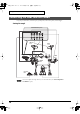
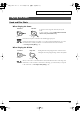
Table Of Contents
- USING THE UNIT SAFELY
- IMPORTANT NOTES
- Contents
- Features
- Panel Descriptions
- Setting Up the Kit
- Choosing a Drum Kit
- Playing the Drum Kit
- Creating Your Own Drum Kit
- Playing with the Metronome (Click)
- Playing with a CD, Tape, or MD (Via MIX IN Jack)
- COACH Mode
- Pad Adjustments
- Hi-Hat Control Pedal Adjustment
- Factory Reset (Restoring the Factory Settings)
- About the Pads
- Pad Configuration Possibilities
- Pad and Trigger Settings
- Selecting the Pad Type (Trigger Type)
- Adjusting Pad Sensitivity
- Setting the Minimum Levels for the Pads (Threshold)
- How Playing Dynamics Changes the Volume (Velocity Curve)
- Adjusting the Trigger Signal Detection Time (Scan Time)
- Detecting Trigger Signal Attenuation and Cancelling Incorrect Triggering (Retrigger Cancel)
- Eliminate Crosstalk Between Pads (Crosstalk Cancel)
- Double Triggering Prevention (Mask Time)
- Rim Shots Response (Rim Sensitivity)
- Rim/Edge Dynamic Response (Rim Gain)
- MIDI Settings
- Troubleshooting / Error Messages
- Drum Kit List
- Drum Instrument List
- MIDI Implementation Chart
- Specifications
- Index

12
Setting Up the Kit
Using the provided cables, connect the pads, cymbal pads, hi-hat control pedal, and kick trigger.
Setting Example
fig.P-004.e
For more examples showing other ways to connect the TD-3, see
“Pad Configuration
Possibilities”
(p. 48).
Connecting the Pads and the Pedals
TRIGGER INPUT jacks
RIDE
CY-8
CY-8
CRASH 1
TOM 3
PD-8
PD-8
TOM 1
PD-8
HI-HAT
PD-8
SNARE
KICK
KD-8
FD-8
HH CTRL
TD-3
TD-3_e.book 12 ページ 2005年5月20日 金曜日 午後4時57分