
User Manual


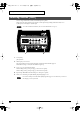
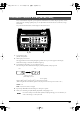
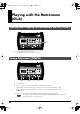
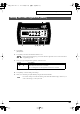
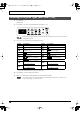
Table Of Contents
- USING THE UNIT SAFELY
- IMPORTANT NOTES
- Contents
- Features
- Panel Descriptions
- Setting Up the Kit
- Choosing a Drum Kit
- Playing the Drum Kit
- Creating Your Own Drum Kit
- Playing with the Metronome (Click)
- Playing with a CD, Tape, or MD (Via MIX IN Jack)
- COACH Mode
- Pad Adjustments
- Hi-Hat Control Pedal Adjustment
- Factory Reset (Restoring the Factory Settings)
- About the Pads
- Pad Configuration Possibilities
- Pad and Trigger Settings
- Selecting the Pad Type (Trigger Type)
- Adjusting Pad Sensitivity
- Setting the Minimum Levels for the Pads (Threshold)
- How Playing Dynamics Changes the Volume (Velocity Curve)
- Adjusting the Trigger Signal Detection Time (Scan Time)
- Detecting Trigger Signal Attenuation and Cancelling Incorrect Triggering (Retrigger Cancel)
- Eliminate Crosstalk Between Pads (Crosstalk Cancel)
- Double Triggering Prevention (Mask Time)
- Rim Shots Response (Rim Sensitivity)
- Rim/Edge Dynamic Response (Rim Gain)
- MIDI Settings
- Troubleshooting / Error Messages
- Drum Kit List
- Drum Instrument List
- MIDI Implementation Chart
- Specifications
- Index

25
Creating Your Own Drum Kit
Every sound in the kit assigned to a pad or pedal has individual level (volume) and pan (position) controls.
When using rim- and edge-capable pads, you can adjust the level for the head (or bow) and rim (or edge)
individually.
Pan position for the head (bow) and rim (edge) are the same however.
fig.01-005a
1.
Press [LEVEL/PAN].
[LEVEL/PAN] flashes.
2.
Hit the pad you wish to set.
The trigger indicator for the struck pad lights up, and the level or pan value appears in the display.
When the rim (edge) is struck, the rim indicator lights up.
3.
Press [LEVEL/PAN] and [+] or [-] to set the level or pan.
The level and pan values alternate in the display each time [LEVEL/PAN] is pressed.
fig.01-005.e
When holding down [+] and pressing [-] values increase rapidly.
When holding down [-] and pressing [+] values decrease rapidly.
(When using the above mentioned, “quick” mode, the pan value will stop once it reaches “Ctr.”)
LEVEL:
0–15
PAN:
L15 (left)–Ctr (center)–r15 (right)
4.
Repeat Steps
2
and
3
to make the settings for other pads or pedals.
5.
When you’re finished, press [DRUM KIT]; the [LEVEL/PAN] light goes off.
Do not turn off the power without the [LEVEL/PAN] light having gone out. Otherwise you
will lose the changes you have just made.
Instrument Volume & Pan [LEVEL/PAN]
31, 3
Level
Pan
Switches each time
[LEVEL/PAN] is pressed
TD-3_e.book 25 ページ 2005年5月20日 金曜日 午後4時57分