C5100064 08-01-1YG
For EU Countries For the U.K. IMPORTANT: THE WIRES IN THIS MAINS LEAD ARE COLOURED IN ACCORDANCE WITH THE FOLLOWING CODE. BLUE: NEUTRAL BROWN: LIVE As the colours of the wires in the mains lead of this apparatus may not correspond with the coloured markings identifying the terminals in your plug, proceed as follows: The wire which is coloured BLUE must be connected to the terminal which is marked with the letter N or coloured BLACK.
TD-9_e.book 3 ページ 2008年1月23日 水曜日 午後4時24分 Thank you, and congratulations on your choice of the Roland Percussion Sound Module TD-9. Before using this unit, carefully read the sections entitled: “USING THE UNIT SAFELY” and “IMPORTANT NOTES” (Owner’s manual p. 4–5; p. 6–7). These sections provide important information concerning the proper operation of the unit.
TD-9_e.book 4 ページ 2008年1月23日 水曜日 午後4時24分 USING THE UNIT SAFELY The symbol alerts the user to important instructions or warnings.The specific meaning of the symbol is determined by the design contained within the triangle. In the case of the symbol at left, it is used for general cautions, warnings, or alerts to danger. Used for instructions intended to alert the user to the risk of death or severe injury should the unit be used improperly.
TD-9_e.
TD-9_e.book 6 ページ 2008年1月23日 水曜日 午後4時24分 IMPORTANT NOTES Power Supply Maintenance 301 401a • Do not connect this unit to same electrical outlet that is being used by an electrical appliance that is controlled by an inverter (such as a refrigerator, washing machine, microwave oven, or air conditioner), or that contains a motor. Depending on the way in which the electrical appliance is used, power supply noise may cause this unit to malfunction or may produce audible noise.
TD-9_e.book 7 ページ 2008年1月23日 水曜日 午後4時24分 IMPORTANT NOTES 558c • Since sound vibrations can be transmitted through floors and walls to a greater degree than expected, take care not to allow such sound to become a nuisance to neighbors, especially at night and when using headphones. Although the drum pads and pedals are designed so there is a minimal amount of extraneous sound produced when they’re struck, rubber heads tend to produce louder sounds compared to mesh heads.
TD-9_e.book 8 ページ 2008年1月23日 水曜日 午後4時24分 Contents USING THE UNIT SAFELY..................................................................................... 4 IMPORTANT NOTES ............................................................................................ 6 1. Introduction 11 TD-9 Components ............................................................................................. 12 Top and rear panels ....................................................................................
TD-9_e.book 9 ページ 2008年1月23日 水曜日 午後4時24分 Contents Editing instrument parameters ...................................................................................... 25 Using the Mixer (MIXER).............................................................................................. 27 Using the onboard effects (AMB/EQ)............................................................................ 28 Adjusting the ambience for each pad (SEND) ............................................................
TD-9_e.book 10 ページ 2008年1月23日 水曜日 午後4時24分 Contents 5. Advanced applications 45 Optimizing the pad settings (Trigger parameters) ............................................... 46 Specifying the type of pad [F1] (TYPE) .......................................................................... 46 Dual trigger support for each pad ..................................................................................... 46 Setting the Pad Sensitivity [F2] (BASIC) .............................................
TD-9_e.book 11 ページ 2008年1月23日 水曜日 午後4時24分 1.
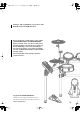
TD-9_e.book 12 ページ 2008年1月23日 水曜日 午後4時24分 TD-9 Components Top and rear panels 19 21 1 3 2 4 5 9 10 6 7 8 11 12 13 14 15 16 17 18 24 23 22 20 1. POWER button 7. Turns the power on/off. 2. Display This shows the drum kit name in “normal” playing mode, or if you select Edit, Song etc, various graphic/text displays will appear. 3. VOLUME knob Adjusts the volume from the OUTPUT and PHONES jacks. 4. QUICK REC button Use this to record your playing. 5.
TD-9_e.book 13 ページ 2008年1月23日 水曜日 午後4時24分 TD-9 Components 17. SCOPE button 11. + button, - button Use these buttons to switch drum kits or to edit a value. Pressing the “+” button increases the value, and pressing the “-” button decreases it. This activates the Scope function, allowing you to view your timing on the screen. 18. KIT button 12. VALUE dial This dial has the same function as the “+” and “-” buttons. Use the dial when you want to quickly change the drum kit or value in large steps. 13.
TD-9_e.book 14 ページ 2008年1月23日 水曜日 午後4時24分 Basic concepts and operations of the TD-9 This section explains operations that are common to all of the TD-9’s functionality. Function buttons ([F1]–[F3]) Saving your settings The TD-9 has no “Save” function to save your settings. Any changes you make will be saved when you turn off the power. * Be sure to turn off the power by pressing the POWER button (p. 18).
TD-9_e.book 15 ページ 2008年1月23日 水曜日 午後4時24分 Basic concepts and operations of the TD-9 Preview function By holding down [SHIFT] and pressing [KIT], you can audition a sound. To set the preview velocity, use [SETUP]-[F3] (UTIL)-[F1] (UTIL) (p. 55). Setting the Tempo (for the metronome or song) To adjust the tempo, hold down [SHIFT] and press [CLICK (TEMPO)] the tempo screen appears. Use the [+/-] buttons or [VALUE] to set the tempo. Song playback When you press [SONG], the “Song” screen appears.
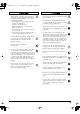
TD-9_e.book 16 ページ 2008年1月23日 水曜日 午後4時24分 Getting ready to play Mounting the TD-9 on the Stand 1. Attach the included sound module mounting plate to the TD-9. Use the included wing bolts to attach the plate as shown in the illustration. Labels indicating the pad to be connected are attached to the cable. Connect the pads and pedals as shown in the illustration. * Use only the included wing boits. Using any other nuts may cause malfunction.
TD-9_e.book 17 ページ 2008年1月23日 水曜日 午後4時24分 Getting ready to play Connecting your audio equipment Portable Audio Player Stereo mini plug 1/4” Phone plug (mono) AC Adaptor Stereo 1/4” Phone plug Powered Amp, etc. Power Cord Stereo Headphones 1. Power-off all equipment before making connections. To prevent malfunction and/or damage to speakers or other devices, always turn down the volume, and turn off the power on all devices before making connections. 2. 3.
TD-9_e.book 18 ページ 2008年1月23日 水曜日 午後4時24分 Getting ready to play Turning the power on/off * Once connections have been made (p. 17), turn on the power to the connected equipment in the order specified. Doing it in the wrong order raises the risk of damage/malfunction to that equipment. 1. Turn [VOLUME] all the way to the left. If you don’t hear any sound Check the following points. 2.
TD-9_e.book 19 ページ 2008年1月23日 水曜日 午後4時24分 Getting ready to play Tensioning the pads Tensioning the head of a mesh pad BEFORE using the PD-105/85 mesh pads you must adjust the tension. Tensioning the PD-85 head 1. Use a drum key to make adjustments. You can tension mesh heads the same way you do with acoustic drums. Use the included drum key to tighten the tuning bolts. Adjust the bolts so that the gap between the frame and hoop is consistent all the way around the hoop.
TD-9_e.
TD-9_e.book 21 ページ 2008年1月23日 水曜日 午後4時24分 2.
TD-9_e.book 22 ページ 2008年1月23日 水曜日 午後4時24分 Selecting a drum kit A drum kit is a combination of the sounds & settings for each pad and pedal, as well as ambience. About the “DRUM KIT” screen This is the TD-9’s basic screen; it appears when you press [KIT].
TD-9_e.book 23 ページ 2008年1月23日 水曜日 午後4時24分 Performance techniques Pads (e.g., PD-105/PD-85) Cymbals (e.g., CY-8, CY-12R/C) Head Shot Bow Shot Hit only the head of the pad. The most common method, playing the middle area of the cymbal. It corresponds to the sound assigned to the “head” the relative trigger input. Head Rim Shot Strike the head and the rim of the pad simultaneously.
TD-9_e.book 24 ページ 2008年1月23日 水曜日 午後4時24分 Performance techniques Hi-Hat (CY-5, VH-11) Choking a cymbal Choking (pinching) the cymbal’s edge with the hand immediately after hitting the cymbal will mute or choke the sound, just like with a real cymbal. The Choke function only works when you grasp in the area (where the edge sensor is) as shown in the figure. If you do otherwise, it will not work.
TD-9_e.book 25 ページ 2008年1月23日 水曜日 午後4時24分 Creating a drum kit All sounds assigned to a drum kit can be edited for your specific purposes. Selecting an instrument On the TD-9, all sounds are referred to as “instruments” (INST). 1. 2. Press [KIT]-[F1] (INST). Hit the desired pad or use CURSOR [ select a pad. ][ ] to The edit screen for the selected pad appears. The “INST” screen appears. 3. Use CURSOR [ ] [ “Group” or “Inst.” ] to move the cursor to 4.
TD-9_e.
TD-9_e.book 27 ページ 2008年1月23日 水曜日 午後4時24分 Creating a drum kit Using the Mixer (MIXER) Adjusting the volume and pan (stereo position) of individual pads/pedals. 1. Press [KIT]-[F1] (INST). The “INST” screen appears. 2. If you pressed [F1] or [F2] 4-1. Hit the desired pad or use CURSOR [ select a pad. 4-2. Use CURSOR [ Press [F2] (MIXER). ][ ] to ][ ] to select HEAD or RIM. ][ ] to select a parameter. If you pressed [F3] Use CURSOR [ 5. Use [+/-] or [VALUE] to edit the value. 6.
TD-9_e.book 28 ページ 2008年1月23日 水曜日 午後4時24分 Creating a drum kit Using the onboard effects (AMB/EQ) “Ambience” allows you to choose the environment where the drums are being played. You can adjust room size, wall material and the position of the ambience mics. The “Equalizer” is used to adjust the overall tone. 1. Press [KIT]-[F1] (INST). 3. The “INST” screen appears. 2. [F1] (AMB): Ambience [F3] (EQ): Equalizer Press [F3] (AMB/EQ).
TD-9_e.book 29 ページ 2008年1月23日 水曜日 午後4時24分 Creating a drum kit Naming a drum kit You can create a name of up to twelve characters for each kit. A sub-title of up to sixteen characters can also be added below the name. This is useful for song indications, dates, styles etc. 1. Press [KIT]-[F2] (FUNC). The “FUNCTION” screen appears. Copying a drum kit or instrument You can copy a complete drum kit or an individual instrument.
TD-9_e.book 30 ページ 2008年1月23日 水曜日 午後4時24分 Creating a drum kit Copying a drum kit 1. Press [KIT]-[F2] (FUNC). 5. The “FUNCTION” screen appears. Press [F2] or [F3]. [F2] (EXCHNG): All contents of the copy-source and copy-destination will be exchanged. (This is shown only if the copy-source is “USER.”) [F3] (COPY): Contents of the copy-source will be overwritten onto the copy-destination. 2. A confirmation screen will appear. Press [F2] (COPY). The “COPY” screen appears.
TD-9_e.book 31 ページ 2008年1月23日 水曜日 午後4時24分 Creating a drum kit Copying an instrument 1. Press [KIT]-[F2] (FUNC). The “FUNCTION” screen appears. • Both the HEAD and RIM instruments will be copied. • If you want to restore the factory settings, choose “PRESET” as the copy-source. • If the cursor is located at E or F, you can choose the copysource or copy-destination pad by striking a pad directly. 5. 2. Press [F2] or [F3].
TD-9_e.book 32 ページ 2008年1月23日 水曜日 午後4時24分 Creating a drum kit MIDI parameters for each pad & pedal 1. 3. Press [KIT]-[F2] (FUNC). The “FUNCTION” screen appears. Press [F1] or [F2] to select the parameter you want to edit. If you pressed [F1] 4-1. Use [CURSOR] to select the pad/parameter. 4-2. While holding down [SHIFT], use CURSOR [ ] [ to switch between HEAD and RIM, or play the desired rim/pad or pedal 2. ] Press [F3] (MIDI). If you pressed [F2] Screen Parameter 4.
TD-9_e.book 33 ページ 2008年1月23日 水曜日 午後4時24分 3.
TD-9_e.book 34 ページ 2008年1月23日 水曜日 午後4時24分 Playing with the internal songs or from a USB memory key The TD-9 contains fifty songs of various styles. Enjoy playing the TD-9 along with them. You can also play the TD-9 while listening to songs (audio files) saved to an optional USB memory key. Song Function profile The internal songs consist of “drum,” “percussion,” and “bass and others” parts. Each part can be muted individually. The tempo for these songs can also be adjusted.
TD-9_e.book 35 ページ 2008年1月23日 水曜日 午後4時24分 Playing with the internal songs or from a USB memory key Song selection 1. Playing a song Press [SONG]. The button will light, and the “SONG” screen appears. 1. 2. Use [+/-] or [VALUE] to select a song. 2. Use [+/-] or [VALUE] to select the song you want to play. Press [ ]. [ No. Title Composer 5 New Disco 19 Break Beat 20 Jump’n Bass 35 Break BeatPtn 3. ] lights up and the song will begin playing.
TD-9_e.book 36 ページ 2008年1月23日 水曜日 午後4時24分 Playing with the internal songs or from a USB memory key 3. To stop playback, press [ ]. [ ] goes dark, and you will return to the beginning of the song. [CURSOR] functions Button [ ] Display Function Returns to the beginning to song. Pauses the song playback. Press again to resume playback from where you paused. [ ] [ ] Fast-forwards the song. [ ] Rewinds the song.
TD-9_e.book 37 ページ 2008年1月23日 水曜日 午後4時24分 Playing with the internal songs or from a USB memory key Viewing song information / Editing song settings 1. Press [SONG]-[F1] (INFO). Using the Repeat function (Repeat) This function allows you to select a specific section of a song, and have it repeat. The “INFORMATION” screen appears. A B Repeat 2. Use CURSOR [ ][ ] to select a parameter. 3. Use [+/-] or [VALUE] to edit the value. 4.
TD-9_e.book 38 ページ 2008年1月23日 水曜日 午後4時24分 Using the MIX IN By connecting a portable audio/CD player to the MIX IN jack you can play the TD-9 with your favorite songs. You can connect other audio devices as well. Connections * Lower the volume of the TD-9 and your audio player before making connections. * If a connection cable has built-in resistors, the volume level of the source connected to the TD-9 (MIX IN) may be too low. If this occurs, use connection cables that do not contain resistors.
TD-9_e.book 39 ページ 2008年1月23日 水曜日 午後4時24分 4.
TD-9_e.book 40 ページ 2008年1月23日 水曜日 午後4時24分 On Board Metronome Practicing with the TD-9’s built in metronome will help you perfect your tempo skills. Changing the metronomes sound (CLICK INST) Using the metronome 1. Press the [CLICK (TEMPO)] button. The [CLICK (TEMPO)] button lights up and the metronome starts. 2. Play along with it or press the button again to stop it. Metronome parameters You can change the tempo, sound, and time signature of the metronome. 1.
TD-9_e.book 41 ページ 2008年1月23日 水曜日 午後4時24分 Quick recording and playback (QUICK REC / QUICK PLAY) The TD-9 provides a Quick Rec function that lets you easily record your own performance, and a Quick Play function that immediately plays back what you recorded. This is a very useful practice tool, recording and then checking your drumming. Maximum number of recordable notes: approximately 32,000 notes Recording together with a song * First: Please select the drum kit that you want to use for recording.
TD-9_e.book 42 ページ 2008年1月23日 水曜日 午後4時24分 Quick recording and playback (QUICK REC / QUICK PLAY) Playback 1. Press [QUICK PLAY] and the button lights up. The “QUICK PLAY” screen appears, and playback begins. The following buttons correspond to various playback functions. Button 2. [ ] [ ] [ [ ] ] Function Returns to the beginning of what you have recorded. Pauses the playback of that recorded performance. Press this button again to resume playback from the paused location.
TD-9_e.book 43 ページ 2008年1月23日 水曜日 午後4時24分 Using the Scope function (SCOPE) The Scope function provides an on-screen view of the timing of your drumming. This will help you improve timing control in the tempo and time signature of your own choosing. 1. Press [SCOPE] and the button lights up. 2. The “SCOPE” screen appears. Play the pads while listening to the metronome. Your timing will be shown in the display. * Foot-close is not shown.
TD-9_e.
TD-9_e.book 45 ページ 2008年1月23日 水曜日 午後4時24分 5.
TD-9_e.book 46 ページ 2008年1月23日 水曜日 午後4時24分 Optimizing the pad settings (Trigger parameters) 1. Press [SETUP]. 2. Press [F1] (TRIG). [SETUP] will light and the “SETUP” screen will appear. 3. Press [F1]–[F3] to choose the item that you want to edit. 4. Use [CURSOR] to select a parameter. 5. Use [+/-] or [VALUE] to set the value of the parameter. 6. Press [EXIT] several times to return to the “DRUM KIT” screen or just press [KIT].
TD-9_e.book 47 ページ 2008年1月23日 水曜日 午後4時24分 Optimizing the pad settings (Trigger parameters) Setting the Pad Sensitivity [F2] (BASIC) When you specify the trigger type (p. 46), the following settings (basic trigger parameters) are automatically set to the values appropriate for each pad, meaning that you will normally not need to adjust them. If you wish to make detailed adjustments, you can edit the following parameters. Parameter Trig Type Value refer to p.
TD-9_e.book 48 ページ 2008年1月23日 水曜日 午後4時24分 Optimizing the pad settings (Trigger parameters) Detailed settings for trigger parameters [F3] (ADVNCD) The following parameters (Advanced Trigger Parameters) are automatically set to the most efficient values for each pad when you select the Trigger Type (p. 46). They don’t require adjustment, except if you experience any of the problems that are discussed in the explanation of each parameter. 1. Press [F1]–[F3] to choose the item that you want to edit. 2.
TD-9_e.book 49 ページ 2008年1月23日 水曜日 午後4時24分 Optimizing the pad settings (Trigger parameters) Parameter Value Mask Time 0–64 (ms) Description This setting prevents double triggering. When playing a kick trigger, the beater can bounce back Mask Time and hit the head a second time immediately after the intended note—with acoustic drums sometimes the beater stays against the head—this causes a single hit to “double trigger” (two sounds instead of one). The Mask Time setting helps to Time prevent this.
TD-9_e.book 50 ページ 2008年1月23日 水曜日 午後4時24分 Optimizing the pad settings (Trigger parameters) Connecting the VH-11 and making settings on the TD-9 Connections 7. Press [F3] (ADVNCD)-[F3] (HI-HAT). The following screen will appear. 8. TRIGGER OUT jack Motion sensor unit CONTROL OUT jack Connect the HHC cable Parameter Hi-Hat Type 9. Connect the HH cable Verify the TD-9’s setting.
TD-9_e.book 51 ページ 2008年1月23日 水曜日 午後4時24分 MIDI-related settings There are many possibilities when using MIDI, such as: 1. Press [SETUP]. [SETUP] will light, and the “SETUP” screen will appear. Use the pads to play external instruments You can layer sounds on the TD-9 as well as play sounds from MIDI sound modules and samplers. Use the TD-9 as a sound module If you’re using an external MIDI sequencer to perform with an ensemble, you can use the TD-9 as a dedicated drum sound module.
TD-9_e.book 52 ページ 2008年1月23日 水曜日 午後4時24分 MIDI-related settings Parameter Local Control value Description OFF, ON Turns the Local Control on/off. This is required when you want to trigger sounds in an external sound module and/or record your performance on an external MIDI sequencer, and NOT use the TD-9’s internal sounds. If that is your need, then turn Local Control to “OFF.
TD-9_e.book 53 ページ 2008年1月23日 水曜日 午後4時24分 MIDI-related settings MIDI settings for precise expressiveness in performances [F2] (CTRL) Parameter value Description PedalCC OFF, MODULATION(1), FOOT(4), GENERAL1(16) Specifies the MIDI control change message used to transmit/receive the depth to which the hi-hat pedal is pressed. This is a setting for the MIDI messages transmitted when you’re using an external MIDI sound module to sound the notes played by the TD-9 and pads.
TD-9_e.book 54 ページ 2008年1月23日 水曜日 午後4時24分 MIDI-related settings Editing a percussion set [F3] (PERC) A collection of different percussion instruments is called a percussion set. A different percussion instrument is assigned to each note number, and multiple instruments can be used together. The percussion part is to CH11 (fixed). Editing the Percussion Set Select an instrument for each note number. 1. Press [SETUP]-[F2] (MIDI). The “MIDI” screen will appear. 2. 3.
TD-9_e.book 55 ページ 2008年1月23日 水曜日 午後4時24分 Other settings (Utility) 1. Press [SETUP]-[F3] (UTIL). 2. Press [F1]–[F3] to choose the item you want to edit. The “UTILITY” menu screen appears. Overall settings for the TD-9 [F1] (UTILITY) “UTILITY” screen Adjusting the display contrast (LCD Contrast) The visibility of the display can be affected by the viewing angle or the brightness of the room. If you have difficulty reading the display, adjust the contrast as follows. 1.
TD-9_e.book 56 ページ 2008年1月23日 水曜日 午後4時24分 Other settings (Utility) Using USB memory [F2] (USB) “USB UTILITY” screen Saving data to a USB memory key (SAVE) * If you select a number where data has already been saved and then press [F3] (SAVE), a message will ask you to confirm it’s OK to overwrite the existing data. If you want to overwrite the existing data, press [F3] (OK). If you decide to cancel, press [F1] (CANCEL) and select a different save-destination number.
TD-9_e.book 57 ページ 2008年1月23日 水曜日 午後4時24分 Other settings (Utility) Saving data recorded by Quick Rec 1. 5. Press [F2] (NAME). The “QUICK REC DATA NAME” screen will appear. You can write a name of up to eight characters. In the “USB UTILITY” screen, press [F1] (SAVE). The “UTILITY USB SAVE” screen appears. 2. 6. Use CURSOR [ ] [ ] to move the cursor to the character that you want to change. 7. Use [+/-] or [VALUE] to select the desired character. Press [F2] (Q REC).
TD-9_e.book 58 ページ 2008年1月23日 水曜日 午後4時24分 Other settings (Utility) Loading data from a USB memory key back into the TD-9 (LOAD) Data you’ve saved on a USB memory key can be loaded back into the TD-9. This is called “Load.” Loading Quick Rec data 1. Loading backup data 1. In the “USB UTILITY” screen, press [F2] (LOAD). The “UTILITY USB LOAD” screen appears. In the “USB UTILITY” screen, press [F2] (LOAD). The “UTILITY USB LOAD” screen appears. 2. Press [F2] (Q REC).
TD-9_e.book 59 ページ 2008年1月23日 水曜日 午後4時24分 Other settings (Utility) Deleting data from a USB memory key / Formatting a USB memory key (DL/FMT) How to delete saved data from USB memory key and formatting the USB memory key. Deleting Quick Rec data 1. Deleting backup data 1. In the “USB UTILITY” screen, press [F3] (DL/FMT). The “USB DELETE/FORMAT” screen appears. In the “USB UTILITY” screen, press [F3] (DL/FMT). The “USB DELETE/FORMAT” screen appears. 2. Press [F2] (Q REC).
TD-9_e.book 60 ページ 2008年1月23日 水曜日 午後4時24分 Other settings (Utility) Formatting a USB memory key When executing the Format operation, all data on the USB memory key (backup data, Quick Rec data, and audio files) will be lost. 1. Restoring the factory settings [F3] (RESET) The “Factory Reset” operation returns all settings of all pads and instruments stored in the TD-9 to their factory-set condition. In the “USB UTILITY” screen, press [F3] (DL/FMT). • All data and settings in the TD-9 will be lost.
TD-9_e.book 61 ページ 2008年1月23日 水曜日 午後4時24分 Other settings (Utility) Changing the default trigger type You can change the default trigger type values that will be assigned when a Factory Reset is executed. Normally, you will not need to change this, but if the drum system you’re using has different pads and trigger types, you can change the settings as follows. 1. Turn off the power. 2. Press [POWER] to turn on the power.
TD-9_e.
TD-9_e.book 63 ページ 2008年1月23日 水曜日 午後4時24分 6.
TD-9_e.book 64 ページ 2008年1月23日 水曜日 午後4時24分 Error Messages If an error message appears in the TD-9’s screen, the TD-9 has failed to operate correctly for some reason, or an incorrect operation has been performed. Please take the appropriate action described here. Message Meaning Action MIDI-related error messages MIDI Offline! A MIDI cable was disconnected. (Or communication with the external MIDI device stopped for some reason.) Make sure that MIDI cables have not been pulled out or broken.
TD-9_e.book 65 ページ 2008年1月23日 水曜日 午後4時24分 Preset Drum Kit List No. 1 2 3 4 5 6 7 8 9 10 11 12 13 14 15 16 17 18 19 20 Name V-Tour Studio CoolJazz Double BASS Compact 18”Kick Acoustic House +LatinPerc Ambient ChillOut Junk INDUSTRIAL TightHit 2ndHi-Hat Brushes Ballad Reverb Big Rock Stadium Modern JAZZ JazzyBop Sizzle Fusion Alterna Rock/Punk Blast Mixture Groove Vintage 30’s-40’s No.
TD-9_e.book 66 ページ 2008年1月23日 水曜日 午後4時24分 Preset Song List No. Name No.
TD-9_e.book 67 ページ 2008年1月23日 水曜日 午後4時24分 Drum Instrument List No. Name No. 39 KICK Name Name No. Ninja K No.
TD-9_e.book 68 ページ 2008年1月23日 水曜日 午後4時24分 Drum Instrument List No. Name No. Name No. Name No.
TD-9_e.book 69 ページ 2008年1月23日 水曜日 午後4時24分 Drum Instrument List No. Name No. Name No. Name No.
TD-9_e.book 70 ページ 2008年1月23日 水曜日 午後4時24分 Drum Instrument List No. Name 486 Scratch3 487 Stamp 488 Ratchet About Remarks *X (Cross Stick): When the XSTICK is turned ON, it makes possible to use both “Rim Shot” and “Cross Stick” on the rim. 489 AirDrive 490 Hammer 491 Barrel 492 TrashCan About Snare/Tom Instruments The last letter of each instrument name means the sound of head shot, or rim shot.
TD-9_e.book 71 ページ 2008年1月23日 水曜日 午後4時24分 Preset Percussion Set List Note No.
TD-9_e.book 72 ページ 2008年1月23日 水曜日 午後4時24分 MIDI Implementation Chart PERCUSSION SOUND MODULE Date : Dec. 1, 2007 MIDI Implementation Chart Model TD-9 Transmitted Function...
TD-9_e.book 73 ページ 2008年1月23日 水曜日 午後4時24分 Specifications TD-9: Percussion Sound Module ● Instruments Drum Instruments: 522 ● Drum Kits 50 ● Instrument Parameters KICK: Head Tuning, Muffling SNARE: Head Tuning, Muffling TOM: Head Tuning, Muffling HI-HAT: Cymbal Size, Fixed Hi-Hat CYMBAL: Cymbal Size, Sustain ● Quick Rec Resolution: 480 ticks per quarter note Recording Method: Real-time Maximum Note Storage: approx.
TD-9_e.
kit are used. TD-9_e.
TD-9_e.book 76 ページ 2008年1月23日 水曜日 午後4時24分 Index Symbols +/- ........................................ 13–14 A A ................................................ 37 Advanced Trigger Parameters ........ 48 AMB ........................................... 28 Amb Send Level ........................... 54 AMB/EQ ..................................... 28 Ambience .................................... 28 AMBIENCE SEND ........................ 28 Audio Files ............................. 34–35 AUX .................
TD-9_e.book 77 ページ 2008年1月23日 水曜日 午後4時24分 Index O S ONESHOT .................................. Open Hi-Hat ................................ OTHERS ...................................... Others Part ............................ 34, OUTPUT ...................................... 37 24 36 36 13 P Pad Switch .................................. PAN ........................................... Pan ....................................... 40, PD-105 ....................................... PD-85 ...............
TD-9_e.book 78 ページ 2008年1月23日 Information AFRICA EGYPT Al Fanny Trading Office 9, EBN Hagar Al Askalany Street, ARD E1 Golf, Heliopolis, Cairo 11341, EGYPT TEL: (022)-418-5531 REUNION Maison FO - YAM Marcel 25 Rue Jules Hermann, Chaudron - BP79 97 491 Ste Clotilde Cedex, REUNION ISLAND TEL: (0262) 218-429 SOUTH AFRICA T.O.M.S. Sound & Music (Pty)Ltd. 2 ASTRON ROAD DENVER JOHANNESBURG ZA 2195, SOUTH AFRICA TEL: (011)417 3400 Paul Bothner(PTY)Ltd.
For EU Countries For the U.K. IMPORTANT: THE WIRES IN THIS MAINS LEAD ARE COLOURED IN ACCORDANCE WITH THE FOLLOWING CODE. BLUE: NEUTRAL BROWN: LIVE As the colours of the wires in the mains lead of this apparatus may not correspond with the coloured markings identifying the terminals in your plug, proceed as follows: The wire which is coloured BLUE must be connected to the terminal which is marked with the letter N or coloured BLACK.
C5100064 08-02-2YG