
User Manual
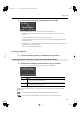
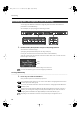
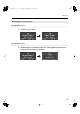
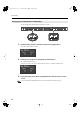
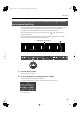

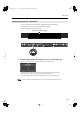
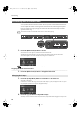
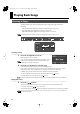
Table Of Contents
- IMPORTANT SAFETY INSTRUCTIONS
- Introduction
- Contents
- USING THE UNIT SAFELY
- Important Notes
- Names of Things and What They Do
- Before You Play
- Listening to Demo Songs
- Performing
- Performing with a Variety of Sounds
- Adjusting the Piano Sound to Your Taste (Piano Designer)
- Adjusting the Keyboard Sensitivity (Key Touch)
- Adding Spatial Depth to the Sound (3D Sound Control)
- Adding Liveliness to the Sound (Dynamics Sound Control)
- Adding Reverberation to Sounds (Reverb Effect)
- Adding a Variety Effects to the Sound (Effects)
- Changing the Key of the Keyboard (Key Transpose)
- Dividing the Keyboard for Two-person Performance (Twin Piano)
- Performing with Two Layered Tones (Dual Play)
- Performing with Different Tones in the Left and Right Sides of the Keyboard (Split Play)
- Performing with the Metronome
- Sounding a Count to Keep Your Timing Accurate
- Playing Back Songs
- Recording
- Saving Your Performance
- Various Settings
- Basic Operation in Function Mode
- Tuning Settings
- Equalizer Settings
- Song Playback Settings
- Changing the CD Settings
- Metronome Setting
- Keyboard Settings
- Pedal Settings
- MIDI Settings
- Other Settings
- Using the V-LINK Function (V-LINK)
- Specifying the V-LINK Transmission Channel
- Changing the USB Driver Settings (USB Driver)
- Changing the External Memory Setting (Ext. Memory Mode)
- Adjusting the Volume (Master Gain)
- Changing How Grand Space is Applied (3D Mode)
- Changing the Parts Assigned to the Track Buttons During SMF Playback (Track Assign)
- Switching On/Off the Display of Lyrics (Lyrics)
- Switching VIMA TUNES Recommended Tones (Recommended Tone)
- Changing the Language Displayed in the Screen (Language)
- Remembering the Settings (Memory Backup)
- Restoring the Settings to the Factory Condition (Factory Reset)
- Disabling the Buttons (Panel Lock)
- Connecting to Other Devices
- Troubleshooting
- Error Messages
- Tone List
- Internal Song List
- Parameters Stored in Memory Backup
- Music Files That the LX-10 Can Use
- MIDI Implementation Chart
- Main Specifications
- Index

42
Performing
You can play two different sounds from a single key at the same time. This method of
performance is called “Dual Play.”
As an example, let’s try layering piano and strings sounds.
fig.Panel-Tones-e.eps
1.
Hold down the [Piano] button and press the [Strings] button.
The indicators for both buttons light.
Try fingering the keyboard. Both the piano and string sounds play.
Pressing two Tone buttons at the same time in this manner activates Dual Play.
Of the two selected tones, the one for the tone button at left is called “Tone 1” and the one for the
button at right is called “Tone 2.”
fig.d-Dual.eps
Here, the piano tone is the Tone 1 and the strings tone is the Tone 2.
You can’t select Dual Play if you’ve turned on Split play or Twin Piano.
Turning Off Dual Play
1.
Press any one of the Tone buttons.
Now you’ll hear only the tone of the button you pressed.
You can change the pitch of the Tone 2 an octave at a time. Refer to “Changing the Pitch of the Tone
in Octave Steps (Octave Shift)” (p. 84).
You can vary the volume-level balance of the two tones. Refer to “Changing the Volume Balance for
Dual Play” (p. 44).
If you press the pedals while using Dual Play, the effect will be applied to both Tone 1 and Tone 2.
However, you can change this setting so that the pedals will affect only one of the tones. Refer to
“Changing How the Pedal Effects Are Applied (Damper/Center/Left Pedal Part)” p. 85.
Depending on the combination of the two tones, the effect may not be applied to Tone 2.
Performing with Two Layered Tones (Dual Play)
Tone 1
Tone 2
NOTE
NOTE
LX-10_e.book 42 ページ 2009年2月13日 金曜日 午前10時39分