
User Manual
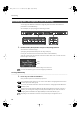

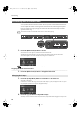
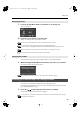
Table Of Contents
- IMPORTANT SAFETY INSTRUCTIONS
- Introduction
- Contents
- USING THE UNIT SAFELY
- Important Notes
- Names of Things and What They Do
- Before You Play
- Listening to Demo Songs
- Performing
- Performing with a Variety of Sounds
- Adjusting the Piano Sound to Your Taste (Piano Designer)
- Adjusting the Keyboard Sensitivity (Key Touch)
- Adding Spatial Depth to the Sound (3D Sound Control)
- Adding Liveliness to the Sound (Dynamics Sound Control)
- Adding Reverberation to Sounds (Reverb Effect)
- Adding a Variety Effects to the Sound (Effects)
- Changing the Key of the Keyboard (Key Transpose)
- Dividing the Keyboard for Two-person Performance (Twin Piano)
- Performing with Two Layered Tones (Dual Play)
- Performing with Different Tones in the Left and Right Sides of the Keyboard (Split Play)
- Performing with the Metronome
- Sounding a Count to Keep Your Timing Accurate
- Playing Back Songs
- Recording
- Saving Your Performance
- Various Settings
- Basic Operation in Function Mode
- Tuning Settings
- Equalizer Settings
- Song Playback Settings
- Changing the CD Settings
- Metronome Setting
- Keyboard Settings
- Pedal Settings
- MIDI Settings
- Other Settings
- Using the V-LINK Function (V-LINK)
- Specifying the V-LINK Transmission Channel
- Changing the USB Driver Settings (USB Driver)
- Changing the External Memory Setting (Ext. Memory Mode)
- Adjusting the Volume (Master Gain)
- Changing How Grand Space is Applied (3D Mode)
- Changing the Parts Assigned to the Track Buttons During SMF Playback (Track Assign)
- Switching On/Off the Display of Lyrics (Lyrics)
- Switching VIMA TUNES Recommended Tones (Recommended Tone)
- Changing the Language Displayed in the Screen (Language)
- Remembering the Settings (Memory Backup)
- Restoring the Settings to the Factory Condition (Factory Reset)
- Disabling the Buttons (Panel Lock)
- Connecting to Other Devices
- Troubleshooting
- Error Messages
- Tone List
- Internal Song List
- Parameters Stored in Memory Backup
- Music Files That the LX-10 Can Use
- MIDI Implementation Chart
- Main Specifications
- Index

46
Performing
Turning Off Split Play
1.
Press the [Split] button so its illumination is turned off.
The right-hand tone becomes the tone for the entire keyboard.
When you switch from Dual Play (p. 42) to Split Play, the Tone 1 used in Dual Play is selected as the
right-hand one for Split Play.
Changing the Right-hand Tone
1.
Press the Tone button to choose a tone group.
2.
Press the [-] [+] buttons to select a variation tone.
fig.d-Split.eps
Changing the Left-hand Tone
1.
Hold down the [Split] button and press the Tone button to choose a tone
group.
2.
Hold down the [Split] button and press the [-] [+] buttons to select a
variation tone.
fig.d-Split.eps
You can change the pitch of the left-hand tone an octave at a time. Refer to “Changing the Pitch of
the Tone in Octave Steps (Octave Shift)” (p. 84).
Switching Tone Groups and Tone Variations
LX-10_e.book 46 ページ 2009年2月13日 金曜日 午前10時39分