
User manual

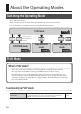
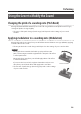
Table Of Contents
- USING THE UNIT SAFELY
- IMPORTANT NOTES
- Quick Page Reference Table
- Contents
- Contents of the Package
- Panel Descriptions
- Driver Installation
- About the Operating Modes
- Performing
- Setting the MIDI Transmit Channel (MIDI CHANNEL)
- Switching Sounds
- Shifting the Pitch of the Keyboard
- Using the Lever to Modify the Sound
- Using the D-BEAM to Modify the Sound
- Using the Knobs to Modify the Sound
- Using the Pedals to Modify the Sound
- Using Aftertouch to Modify the Sound
- Halting Stuck Notes (PANIC)
- Changing the A-49 Settings
- Changing the Velocity Curve (VELO CURVE)
- Specifying the Keyboard Velocity Value (KEY VELO)
- Switching the Function of the [C2] Knob in SuperNATURAL Mode (SN SETTING)
- Assigning Functions to the Knobs, Buttons, and Jacks
- Changing the Direction of Value Increases for the Knobs, D-BEAM Controller, Buttons, and Pedals (CTRL DIR)
- Selecting the Dedicated Driver or the Generic Driver
- Restoring the Factory Settings (FACT RESET)
- Troubleshooting
- Main Specifications
- Index

Performing
30
Using the D-BEAM to Modify the Sound
You use the D-BEAM controller simply by moving your hand above it. By assigning dierent
functions to it, you can control the sound in various ways.
1. Press the D-BEAM [PITCH], [VOL], or [ASSIGN] button to turn the D-BEAM controller
on.
Button Function
[PITCH] button The pitch will change as you move your hand above the D-BEAM controller.
[VOL] button The volume will change, allowing you to add expression to your performance.
[ASSIGN] button
The function assigned to the D-BEAM controller will be controlled. (Factory
setting: aftertouch)
* The eect that’s applied will depend on the sound module. For details, refer to the owner’s
manual of your sound module.
MEMO
You can change the function that’s assigned to the [ASSIGN] button. For details, refer to
“Assigning Functions to the Knobs, Buttons, and Jacks” (p. 37).
2. While playing the keyboard to produce sound, position your hand above the
D-BEAM controller and slowly move it up and down.
3. To turn o the D-BEAM controller, once again press the button you pressed in step 1
(the button will go out).
Eective range of the D-BEAM controller
This illustration shows the eective range of the D-BEAM controller. No eect
will be obtained if you position your hand outside the eective range.
NOTE
The eective range of the D-BEAM controller will change depending on
the lighting conditions.