Owner’s Manual For the following languages, a PDF version of the Owner’s Manual can be found on the CD-ROM.
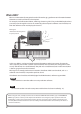
What is MIDI? MIDI is an internationally recognized standard for exchanging performance information between electronic musical instruments and computers. For example, in the illustration below, a MIDI signal meaning “the ‘C’ key on the MIDI keyboard was pressed” passes through the A-49 and is received by the computer’s software sound module, and then the software sound module plays the note “C.
USING THE UNIT SAFELY About WARNING and CAUTION Notices Used for instructions intended to alert the user to the risk of death or severe injury should the unit be used improperly. Used for instructions intended to alert the user to the risk of injury or material damage should the unit be used improperly. * Material damage refers to damage or other adverse effects caused with respect to the home and all its furnishings, as well to domestic animals or pets.
IMPORTANT NOTES WARNING Adults must provide supervision in places where children are present When using the unit in locations where children are present, be careful so no mishandling of the unit can take place. An adult should always be on hand to provide supervision and guidance. Do not drop or subject to strong impact Protect the unit from strong impact. CAUTION Manage cables for safety Try to prevent cords and cables from becoming entangled.
IMPORTANT NOTES • Do not put anything that contains water on this unit. Also, avoid the use of insecticides, perfumes, alcohol, nail polish, spray cans, etc., near the unit. Swiftly wipe away any liquid that spills on the unit using a dry, soft cloth. Maintenance • For everyday cleaning wipe the unit with a soft, dry cloth or one that has been slightly dampened with water. To remove stubborn dirt, use a cloth impregnated with a mild, non-abrasive detergent.
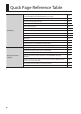
Quick Page Reference Table Performing Changing the A-49’s Settings 6 Switching the operating mode (PLAY/FUNCTION/SuperNATURAL/MIDI Visual Control) p. 22 Setting the MIDI transmit channel (MIDI CHANNEL) p. 26 Switching sounds ([S1][S2] knobs) p. 26 Performing — Octave Shift, Transpose p. 28 Pitch Bend, Modulation p. 29 D-BEAM p. 30 [C1][C2] knobs p. 31 Hold, Expression p. 32 Aftertouch p. 33 Halting stuck notes p. 33 Performing with a SuperNATURAL sound module p.
Contents USING THE UNIT SAFELY. . . . . . . . . . . . . . . . . . . . . 3 Changing the A-49 Settings . . . . . . . . . . . . . . . . 34 IMPORTANT NOTES . . . . . . . . . . . . . . . . . . . . . . . . . 4 Changing the Velocity Curve (VELO CURVE). . . . . . . . . . . . . . . . . . . . . . . . . . . . 35 Quick Page Reference Table . . . . . . . . . . . . . . . . . 6 Specifying the Keyboard Velocity Value (KEY VELO). . . . . . . . . . .
How to read the procedural explanations Press the [FUNCTION] button. Press the key that has “PRGM CHANGE” printed above it. 0–9 Value Press the keys that have “NUMERIC ENTRY” printed above them. 1–128 Press the key that has “ENTER” printed above it.
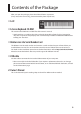
Contents of the Package After you open the package, please check that all items are present. (If any accessories are missing, please contact the place of purchase.) ☐ A-49 ☐ A-Series Keyboard CD-ROM This contains the USB driver and PDF files of the owner’s manual. * Avoid touching or scratching the shiny underside (encoded surface) of a disc. Damaged or dirty discs may not be read properly. Use a commercially available CD-ROM/DVD-ROM cleaner to keep your disc clean.
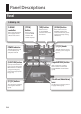
Panel Descriptions Panel D-BEAM (p. 30) D-BEAM controller [PITCH] button Move your hand above this to apply various effects to the sound. If this is turned on, the D-BEAM controller will control the pitch. [VOL] button [ASSIGN] button If this is turned on, the D-BEAM controller will control the volume. If this is turned on, the D-BEAM controller will control the function you’ve assigned.
Panel Descriptions [TRANSPOSE] button, OCTAVE/TRANSPOSE indicator, [+][–] buttons In PLAY mode (p. 22), you can press the [TRANSPOSE] button to switch the function of the OCTAVE/TRANSPOSE indicator and the [+] [–] buttons. When the [TRANSPOSE] button is turned on, the transposition setting is enabled. When the [TRANSPOSE] button is turned off, the transposition setting is disabled. Button Function OCTAVE/TRANSPOSE indicator [+][–] buttons Change the octave setting (p.
Panel Descriptions Rear Panel HOLD jack USB COMPUTER port You can connect a pedal switch (DP-2, DP-10; available separately) here and use it as a hold pedal (p. 32). Use a USB cable to connect the A-49 to your computer. * Install the driver in your computer before you make this connection (p. 13). EXPRESSION jack You can connect an expression pedal (EV-5, EV-7; available separately) here and use it to control various parameters and functions (p. 32).
Driver Installation Windows Mac OS X Note Do not connect the A-49 to the computer until you are directed to do so. A “driver” is software that transfers data between the A-49 and application software running on your computer when your computer and the A-49 are connected. 1. Start up the computer without the A-49 connected. Disconnect all USB cables other than those for a USB keyboard and/or USB mouse (if used). Windows Log on to the computer with a user account that has administrator privileges.
Driver Installation Windows 5. When a confirmation screen regarding user account control appears, click [Yes] or [Continue]. 6. When “The A-Series Keyboard Driver will be installed on your computer” appears, click [Next]. 7. Click [Next] again. Windows 8/Windows 7/Windows Vista If a dialog box regarding Windows security appears, click [Install]. Windows XP If the “Software Install” dialog box appears, click [Continue] to proceed with the installation.
Driver Installation Windows 8/Windows 7/Windows Vista 9. When “Installation has been completed.” appears, click [Close]. Close the “A-Series Keyboard Driver Setup” dialog box. If the “Change System Settings” dialog box appears, click [Yes] to restart Windows. page 19 Windows XP 9. If a dialog box that asks whether you want to connect to Windows Update appears, select [No, not this time] and click [Next]. 10. Select [Install the software automatically (Recommended)] and click [Next]. 11.
Driver Installation Mac OS X If a dialog box requesting a password appears during installation, enter a computer administrator’s user name and password and click the [Install Software] button or [OK] button. 5. When “Welcome to the A-Series Keyboard Driver installer” appears, click [Continue]. 6. If the screen for selecting the installation destination appears, select the startup disk and click [Continue]. 7. When the installation type appears, click [Install] or [Upgrade]. 8.
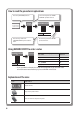
Driver Installation 13. Confirm that [A-Series Keyboard] appears in the “MIDI Studio” window or the “Audio MIDI Settings” dialog box. If [A-Series Keyboard] does not appear or if it is grayed out, it means that the A-49 is not being detected properly. Click [Rescan MIDI]. Also try disconnecting and reconnecting the A-49’s USB cable. 14. Click [Add Device] two time. Two [New Device] items will appear. 15. Specify device names for the newly added [New Device]. 1.
Driver Installation 16. Using your mouse, drag and connect the ▲ and ▼ (which represent the input/ output ports of each device) of the [A-Series Keyboard] and each [New Device] that you added so that they are connected as shown in the figure. 14 15 13 16 17. Close the “MIDI Studio” window or the “Audio MIDI Setup” dialog box.
Driver Installation Verify That You Can Hear Sound After you’ve installed the driver, check to verify that the driver was installed correctly. We will use SONAR LE as an example for Windows, and GarageBand as an example for Mac OS X. Checking with a SONAR Soft Synths (Windows) Here’s an example using a plug-in synth included with SONAR LE. The procedure or screens may differ if you’re using a different version. 1. Start up SONAR LE. 2.
Driver Installation 8. In the “Insert Soft Synth Options” dialog box, select the [Synth Property Page] option in the “Open These Windows” area, and click [OK]. 9. Play the A-49’s keyboard. If the MIDI monitor in the taskbar responds and you hear the sound of the synth, the A-49 is correctly connected to your computer. This completes the necessary settings. Now you can proceed to “Using the A-49” (p. 22). Checking in GarageBand (Mac OS X) GarageBand is software that is included with Apple’s iLife.
Driver Installation If you don’t hear sound • From the [GarageBand] menu, click [Preferences]. If MIDI input is not detected in the [Audio/MIDI] tab’s “MIDI Status” field, it may be that a problem has occurred. Please refer to “Problems When Using the Unit” (p. 43). • In “System Preferences,” choose the [Sound]-[Output] tab. Make sure that your computer’s main volume is not turned down or muted. Also make sure that internal audio is selected.
About the Operating Modes Switching the Operating Mode The A-49 has four modes. When you turn on the power, the A-49 will automatically start up in PLAY mode. You can switch the operating mode by pressing the following buttons. PLAY mode page 22 or when you’ve finished making settings FUNCTION mode page 23 + SuperNATURAL mode MIDI Visual Control mode page 24 page 25 PLAY Mode What is PLAY mode? This is the mode that’s used when performing.
About the Operating Modes FUNCTION Mode What is FUNCTION mode? This is the mode that lets you transmit specific control messages or make settings for the A-49 itself. In FUNCTION mode, the keyboard is used to select the function that you want to set (You won’t be able to perform by playing the keyboard).
About the Operating Modes SuperNATURAL Mode What is SuperNATURAL mode? This is the mode that lets you control a SuperNATURAL sound module. You can control the SuperNATURAL sound module that’s connected to the A-49 via a MIDI cable. What are SuperNATURAL Tones? Taking advantage of Behavior Modeling Technology, SuperNATURAL is Roland’s exclusive sound set that achieves a new level of realism and expression that were difficult to realize with previous sound generators.
About the Operating Modes MIDI Visual Control Mode What is MIDI Visual Control mode? This is the mode that lets you control a video device that supports MIDI Visual Control (MVC). You can control images on the Visual Control device that’s connected to the A-49 via a MIDI cable. When you select MIDI Visual Control mode and play the keyboard of the A-49, images will be controlled in synchronization with your performance.
Performing When the A-49’s power is turned on, it will automatically start up in PLAY mode (p. 22). In PLAY mode, playing the keyboard will transmit note messages, causing your MIDI device to produce sound. 1. Set the A-49’s MIDI transmit channel to match the MIDI receive channel of your MIDI device (or software) (p. 26). 2. Select a sound (p. 26). 3. Play the keyboard. When you play the keyboard, MIDI messages will be transmitted.
Performing MEMO You can change the functions that are assigned to the [S1] [S2] buttons. For details, refer to “Assigning Functions to the Knobs, Buttons, and Jacks” (p. 37). To select sounds from a different bank, first transmit a Bank Select message, and then transmit a Program Change message. * Simply transmitting a Bank Select message will not make the sound change. * The Bank Select message must be sent before the Program Change message.
Performing Transmitting a Program Change number (PRGM CHANGE) 0–9 Value 0–127 For details on this value, refer to p. 8. Shifting the Pitch of the Keyboard Changing the octave (Octave Shift) You can raise or lower the pitch range of the keyboard (Octave Shift) by using the [+] [–] buttons. You can change this setting in the range of -4 to 5 octaves. The OCTAVE/TRANSPOSE indicator will light to indicate the current octave shift setting (p. 11).
Performing Using the Lever to Modify the Sound Changing the pitch of a sounding note (Pitch Bend) Moving the [Pitch Bend/Modulation] lever to the left or right will transmit pitch bend messages, causing the pitch to change slightly. * The range of the pitch change (“bend range”) will depend on the settings of your sound module. Applying modulation to a sounding note (Modulation) Moving the bender lever away from yourself will transmit modulation messages (CC#01), applying a vibrato effect to the sound.
Performing Using the D-BEAM to Modify the Sound You use the D-BEAM controller simply by moving your hand above it. By assigning different functions to it, you can control the sound in various ways. 1. Press the D-BEAM [PITCH], [VOL], or [ASSIGN] button to turn the D-BEAM controller on. Button Function [PITCH] button The pitch will change as you move your hand above the D-BEAM controller. [VOL] button The volume will change, allowing you to add expression to your performance.
Performing Using the Knobs to Modify the Sound You can modify the sound by turning the [C1] [C2] knobs. Knob Function [C1] knob Transmits a Cutoff (CC#74) message. [C2] knob Transmits a Resonance (CC#71) message. * The effect that’s applied will depend on the sound module. For details, refer to the owner’s manual of your sound module. MEMO You can change the functions that are assigned to the [C1] [C2] knobs. For details, refer to “Assigning Functions to the Knobs, Buttons, and Jacks” (p. 37).
Performing Using the Pedals to Modify the Sound The A-49 supports the use of a hold pedal (DP-2, DP-10; available separately) and an expression pedal (EV-5, EV-7; available separately). Jack Function Pedal HOLD jack Hold (CC#64) Hold pedal EXPRESSION jack Expression (CC#11) Expression pedal * The effect that’s applied will depend on the sound module. For details, refer to the owner’s manual of your sound module.
Performing Using Aftertouch to Modify the Sound Aftertouch is a function that lets you modify the sound by applying additional pressure to the key after playing a note. On the A-49, applying further pressure to a key after playing a note will not affect the sound, turning on the [ASSIGN] button and moving your hand above the D-BEAM controller will cause Aftertouch messages to be transmitted.
Changing the A-49 Settings To change settings for the A-49, you need to be in FUNCTION mode. Parameter VELO CURVE Factory setting Explanation 1-MEDIUM When you play the A-49’s keyboard, the transmitted note message will include a velocity value (volume data) corresponding to the force of your strike. Page p. 35 The VELO CURVE setting lets you choose the curve by which the velocity value will change. KEY VELO TOUCH Specifies the velocity value of the keys you play. p.
Changing the A-49 Settings Changing the Velocity Curve (VELO CURVE) 0–9 Value 0–11 For details on this value, refer to p. 8. * Values outside the acceptable range (12–) will not be entered. Value 0 1 Setting Keyboard sensitivity 1-LIGHT Higher velocity values (volume) can be produced even if you play softly. 1-MEDIUM (default) Keyboard sensitivity will be typical. 2 1-HEAVY Higher velocity values (volume) will not be produced unless you play strongly.
Changing the A-49 Settings Specifying the Keyboard Velocity Value (KEY VELO) 0–9 Value Value 0 1–127 0–127 For details on this value, refer to p. 8. Setting Explanation TOUCH The velocity value that’s transmitted will depend on the keyboard sensitivity and change curve you specify in “Changing the Velocity Curve (VELO CURVE)” (p. 35). (default) FIXED VALUE The velocity value you specify here will be transmitted regardless of how strongly you play the keyboard.
Changing the A-49 Settings Assigning Functions to the Knobs, Buttons, and Jacks Assigning a Program Change Message (PRGM CHANGE) [S1] [S2] buttons Press either Button Function [S1] button Decrement the program change number [S2] button Increment the program change number Other controllers Operate either Assigning Aftertouch Operate either 37
Changing the A-49 Settings Assigning a Control Change Number (CC#) [S1] [S2] buttons Momentary 0–9 Press either Latched Value 0–127 For details on this value, refer to p. 8.
Changing the A-49 Settings Frequently used CC# CC# Function Factory assignments 1 Modulation Modulation of [Pitch Bend/Modulation] lever 5 Portamento time — 7 Volume [VOL] button 10 Panpot — 11 Expression EXPRESSION jack 64 Hold HOLD jack 65 Portamento — 66 Sostenuto — 67 Soft — 71 Resonance [C2] knob 72 Release time — 73 Attack time — 74 Cutoff [C1] knob 75 Decay time — 76 Vibrato rate — 77 Vibrato depth — 78 Vibrato delay — 84 Portamento control —
Changing the A-49 Settings Changing the Direction of Value Increases for the Knobs, D-BEAM Controller, and Pedals (CTRL DIR) Operate either Button [+] button [–] button Setting POSITIVE (default) REVERSED Explanation Moving the knob toward the right will increase the value. Moving your hand closer to the D-BEAM controller will increase the value, and moving it away from the D-BEAM controller will decrease the value. Pressing a pedal will increase the value. The opposite will occur.
Changing the A-49 Settings Restoring the Factory Settings (FACT RESET) 41
Troubleshooting If you experience problems, read this chapter first. It contains tips for solving most problems. If this chapter cannot help you solve a problem, please refer to the support section of our website. If the problem is not resolved, refer to the contact information listed at the end of this manual. Roland support website: http://www.roland.
Troubleshooting Problems When Using the Unit Problem Confirmation Resolution Is the driver installed? Install the driver (p. 13). Is the POWER indicator off? Is the unit’s device name displayed? Is another program using the unit? Cannot select or use unit device Make sure that the unit is connected to the computer correctly. If the problem is not resolved, reinstall the driver (p. 48). Exit all programs that are using the unit, disconnect the unit’s USB cable, and then reconnect it.
Troubleshooting Problem Confirmation Resolution Is the driver installed? Install the driver (p. 13). Are the software’s input device and output device configured? Select the A-49 as the input and output device (p. 19). Is the unit’s POWER indicator off? Is the sound module connected to the MIDI OUT cable receiving MIDI signals? Is there another program using the unit? Make sure that the unit is connected to the computer correctly. If the problem is not resolved, reinstall the driver (p. 48).
Troubleshooting Problem Confirmation Resolution Are multiple programs running? Exit programs that are not in use.
Troubleshooting Changing Computer Settings to Avoid Problems Changing these computer settings can help you avoid the problems described in “Problems When Installing the Driver” (p. 42) and “Problems When Using the Unit” (p. 43). Driver Signing Options Setting (Windows XP) If the “Driver Signing Options” setting is set to [Block], you cannot install the driver. Configure as follows. 1. Open the “Control Panel,” click [Performance and Maintenance], and then click the [System] icon.
Troubleshooting 4. Click [Change advanced power settings]. 5. In the [Advanced settings] tab of the “Power Options” control panel, click the [+] mark next to “Hard disk,” and then click the [+] mark next to “Turn off hard disk after.” 6. Click [Setting], click the down arrow, and then select [Never]. 7. Click [OK] to close the “Power Options” window. 8. Close the “Edit plan settings” screen. Windows XP 1.
Troubleshooting Reinstalling the Driver If you experience problems installing the driver, use the following procedure and reinstall the driver. 1. Delete the driver. 2. Install the driver again as described in “Driver Installation” (p. 13). Deleting the Driver If the computer does not detect the unit correctly, use the following procedure to delete the driver, and then install the driver again as described in “Driver Installation” (p. 13). Windows 1.
Troubleshooting Mac OS X 1. Start up the Mac without the unit connected. Disconnect all USB cables other than those for a USB keyboard and/or USB mouse (if used). 2. Insert the included CD-ROM into the computer’s DVD-ROM drive. 3. Double-click [Uninstaller] in the [MacDriver] folder on the included CD-ROM. 4. When “This uninstalls A-Series Keyboard driver from this Mac.” appears, click [Uninstall]. If other messages appear, follow the instructions on the screen. 5.
Main Specifications Roland A-49: MIDI Keyboard Controller Keyboard 49 keys (with velocity) Buttons: [S1] [S2] (Assignable) Knobs: [C1] [C2] (Assignable) Controllers Foot Pedals: HOLD, EXPRESSION [Pitch Bend/Modulation] lever D-BEAM controller [FUNCTION] button Buttons [SuperNATURAL] button [+][–] buttons [TRANSPOSE] button Display POWER indicator LED OCTAVE/TRANSPOSE indicator LED HOLD jack: 1/4-inch phone type Connectors EXPRESSION jack: 1/4-inch TRS phone type MIDI OUT connector USB COMPUTER port
MIDI Implementation Chart Date: Sep. 1, 2012 Version: 1.00 Model: A-49 Function...
Index Symbols M [+][–] buttons. . . . . . . . . . . . . . . . . . 11 MIDI CHANNEL. . . . . . . . . . . . . . . . . MIDI OUT connector . . . . . . . . . . . MIDI transmit channel. . . . . . . . . . MIDI Visual Control. . . . . . . . . . . . . MIDI Visual Control mode . . . . . . Modulation. . . . . . . . . . . . . . . . . . . . MSB. . . . . . . . . . . . . . . . . . . . . . . . . . . A Ableton Live Lite Serial Number. 9 Aftertouch. . . . . . . . . . . . . . . . . . . . . 33 [ASSIGN] button . . . . . . .
MEMO 53
For EU Countries For China 54
For the USA Model Name : Type of Equipment : Responsible Party : Address : Telephone : DECLARATION OF CONFORMITY Compliance Information Statement A-49 MIDI Keyboard Controller Roland Corporation U.S. 5100 S. Eastern Avenue, Los Angeles, CA 90040-2938 (323) 890-3700 For EU Countries This product complies with the requirements of EMC Directive 2004/108/EC.
* 5 1 0 0 0 4 3 6 8 5 - 0 4 *