* 5 1 0 0 0 1 6 2 3 3 - 0 5 *
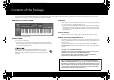
A-300_500_800C_e.book 2 ページ 2014年8月19日 火曜日 午後3時27分 Contents of the Package The package of the A-300PRO/500PRO/800PRO (which we’ll subsequently refer to as the A-PRO) contains the following items. When you open the package, first make sure that all items are included. If any are missing, contact the dealer where you purchased the A-PRO. MIDI keyboard controller A-PRO USB cable Use this cable to connect the A-PRO to the USB connector of your computer.
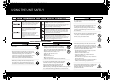
A-300_500_800C_e.book 3 ページ 2014年8月19日 火曜日 午後3時27分 USING THE UNIT SAFELY 008e About WARNING and CAUTION Notices About the Symbols The symbol alerts the user to important instructions or warnings.The specific meaning of the symbol is determined by the design contained within the triangle. In the case of the symbol at left, it is used for general cautions, warnings, or alerts to danger.
A-300_500_800C_e.
A-300_500_800C_e.book 5 ページ 2014年8月19日 火曜日 午後3時27分 IMPORTANT NOTES Power Supply 301 • Do not connect this unit to same electrical outlet that is being used by an electrical appliance that is controlled by an inverter (such as a refrigerator, washing machine, microwave oven, or air conditioner), or that contains a motor. Depending on the way in which the electrical appliance is used, power supply noise may cause this unit to malfunction or may produce audible noise.
A-300_500_800C_e.book 6 ページ 2014年8月19日 火曜日 午後3時27分 Contents Contents of the Package................................................... 2 USING THE UNIT SAFELY................................................... 3 IMPORTANT NOTES ........................................................... 5 Names of Things and What They Do................................ 8 Panel..................................................................................................................................................
A-300_500_800C_e.book 7 ページ 2014年8月19日 火曜日 午後3時27分 Contents Assigning MIDI Messages (EDIT Mode) .........................48 Assigning a MIDI Message on the A-PRO Keyboard.........................................................48 Note Assignments .......................................................................................................49 Aftertouch Assignment .............................................................................................50 Control Change Assignment ..........
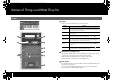
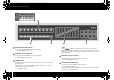
A-300_500_800C_e.book 8 ページ 2014年8月19日 火曜日 午後3時27分 Names of Things and What They Do Panel 2 1 1 Display This shows a variety of information, such as the current state. Indication Summary Alphanumeric characters When you operate a controller, the value of the parameter assigned to that controller is shown for a certain duration. Information such as the MIDI channel and program change is also shown. PRM MUTE When the cursor is located here, moving a controller will not transmit MIDI messages (p.
A-300_500_800C_e.book 9 ページ 2014年8月19日 火曜日 午後3時27分 Names of Things and What They Do 4 [ ] button, [ ] button You can use the [ ][ ] buttons to move the cursor that is shown at CTRL MAP, PGM CHANGE, MIDI CH, or USER ASSIGN in the display. 10 Bender lever Use this to change the pitch or apply vibrato. You can also assign a desired MIDI message to this lever as a controller. 0 “Assigning MIDI Messages” (p. 29) 5 Controllers [B1]–[B4] (button) You can assign any desired MIDI messages to these buttons.
A-300_500_800C_e.book 10 ページ 2014年8月19日 火曜日 午後3時27分 Names of Things and What They Do fig.Panel-Top.eps 11 12 13 11 Controllers [R1]–[R9] (knobs) You can assign the desired MIDI messages to these knobs. 0 “Assigning MIDI Messages” (p. 29) 12 Controllers [L1]–[L8] (button) You can assign the desired MIDI messages to these buttons. 0 “Assigning MIDI Messages” (p. 29) 13 [HOLD] button This button turns Hold on/off (a function that sustains the note even after you release the [A1]–[A8] pad).
A-300_500_800C_e.book 11 ページ 2014年8月19日 火曜日 午後3時27分 Names of Things and What They Do Side Panel * Any settings that you are in the process of editing will be lost when the power is turned off. If you have any settings that you want to keep, you should save them beforehand. fig.Panel-Side.eps * To restore power, turn the power on again. 18 USB connector Use this to connect the A-PRO to your computer via a USB cable.
A-300_500_800C_e.book 12 ページ 2014年8月19日 火曜日 午後3時27分 Installing the Driver A driver is software that transfers data between the A-PRO and the application software on your computer when the A-PRO is connected to your computer. Windows 8/Windows 7/Windows Vista Users Refer to the Roland website for the latest drivers and information about compatibility with the latest operating system versions. http://www.roland.
A-300_500_800C_e.book 13 ページ 2014年8月19日 火曜日 午後3時27分 Installing the Driver Windows Vista users Open “Control Panel,” click [System and Maintenance], and then click [System]. If the Control Panel shows the classic view, double-click the “System” icon. 5 7 To begin the installation, click [Next] once again. Installation will begin. fig.win7securitya-e.eps_36 A user account control confirmation screen will appear. Click [Yes] or [Continue]. fig.win7uac_e.
A-300_500_800C_e.book 14 ページ 2014年8月19日 火曜日 午後3時27分 Installing the Driver 11 When the installation is completed, the “A-PRO Driver Setup” dialog box will indicate “Installation has been completed.” Click [Close] to close the “A-PRO Driver Setup” dialog box. If the “System Settings Change” dialog box appears, click [Yes]. Windows will automatically restart. Now let’s check to make sure that installation was successful. 0 “Checking with a SONAR Soft Synths (Windows)” (p.
A-300_500_800C_e.book 15 ページ 2014年8月19日 火曜日 午後3時27分 Installing the Driver Windows XP Users Steps to be performed on the A-PRO keyboard itself are marked by a Operation of the A-PRO symbol. Don’t connect the A-PRO to your computer until you are told to do so. 1 With the A-PRO disconnected, start up Windows. If the “Software Installation” dialog box appears, click [Continue Anyway] to continue the installation.
A-300_500_800C_e.book 16 ページ 2014年8月19日 火曜日 午後3時27分 Installing the Driver 10 If you are asked whether you want to connect to Windows Update, choose [No, not this time] and click [Next]. fig.xpwupd-e.eps 11 12 If the “Hardware Installation” dialog box appears, click [Continue Anyway] to continue the installation. fig.xpdrv7-e.eps If you are unable to proceed, click [OK] in the dialog box to terminate the installation.
A-300_500_800C_e.book 17 ページ 2014年8月19日 火曜日 午後3時27分 Installing the Driver Mac OS X Users Steps to be performed on the A-PRO keyboard itself are marked by a Operation of the A-PRO symbol. Don’t connect the A-PRO to your computer until you are told to do so. * If a dialog box requesting a password appears during installation, enter a computer administrator’s user name and password and click the [Install Software] button or [OK] button. 8 In the next screen, click [Continue Installation].
A-300_500_800C_e.book 18 ページ 2014年8月19日 火曜日 午後3時27分 Installing the Driver 15 Verify that [A-PRO] is shown in the “MIDI Studio” or “Audio MIDI Settings” dialog box. New Device fig.osxaudiomidi1-e.eps 18 Device Name First A-PRO MIDI OUT Second A-PRO Third A-PRO MIDI IN Fourth A-PRO 1 Fifth A-PRO 2 Use the mouse to drag between the H and I symbols (representing input and output, respectively) of [A-PRO] and each [New Device] so that they are connected as shown in the illustration below.
A-300_500_800C_e.book 19 ページ 2014年8月19日 火曜日 午後3時27分 Installing the Driver Verifying that Installation was Successful Proceed as follows to verify that the driver was installed correctly. We will use SONAR LE as an example for Windows, and GarageBand as an example for Mac OS X. Checking with a SONAR Soft Synths (Windows) Here’s an example using a plug-in synth included with SONAR LE. The procedure or screens may differ if you’re using a different version.
A-300_500_800C_e.book 20 ページ 2014年8月19日 火曜日 午後3時27分 Installing the Driver Checking in GarageBand (Mac OS X) GarageBand is software that is included with Apple’s iLife. Here, the explanation assumes that you’re using GarageBand ‘11. The steps or screens may be different if you’re using a different version. 1 In the [Applications] folder, double-click [GarageBand]. 2 When GarageBand has started up, click the [File] menu item [New]. 3 In the “New Project” screen, assign a name and click [Create].
A-300_500_800C_e.book 21 ページ 2014年8月19日 火曜日 午後3時27分 Look what You Can Do with the A-PRO Play Use Control Maps When playing the A-PRO’s keyboard, you can select sounds in your sound module from the A-PRO. You can also play two sounds together (DUAL) or separately (SPLIT). About Control Maps For details, refer to “Performing (Play Mode)” (p. 41). Use ACT If you’re using SONAR, you can use the A-PRO as a controller for SONAR simply by pressing the A-PRO’s [ACT] button to turn it on.
A-300_500_800C_e.book 22 ページ 2014年8月19日 火曜日 午後3時27分 Using A-PRO Editor A-PRO Editor is software that lets you create control maps (p. 21) for the A-PRO series on your computer, and make settings for the keyboard. The graphical screen makes it easy to edit the values (settings). Installing A-PRO Editor fig.editor-mainwindow-e+.
A-300_500_800C_e.book 23 ページ 2014年8月19日 火曜日 午後3時27分 Using A-PRO Editor MIDI Port Assignments In order to transfer control maps between A-PRO Editor and the A-PRO keyboard, you’ll need to specify the MIDI ports used by A-PRO Editor. * If the A-PRO is connected via USB, the ports will be as follows. If you’re using a MIDI connection, specify the MIDI input port and MIDI output port of the MIDI device to which the A-PRO is connected, instead of “A-PRO 2” and “A-PRO.
A-300_500_800C_e.book 24 ページ 2014年8月19日 火曜日 午後3時27分 Using A-PRO Editor Items in the Windows Main Window Message Assignment Window fig.editor-mainwindow-e.eps fig.editor04-num-e.eps, fig.editor05-num-e.eps 1 2 3 4 1 7 2 3 4 6 8 5 * The items in the window will differ depending on the controller and on the type of message being assigned. 1 Title 1 Controller name You can assign a name to the control map you’re editing.
A-300_500_800C_e.book 25 ページ 2014年8月19日 火曜日 午後3時27分 Using A-PRO Editor 3 Message assignment area 7 Name Here you can specify the value of various parameters for the MIDI message you selected in the Assign Message selection list 2 . For details on the parameters of each MIDI message, refer to “Message Parameters” (p. 33) 4 Output Port 8 Virtual Center Click This specifies the USB port from which the MIDI messages will be transmitted to a USBconnected computer.
A-300_500_800C_e.book 26 ページ 2014年8月19日 火曜日 午後3時27分 Using A-PRO Editor 5 Keyboard range settings Keyboard Set Window Specify the lower limit of the UPPER part and the upper limit of the LOWER part. fig.keyboarset-e.eps 1 2 3 4 5 6 [Transmit], [Receive] Click [Transmit] if you want to save a keyboard set on the A-PRO. Click [Receive] if you want to load a keyboard set from the A-PRO. 7 Setting buttons Specify the button ([SPLIT]/[DUAL]/[LOWER]) for which you are assigning a keyboard set.
A-300_500_800C_e.book 27 ページ 2014年8月19日 火曜日 午後3時27分 Using A-PRO Editor Menus File Menu Options Menu Menu Explanation New Creates a new control map. The new control map will have no MIDI messages assigned to any of the controllers. Open Loads a control map that was saved in SMF format. For details, refer to “Loading a Control Map that was Saved on Your Computer” (p. 32). Save Saves the control map currently being edited by overwriting the SMF.
A-300_500_800C_e.book 28 ページ 2014年8月19日 火曜日 午後3時27分 Using A-PRO Editor Keyboard Shortcuts You can use the following keyboard shortcuts with A-PRO Editor.
A-300_500_800C_e.book 29 ページ 2014年8月19日 火曜日 午後3時27分 Using A-PRO Editor Using Control Maps Assigning MIDI Messages Here’s how to assign a MIDI message to each controller. fig.editor-assign1.eps 1 In the main window, click the controller to which you want to assign a MIDI message. fig.editor-assign4.eps 4 In the Output Port field, specify the MIDI output port. 5 If desired, enter a name in the Name field. 6 Click [OK]. fig.editor-assign2.
A-300_500_800C_e.book 30 ページ 2014年8月19日 火曜日 午後3時27分 Using A-PRO Editor Checking the Assigned MIDI Messages You can use either of the following two methods to check the MIDI messages that are assigned. Indication Meaning NO ASSIGN Viewing an assignment list Note If you want to use your Web browser to view an assignment list of the current control map, choose the [File] menu command [View Assign List]. This is a convenient way to view all of the control map’s settings.
A-300_500_800C_e.book 31 ページ 2014年8月19日 火曜日 午後3時27分 Using A-PRO Editor Receiving a Control Map from the A-PRO Transmitting a Control Map to the A-PRO If you want to use the control map settings created in A-PRO Editor on the A-PRO keyboard, use the following procedure to transmit the edited control map to the A-PRO keyboard.
A-300_500_800C_e.book 32 ページ 2014年8月19日 火曜日 午後3時27分 Using A-PRO Editor Saving a Control Map on Your Computer Control map settings you’ve edited in A-PRO Editor can not only be transferred directly between the A-PRO keyboard and your computer, they can also be saved on your computer as an SMF format file. To save an SMF file, proceed as follows. 1 Choose the [File] menu command [Save As]. If you want to overwrite the most recently opened file, choose the [File] menu command [Save].
A-300_500_800C_e.book 33 ページ 2014年8月19日 火曜日 午後3時27分 Using A-PRO Editor Message Parameters The setting items shown in the message assign window will depend on the MIDI message you’ve selected. This section explains the setting items for each MIDI message. Values for parameters are specified in decimal. For details on the Settings field, refer to “Message Assignment Window” (p. 24). NO ASSIGN Clears any message assignment. No message will be sent even if you operate a controller that’s set to NO ASSIGN.
A-300_500_800C_e.book 34 ページ 2014年8月19日 火曜日 午後3時27分 Using A-PRO Editor Channel Message Polyphonic Key Pressure Control Change Program Change Assign a polyphonic key pressure message. Assign a control change message. Assign a program change message (with a fixed program number). fig.editor-poly.eps fig.editor-cc.eps Specify the following parameters. Item Content fig.editor-pc.eps Specify the following parameters. Item Content Specify the following parameters.
A-300_500_800C_e.book 35 ページ 2014年8月19日 火曜日 午後3時27分 Using A-PRO Editor Channel Message Program Change (Min-Max) Bank Select + Program Change Program Change – Dec Assign a program change message (with a variable program number). Assign a bank select message and program change message (all values fixed). Assign the program change decrement function (PC DEC).
A-300_500_800C_e.book 36 ページ 2014年8月19日 火曜日 午後3時27分 Using A-PRO Editor Channel Message Program Change – Inc Assign the program change increment function (PC INC). This will transmit a program change number that is one greater than the program change number most recently transmitted in the A-PRO’s program change mode. RPN NRPN Assign a registered parameter number. fig.editor-rpn.eps Assign a non-registered parameter number. fig.editor-nrpn.eps fig.editor-pcinc.eps Specify the following parameters.
A-300_500_800C_e.book 37 ページ 2014年8月19日 火曜日 午後3時27分 Using A-PRO Editor Channel Message System Realtime/F6 Encoder Simulate Assign a function that simulates a rotary encoder. fig.editor-encsim.eps Assign a system realtime message or F6 (Tune Request). fig.editor-realtime.eps Specify the following parameters. Item For System Realtime/F6, use the Status field to choose the message you want to assign.
A-300_500_800C_e.book 38 ページ 2014年8月19日 火曜日 午後3時27分 Using A-PRO Editor System Ex. Table 1: Special characters used in the message entry field Assign a system exclusive message (System Ex.). You can enter up to twenty-four bytes. Special character fig.editor-sysex.eps Explanation DT Data insertion location The data specified by Data Type will be inserted.
A-300_500_800C_e.book 39 ページ 2014年8月19日 火曜日 午後3時27分 Using A-PRO Editor Free Message Tempo Assign a MIDI message. You can enter up to twenty-four bytes. You may assign more than one MIDI message if desired. Assign tempo control for transmitting MIDI CLOCK messages. fig.editor-tempo.eps fig.editor-freemsg.eps There are no parameters to specify. * This will not function if assigned to a button. Specify the following parameters. Item Content You can enter a MIDI message of up to twenty-four bytes.
A-300_500_800C_e.book 40 ページ 2014年8月19日 火曜日 午後3時27分 Using A-PRO Editor Using Keyboard Sets Receiving a Keyboard Set Transmitting a Keyboard Set If you want to use a keyboard set created in A-PRO Editor on the A-PRO keyboard, proceed as follows to transmit it. If you want to edit a keyboard set, use the following procedure to load the keyboard map data from the A-PRO, so that it can be edited. fig.keyboardset1.
A-300_500_800C_e.book 41 ページ 2014年8月19日 火曜日 午後3時27分 Performing (Play Mode) Use Play mode when you want to play the A-PRO’s keyboard or use its controllers to control your software or sound modules. Broadly speaking, the A-PRO has the following two modes. Convenient Performance Functions Here are some of the functions you will find convenient when you’re performing. Mode Explanation To select Play mode This is the mode in which you play the keyboard and operate the controllers.
A-300_500_800C_e.book 42 ページ 2014年8月19日 火曜日 午後3時27分 Performing (Play Mode) Specifying the Current Channel (MIDI Transmit Channel) Here’s how to specify the current channel on which performance data from the keyboard will be transmitted. What is the current channel? The current channel is the MIDI transmit select for the keyboard and bender lever. * Each controller can have its own separate transmit channel.
A-300_500_800C_e.book 43 ページ 2014年8月19日 火曜日 午後3時27分 Performing (Play Mode) Selecting Sounds (PROGRAM CHANGE/BANK) You can transmit program changes to select sounds on your sound module from the A-PRO. If you want to select a sound from a different bank, first use bank mode to transmit a bank select message that will switch the bank. Then transmit a program change message. The bank select message must be transmitted before the program change.
A-300_500_800C_e.book 44 ページ 2014年8月19日 火曜日 午後3時27分 Performing (Play Mode) Selecting the UPPER and LOWER Sounds The A-PRO’s keyboard provides two parts, UPPER and LOWER, and you can assign a different sound to each. Selecting the UPPER Sound Selecting the LOWER Sound The entire keyboard will play the LOWER sound. The entire keyboard will play the UPPER sound. fig.Upper-e.eps fig.Lower-e.eps UPPER 1 Press the [UPPER] button so it’s lit. 1 Press the [LOWER] button so it’s lit.
A-300_500_800C_e.book 45 ページ 2014年8月19日 火曜日 午後3時27分 Performing (Play Mode) Layering Two Sounds (DUAL) Playing Two Sounds Separately (SPLIT) The DUAL button lets you simultaneously play both the LOWER and UPPER sounds from the entire keyboard. fig.Dual-e.eps The SPLIT button lets you play the UPPER sound in the range of C4 and above, while playing the LOWER sound in the range of B3 and below. fig.Split.eps UPPER LOWER 1 Press the [DUAL] button so it’s lit.
A-300_500_800C_e.book 46 ページ 2014年8月19日 火曜日 午後3時27分 Performing (Play Mode) Adjusting the Playing Dynamics (VELOCITY) Normally, note messages are transmitted with a velocity value that corresponds to the force with which you play the keyboard. If desired, the A-PRO can also transmit notes with a fixed velocity value, regardless of your playing dynamics. This is convenient when you want to record notes into your DAW software at a fixed velocity.
A-300_500_800C_e.book 47 ページ 2014年8月19日 火曜日 午後3時27分 Performing (Play Mode) Muting the Controller Values (PRM MUTE) You can mute all controllers so that MIDI messages will not be transmitted when you move a controller.
A-300_500_800C_e.book 48 ページ 2014年8月19日 火曜日 午後3時27分 Assigning MIDI Messages (EDIT Mode) The A-PRO allows you to assign MIDI messages to each of its 44 controllers: [B1]–[B4], [R1]–[R9], [L1]–[L9], [S1]–[S9], [A1]–[A8], HOLD (P1), EXPRESSION (P2), BENDER, MODULATION, and AFTERTOUCH. Edit mode is used to make MIDI message assignments. This section of the manual explains how to assign MIDI messages to the controllers using only the A-PRO keyboard. You can also use A-PRO Editor to make assignments.
A-300_500_800C_e.book 49 ページ 2014年8月19日 火曜日 午後3時27分 Assigning MIDI Messages (EDIT Mode) Note Assignments Here’s how to assign a note message to a controller. In addition to their use in performance, note messages can also be used to control DAW software.
A-300_500_800C_e.book 50 ページ 2014年8月19日 火曜日 午後3時27分 Assigning MIDI Messages (EDIT Mode) Aftertouch Assignment Here’s how to assign an aftertouch message to a controller. A-PRO Editor lets you assign aftertouch messages for individual notes (Polyphonic Key Pressure) as well as channel aftertouch (Channel Pressure) (p. 34).
A-300_500_800C_e.book 51 ページ 2014年8月19日 火曜日 午後3時27分 Assigning MIDI Messages (EDIT Mode) Control Change Assignment Here’s how to assign a control change message to a controller. MIDI transmit channel Control change number Port Button mode 1–16 0–127 (00–7FH) PORT1 (fixed) UNLATCH, LATCH, INCREASE 1 Press the [ACT] button and [ 2 Slightly move the controller to which you want to assign a control change message. ] button simultaneously. If the controller is a button, press it.
A-300_500_800C_e.book 52 ページ 2014年8月19日 火曜日 午後3時27分 Assigning MIDI Messages (EDIT Mode) Program Change Assignment Here’s how to assign a program change message to a controller. MIDI transmit channel BANK MSB BANK LSB Program number Port 1–16 X X 0–127 (00–7FH) PORT1 (fixed) 1 Press the [ACT] button and [ 2 Slightly move the controller to which you want to assign a control change message. ] button simultaneously. If the controller is a button, press it.
A-300_500_800C_e.book 53 ページ 2014年8月19日 火曜日 午後3時27分 Assigning MIDI Messages (EDIT Mode) RPN/NRPN Assignment Here’s how to assign an RPN or NRPN to a controller. Data entry MSB (CC#6) range Data entry LSB (CC#38) range Port 0–127 (00–7FH) not transmitted PORT1 1 Press the [ACT] button and [ 2 Slightly move the controller to which you want to assign a control change message. ] button simultaneously. If the controller is a button, press it.
A-300_500_800C_e.book 54 ページ 2014年8月19日 火曜日 午後3時27分 Assigning MIDI Messages (EDIT Mode) Tempo Assignment You can assign the MIDI CLOCK speed (20–250) to a controller. In order to transmit MIDI CLOCK, the MIDI CLOCK setting must be “ON.” 0 “MIDI CLOCK ON/OFF” (p. 64) 1 Press the [ACT] button and [ 2 Slightly move the controller to which you want to assign tempo. ] button simultaneously. If the controller is a button, press it. The number of the selected controller will blink in the display.
A-300_500_800C_e.book 55 ページ 2014年8月19日 火曜日 午後3時27分 Assigning MIDI Messages (EDIT Mode) Button mode setting Virtual center click setting In Edit mode, when you assign a message to a button as described in “Assigning a MIDI Message on the A-PRO Keyboard” (p. 48), you can specify how the button will operate (the “button mode”).
A-300_500_800C_e.book 56 ページ 2014年8月19日 火曜日 午後3時27分 Assigning MIDI Messages (EDIT Mode) Convenient Functions Copying an Assignment Clearing an Assignment (NO ASSIGN) By using this function, a message assigned to a controller can be copied to a different controller. For example, if you want to assign similar messages to multiple controllers, assign the desired MIDI message to one of the controllers, and then use this function to copy that message to the assignment of the other controllers.
A-300_500_800C_e.book 57 ページ 2014年8月19日 火曜日 午後3時27分 System Settings (EDIT Mode) This section explains how to make system settings for the A-PRO. System settings include the following items. Category LCD Item Contents Factory setting See page LCD CONTRAST Adjusts the LCD contrast. 5 p. 59 KEYBOARD VELOCITY CURVE Specifies how velocity will change in response to keyboard dynamics (velocity curve). 1-MEDIUM p. 60 KEYBOARD AFTERTOUCH CURVE Specifies how keyboard aftertouch will respond. 1 p.
A-300_500_800C_e.book 58 ページ 2014年8月19日 火曜日 午後3時27分 System Settings (EDIT Mode) Category Other 58 Item Contents Factory setting See page H-ACTIVITY ON/OFF Turn this on when using specific applications (such as Pro Tools LE). If this is On, the message “90 00 7F” will be transmitted from “A-PRO 2” at intervals of approximately 500 ms. OFF p. 69 L9 FUNCTION Specifies the function of the [HOLD] button. HOLD p.
A-300_500_800C_e.book 59 ページ 2014年8月19日 火曜日 午後3時27分 System Settings (EDIT Mode) LCD Contrast Setting LCD CONTRAST If you find the text in the display difficult to read, you can adjust the contrast as follows. The brightness of the screen may be affected by environmental conditions such as temperature. 1 Simultaneously press the [ACT] button and the [ 2 Use the [VALUE] knob to select “LCD CONTRAST,” and press the [ENTER] button. 3 Use the [VALUE] knob to adjust the contrast. ] button.
A-300_500_800C_e.book 60 ページ 2014年8月19日 火曜日 午後3時27分 System Settings (EDIT Mode) Keyboard-related Settings KEYBOARD VELOCITY CURVE Here’s how to change the velocity curve, which specifies how the transmitted velocity value will correspond to your keyboard playing dynamics. 1 Simultaneously press the [ACT] button and the [ 2 Use the [VALUE] knob to select “KEYBOARD/PAD,” and press the [ENTER] button. ] button. Number Setting 1 1-LIGHT 2 1-MEDIUM fig.lcd-KBDVELOCURVE.
A-300_500_800C_e.book 61 ページ 2014年8月19日 火曜日 午後3時27分 System Settings (EDIT Mode) KEYBOARD AFTERTOUCH CURVE KEYBOARD PORT SET Here’s how to specify the way that keyboard aftertouch will respond. 1 Simultaneously press the [ACT] button and the [ 2 Use the [VALUE] knob to select “KEYBOARD/PAD,” and press the [ENTER] button. Here’s how to specify the port from which performance data for the keyboard and bender lever will be transmitted. ] button.
A-300_500_800C_e.book 62 ページ 2014年8月19日 火曜日 午後3時27分 System Settings (EDIT Mode) KEYBOARD ACTIVE PART SHIFT KEY LATCH Here’s how to specify the part that will be affected by the [VALUE] knob, BENDER, MODULATION, AFTERTOUCH, HOLD, and EXPRESSION controllers. 1 Simultaneously press the [ACT] button and the [ 2 Use the [VALUE] knob to select “KEYBOARD/PAD,” and press the [ENTER] button.
A-300_500_800C_e.book 63 ページ 2014年8月19日 火曜日 午後3時27分 System Settings (EDIT Mode) Pad-related Settings PAD VELOCITY CURVE PAD AFTERTOUCH CURVE Here’s how to specify the way in which the force of your strike on the controller pads [A1]–[A8] will affect the velocity that is transmitted. 1 Simultaneously press the [ACT] button and the [ 2 Use the [VALUE] knob to select “KEYBOARD/PAD,” and press the [ENTER] button. ] button. fig.lcd-PADVELOCURVE.
A-300_500_800C_e.book 64 ページ 2014年8月19日 火曜日 午後3時27分 System Settings (EDIT Mode) Clock-related Settings MIDI CLOCK ON/OFF MIDI CLOCK OUTPUT PORT Here’s how to specify whether MIDI CLOCK will be transmitted. This setting specifies the port from which MIDI clock will be output when “MIDI CLOCK ON/OFF” is On. 1 Simultaneously press the [ACT] button and the [ 2 Use the [VALUE] knob to select “MIDI CLOCK,” and press the [ENTER] button.
A-300_500_800C_e.book 65 ページ 2014年8月19日 火曜日 午後3時27分 System Settings (EDIT Mode) USB-related Settings ADVANCED DRIVER MODE Here’s how to turn ADVANCED DRIVER MODE on/off. We recommend that you normally leave this On. If you change this setting, the new setting will take force after you’ve turned the power off, then on again. 1 Simultaneously press the [ACT] button and the [ 2 Use the [VALUE] knob to select “USB SETTING,” and press the [ENTER] button.
A-300_500_800C_e.book 66 ページ 2014年8月19日 火曜日 午後3時27分 System Settings (EDIT Mode) MIDI-related Settings MIDI I/F SWITCH This setting specifies whether the MIDI connectors will be used as a MIDI interface. 1 Simultaneously press the [ACT] button and the [ 2 Use the [VALUE] knob to select “MIDI SETTING,” and press the [ENTER] button. ] button. Setting 3 Use the [VALUE] knob to select “MIDI I/F SWITCH,” and press the [ENTER] button. 4 Use the [VALUE] knob to specify the MIDI I/F setting.
A-300_500_800C_e.book 67 ページ 2014年8月19日 火曜日 午後3時27分 System Settings (EDIT Mode) MIDI MERGE DESTINATION The A-PRO provides a [MIDI MERGE] switch (p. 11). Here’s how to specify the port that will be merged as the MIDI MERGE DESTINATION when the [MIDI MERGE] switch is On. The MIDI MERGE function is convenient when an external MIDI controller other than the A-PRO is connected to the A-PRO’s MIDI IN connector.
A-300_500_800C_e.book 68 ページ 2014年8月19日 火曜日 午後3時27分 System Settings (EDIT Mode) Control Map Settings [VALUE] knob Settings STARTUP MEMORY FUNCTION Here you can specify which control map is to be called up when the A-PRO is powered up. 1 Simultaneously press the [ACT] button and the [ 2 Use the [VALUE] knob to select “SYSTEM SETTING,” and press the [ENTER] button. Here you can specify the function that is to be controlled by the [VALUE] knob when the cursor is located at USER ASSIGN. ] button.
A-300_500_800C_e.book 69 ページ 2014年8月19日 火曜日 午後3時27分 System Settings (EDIT Mode) Other Settings H-ACTIVITY ON/OFF L9 FUNCTION Turn this On when using certain applications (such as Pro Tools LE). If this is On, the message “90 00 7F” will be transmitted to “A-PRO 2” at intervals of approximately 500 ms. 1 Simultaneously press the [ACT] button and the [ 2 Use the [VALUE] knob to select “SYSTEM SETTING,” and press the [ENTER] button. This specifies the function of the [HOLD] button.
A-300_500_800C_e.book 70 ページ 2014年8月19日 火曜日 午後3時27分 System Settings (EDIT Mode) OMNI Making the Power Automatically Turn Off After a Time (AUTO OFF) Refer to “What is OMNI?” (p. 42). When not connected to a computer, the unit will automatically be switched off four hours after you stop playing or operating it (if the factory settings have been unmodified). If you don’t want the unit to turn off automatically, change the “AUTO OFF” setting to “OFF” as described below.
A-300_500_800C_e.book 71 ページ 2014年8月19日 火曜日 午後3時27分 Appendices ] Two MIDI Ports If the A-PRO is connected to your computer via USB, the A-PRO will be able to use two MIDI output ports (PORT 1 and PORT 2). Each controller of the A-PRO can be assigned to send its MIDI messages to either port. For details on how to make this assignment, refer to “Using Control Maps” (p. 29) or “Assigning a MIDI Message on the A-PRO Keyboard” (p. 48). fig.MIDI-port1-e.
A-300_500_800C_e.book 72 ページ 2014年8月19日 火曜日 午後3時27分 Appendices Connecting the A-PRO Directly to a Sound Module You can connect the A-PRO connected directly to a MIDI sound module, and use it to play and control the sound module. If you’re not connecting the A-PRO to your computer via USB, you’ll need to use a separately available AC adaptor. You can purchase the appropriate AC adaptor from your dealer. fig.MIDI-External-e.
A-300_500_800C_e.book 73 ページ 2014年8月19日 火曜日 午後3時27分 Appendices About Standard Driver Mode Use this mode if you want to use the standard driver provided by your operating system. Installing the Standard Driver 1 Switch off “ADVANCED DRIVER MODE” (p. 65). 2 3 Close all currently running software. Input/output Device Settings In order to use the A-PRO with your software, you’ll need to choose the A-PRO as the MIDI input/output device.
A-300_500_800C_e.book 74 ページ 2014年8月19日 火曜日 午後3時27分 Troubleshooting If you experience problems, read this chapter first. It contains information that will help you solve the problem. * For help with Windows or Mac OS X operation, refer to the documentation for your computer or operating system. Problems when Installing the Driver Can’t start up the installer Is the CD-ROM inserted correctly in your CD-ROM drive? Make sure that the CD-ROM is correctly inserted in the CD-ROM drive.
A-300_500_800C_e.book 75 ページ 2014年8月19日 火曜日 午後3時27分 Troubleshooting Installation is not successfully completed when you connect the A-PRO Could the A-PRO’s ADVANCED DRIVER mode switch be OFF? Refer to “ADVANCED DRIVER MODE” (p. 65) and set the A-PRO’s ADVANCED DRIVER MODE to ON. Then, install the driver again. After you connect the A-PRO, it may take several tens of seconds or several minutes before it is recognized by your computer. This is not a malfunction.
A-300_500_800C_e.book 76 ページ 2014年8月19日 火曜日 午後3時27分 Troubleshooting Problems with Settings Can’t select/use the A-PRO within software or in system settings Could the A-PRO be in use by other software? Close all software you currently have running. Next, switch off the A-PRO’s power, then turn it back on again. If this does not solve the problem, reinstall the driver. 0 “Reinstalling the driver” (p. 80) Is the driver installed correctly? Driver installation may have failed. Please reinstall the driver.
A-300_500_800C_e.book 77 ページ 2014年8月19日 火曜日 午後3時27分 Troubleshooting Problems when Playing Playback contains clicks, dropouts, or other problems Check the power management settings You may be able to eliminate clicks and pops by changing your system’s power management settings. 0 “Power management settings” (p. 81) Try updating the driver of your display adaptor (Windows) You may be able to eliminate clicks and pops by updating the driver for the display adaptor installed in your computer.
A-300_500_800C_e.book 78 ページ 2014年8月19日 火曜日 午後3時27分 Troubleshooting Can’t play Was the driver installed correctly? Driver installation may have failed. Reinstall the driver. 0 “Reinstalling the driver” (p. 80) Did you make input/output device settings for your software? Refer to the owner’s manual of your software and to the following pages, and select the A-PRO as the input/output device. • Windows : 0 “Checking with a SONAR Soft Synths (Windows)” (p.
A-300_500_800C_e.book 79 ページ 2014年8月19日 火曜日 午後3時27分 Troubleshooting Other Problems Deleting the Driver If the computer does not detect the A-PRO correctly, use the following procedure to delete the driver, and then install the driver again as described in “Installing the Driver” (p. 12). Windows users 1 Start up the computer without the A-PRO connected. Mac OS X users 1 Start up the computer without the A-PRO connected.
A-300_500_800C_e.book 80 ページ 2014年8月19日 火曜日 午後3時27分 Troubleshooting Reinstalling the driver Driver signing options setting (Windows XP) If you experience problems installing the driver, use the following procedure and reinstall the driver. 1 Delete the A-PRO’s driver. 2 Install the driver again as described in “Installing the Driver” (p. 12). If the“Driver Signing Options” setting is set to [Block], you cannot install the driver. Configure as follows.
A-300_500_800C_e.book 81 ページ 2014年8月19日 火曜日 午後3時27分 Troubleshooting Power management settings If the sound is interrupted during a performance or if sounds are missing, you may be able to resolve the problem by changing the computer’s power management settings. Windows 8/Windows 7/Windows Vista users 1 Open the “Control Panel,” click [System and Security] or [System and Maintenance], and then click [Power Options]. Mac OS X users This setting is not available on certain versions of Mac OS X.
A-300_500_800C_e.book 82 ページ 2014年8月19日 火曜日 午後3時27分 MIDI Implementation Chart Model: A-300PRO/500PRO/800PRO Date : Jan. 16, 2010 Version : 1.00 Transmitted Function...
A-300_500_800C_e.
A-300_500_800C_e.book 84 ページ 2014年8月19日 火曜日 午後3時27分 Index A AC Adaptor ................................................................... 72 ACT ................................................................................... 21 [ACT] Button ................................................................... 8 ADVANCED DRIVER MODE ...................................... 65 ADVANCED DRIVER SWITCH ................................... 57 AFT Mode ..........................................................
A-300_500_800C_e.book 85 ページ 2014年8月19日 火曜日 午後3時27分 Index Loading a Control Map that was Saved on Your Computer ...................................................................... 32 LOWER ..................................................................... 44, 45 [LOWER] Button ............................................................. 9 LSB ................................................................................... 68 M Mac OS X ........................................................
A-300_500_800C_e.book 86 ページ 2014年8月19日 火曜日 Index U Uninstall the driver Windows ................................................................. 79 UNLATCH ....................................................................... 55 Unlatch ........................................................................... 25 UPPER ....................................................................... 44, 45 [UPPER] Button .............................................................. 9 USB ...................
A-300_500_800C_e.book 87 ページ 2014年8月19日 火曜日 午後3時27分 Controlling SONAR or SONAR LE from the A-PRO Series The A-PRO series is compatible with SONAR or software in the SONAR LE series (hereafter collectively referred to simply as “SONAR”). After installing the A-PRO control surface plug-in, you’ll be able to use a keyboard from the A-PRO series for controlling SONAR, using the ACT function. Installation Procedure Making the Settings for SONAR 1 Launch SONAR. 2 Access the control surface screen.
A-300_500_800C_e.book 88 ページ 2014年8月19日 火曜日 午後3時27分 Controlling SONAR or SONAR LE from the A-PRO Series Procedure 1 Access the A-PRO control surface plug-in screen. SONAR X1 or later/SONAR LE From the SONAR menu, click [Utilities] - [A-PRO-1]. SONAR 8.5 or earlier From SONAR’s menus, click [Tools] - [A-PRO-1]. 2 Click the [ENABLE] button on the A-PRO control surface plug-in.
A-300_500_800C_e.book 89 ページ 2014年8月19日 火曜日 午後3時27分 Using an A-PRO Series Unit to Control Logic Pro/Express or GarageBand The A-PRO series is compatible with music production software from Apple, including Logic Pro/Express and GarageBand. After installing the relevant A-PRO control surface plug-in (either the one for Logic Pro/ Express or the one for GarageBand) in your Mac, you’ll conveniently and easily be able to control Logic Pro/Express or GarageBand from your A-PRO series unit.
A-300_500_800C_e.book 90 ページ 2014年8月19日 火曜日 午後3時27分 Using an A-PRO Series Unit to Control Logic Pro/Express or GarageBand Parameters that can be Controlled Using the A-PRO After installing the relevant A-PRO control surface plug-in (either the one for Logic Pro/ Express or the one for GarageBand) in your Mac, you’ll be able to control the following parameters. For more detailed information, refer to Readme_E.pdf which can be found in the A-PRO_CSP folder on the A-PRO CD-ROM.
A-300_500_800C_e.
A-300_500_800C_e.book 92 ページ 2014年8月19日 火曜日 午後3時27分 a For the U.K. IMPORTANT: THE WIRES IN THIS MAINS LEAD ARE COLOURED IN ACCORDANCE WITH THE FOLLOWING CODE. BLUE: BROWN: NEUTRAL LIVE As the colours of the wires in the mains lead of this apparatus may not correspond with the coloured markings identifying the terminals in your plug, proceed as follows: The wire which is coloured BLUE must be connected to the terminal which is marked with the letter N or coloured BLACK.
A-300_500_800C_e.book 93 ページ 2014年8月19日 火曜日 午後3時27分 For EU Countries This product complies with the requirements of EMC Directive 2004/108/EC. For the USA FEDERAL COMMUNICATIONS COMMISSION RADIO FREQUENCY INTERFERENCE STATEMENT This equipment has been tested and found to comply with the limits for a Class B digital device, pursuant to Part 15 of the FCC Rules. These limits are designed to provide reasonable protection against harmful interference in a residential installation.
A-300_500_800C_e.
Contents of the Package For China The package of the A-300PRO/500PRO/800PRO (which we’ll subsequently refer to as the A-PRO) contains the following items. When you open the package, first make sure that all items are included. If any are missing, contact the dealer where you purchased the A-PRO. MIDI keyboard controller A-PRO USB cable Use this cable to connect the A-PRO to the USB connector of your computer. For details on connections, refer to “Installing the Driver” (p. 12).
* 5 1 0 0 0 4 3 8 1 4 - 0 6 *