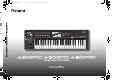
A-300_500_800C_g02.
A-300_500_800C_g02.book 2 ページ 2014年7月25日 金曜日 午後1時58分 Packungsinhalt Die Verpackung des A-300PRO/500PRO/800PRO (die wir im Folgenden einheitlich A-PRO nennen) enthält die folgenden Gegenstände. Vergewissern Sie sich beim ersten Öffnen der Verpackung, dass keine Komponenten fehlen. Falls Teile fehlen, wenden Sie sich an den Händler, bei dem Sie den A-PRO gekauft haben. MIDI-Keyboard-Controller A-PRO USB-Kabel Verwenden Sie dieses Kabel, um den A-PRO mit dem USB-Anschluss Ihres Computers zu verbinden.
A-300_500_800C_g02.book 3 ページ 2014年7月25日 金曜日 午後1時58分 SICHERER BETRIEB DES GERÄTES ANWEISUNGEN ZUR VERMEIDUNG VON FEUER, ELEKTRISCHEM SCHLAG ODER PERSONENSCHÄDEN Über die Hinweise WARNUNG ACHTUNG WARNUNG und ACHTUNG Über die Symbole WARNUNG • Verwenden Sie ausschließlich das mitgelieferte Netzkabel. Das mitgelieferte Netzkabel darf außerdem mit keinem anderen Gerät verwendet werden.
A-300_500_800C_g02.
A-300_500_800C_g02.book 5 ページ 2014年7月25日 金曜日 午後1時58分 WICHTIGE HINWEISE Stromversorgung • Schließen Sie dieses Gerät nicht an eine Steckdose an, die bereits an ein Elektrogerät mit Umrichter (z.B. Kühlschrank, Waschmaschine, Mikrowelle, Klimaanlage) oder mit Elektromotor angeschlossen ist. Je nach Verwendung des Elektrogeräts können Interferenzen in der Stromversorgung zu Fehlfunktionen dieses Geräts führen bzw. hörbare Störgeräusche verursachen.
A-300_500_800C_g02.book 6 ページ 2014年7月25日 金曜日 午後1時58分 Inhalt Packungsinhalt.................................................................. 2 SICHERER BETRIEB DES GERÄTES .................................... 3 WICHTIGE HINWEISE ......................................................... 5 Bezeichnungen und Funktionen der Bedienelemente .. 8 Bedienfeld .........................................................................................................................................
A-300_500_800C_g02.book 7 ページ 2014年7月25日 金曜日 午後1時58分 Inhalt Zuweisung von MIDI-Meldungen (EDIT-Modus) ..........48 Zuweisen einer MIDI-Meldung am A-PRO-Keyboard ......................................................48 Notenzuweisungen.....................................................................................................49 Aftertouch-Zuweisung ..............................................................................................50 Control Change-Zuweisung .........................
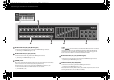
A-300_500_800C_g02.book 8 ページ 2014年7月25日 金曜日 午後1時58分 Bezeichnungen und Funktionen der Bedienelemente Bedienfeld 1 Display Im Display werden verschiedene Informationen, z. B. der aktuelle Status, angezeigt. 1 2 3 4 5 6 7 8 9 Anzeige Zusammenfassung Alphanumerische Zeichen Bei der Betätigung eines Bedienelementes wird der Wert des Parameters, der diesem Bedienelement zugewiesen ist, für bestimmte Zeit angezeigt. Auch Informationen wie MIDI-Kanal und Programmwechsel werden angezeigt.
A-300_500_800C_g02.book 9 ページ 2014年7月25日 金曜日 午後1時58分 Bezeichnungen und Funktionen der Bedienelemente 4 [ ]-Taste, [ ]-Taste Mit den Tasten [ ][ ] können Sie den Cursor bewegen, der sich im Display auf CTRL MAP, PGM CHANGE, MIDI CH oder USER ASSIGN befindet. 5 Bedienelemente [B1]–[B4] (Tasten) 10 Bender-Hebel Verwenden Sie diesen, um die Tonhöhe zu verändern oder ein Vibrato zu erzeugen. Sie können diesem Bedienelement auch eine beliebige andere MIDI-Meldung zuweisen.
A-300_500_800C_g02.book 10 ページ 2014年7月25日 金曜日 午後1時58分 Bezeichnungen und Funktionen der Bedienelemente 11 12 13 11 Bedienelemente [R1]–[R9] (Drehregler) Sie können diesen Drehreglern die gewünschten MIDI-Meldungen zuweisen. 0„Zuweisung von MIDI-Meldungen“ (S. 29) 12 Bedienelemente [L1]–[L8] (Tasten) Sie können diesen Tasten die gewünschten MIDI-Signale zuweisen. 0„Zuweisung von MIDI-Meldungen“ (S.
A-300_500_800C_g02.book 11 ページ 2014年7月25日 金曜日 午後1時58分 Bezeichnungen und Funktionen der Bedienelemente Seitliches Bedienfeld Wenn Sie nicht möchten, dass sich das Gerät automatisch abschaltet, schalten Sie die AUTO-OFF-Funktion aus (S. 70). * Jegliche Einstellungen, die Sie gerade bearbeiten, gehen verloren, wenn das Gerät abgeschaltet wird. Wenn Sie Einstellungen vorgenommen haben, die Sie behalten möchten, sollten Sie diese vorher speichern.
A-300_500_800C_g02.book 12 ページ 2014年7月25日 金曜日 午後1時58分 Treiber installieren Ein Treiber ist eine Software zur Übertragung von Daten zwischen dem A-PRO und der Anwendungssoftware auf Ihrem Computer. Hierfür muss der A-PRO am Computer angeschlossen sein.
A-300_500_800C_g02.book 13 ページ 2014年7月25日 金曜日 午後1時58分 Treiber installieren Anwender von Windows Vista Öffnen Sie „Systemsteuerung“, klicken Sie auf [System und Wartung] und klicken Sie dann auf [System]. Wenn die Systemsteuerung in klassischer Ansicht erscheint, klicken Sie auf das Symbol „System“. 5 7 Um mit der Installation zu beginnen, klicken Sie ein weiteres Mal auf [Weiter]. Die Installation beginnt. Es erscheint ein Bildschirm zur Bestätigung der Benutzerkontensteuerung.
A-300_500_800C_g02.book 14 ページ 2014年7月25日 金曜日 午後1時58分 Treiber installieren 10 Bedienung des A-PRO Stellen Sie den Netzschalter [POWER] des A-PRO auf USB. Der Treiber wird automatisch installiert. 11 Ist die Installation abgeschlossen, erscheint im Dialogfenster „A-PRO Treiber-Setup“ der Hinweis „Installation wurde abgeschlossen“. Klicken Sie auf [Schließen], um das Dialogfenster „A-PRO TreiberSetup“ zu schließen.
A-300_500_800C_g02.book 15 ページ 2014年7月25日 金曜日 午後1時58分 Treiber installieren Anwender von Windows XP Die an Ihrem A-PRO auszuführenden Schritte sind mit dem Symbol Bedienung des A-PRO aufgefordert werden. 1 gekennzeichnet. Schließen Sie den A-PRO so lange nicht an Ihrem Computer an, bis Sie dazu Starten Sie Windows, während der A-PRO noch nicht angeschlossen ist. Wenn das Dialogfenster „Softwareinstallation“ angezeigt wird, klicken Sie auf [Installation fortsetzen], um die Installation fortzusetzen.
A-300_500_800C_g02.book 16 ページ 2014年7月25日 金曜日 午後1時58分 Treiber installieren 10 Wenn Sie gefragt werden, ob Sie eine Verbindung zu Windows Update herstellen möchten, wählen Sie [Nein, diesmal nicht], und klicken Sie auf [Weiter]. 11 Wählen Sie [Software automatisch installieren (Empfohlen)], und klicken Sie auf [Weiter]. 12 Wenn das Dialogfenster „Hardwareinstallation“ angezeigt wird, klicken Sie auf [Installation fortsetzen], um die Installation fortzusetzen.
A-300_500_800C_g02.book 17 ページ 2014年7月25日 金曜日 午後1時58分 Treiber installieren Anwender von Mac OS X Die an Ihrem A-PRO auszuführenden Schritte sind mit dem Symbol Bedienung des A-PRO aufgefordert werden. gekennzeichnet.
A-300_500_800C_g02.book 18 ページ 2014年7月25日 金曜日 午後1時58分 Treiber installieren 15 Vergewissern Sie sich, dass im Dialogfenster „MIDI Studio“ oder „Audio-MIDI-Setup“ der Eintrag [A-PRO] angezeigt wird.
A-300_500_800C_g02.book 19 ページ 2014年7月25日 金曜日 午後1時58分 Treiber installieren Überprüfen, ob die Installation erfolgreich war Gehen Sie wie folgt vor, um zu überprüfen, dass der Treiber korrekt installiert wurde. Wir werden hier SONAR LE als Beispiel für Windows und GarageBand als Beispiel für Mac OS X verwenden. Prüfen mit einem SONAR Soft Synth (Windows) Es folgt ein Beispiel der Anwendung eines mit SONAR LE gelieferten Plug-inSynthesizers.
A-300_500_800C_g02.book 20 ページ 2014年7月25日 金曜日 午後1時58分 Treiber installieren Prüfen in GarageBand (Mac OS X) GarageBand ist eine Software, die in iLife von Apple enthalten ist. Die folgenden Beschreibungen gehen davon aus, dass Sie GarageBand ‘11 verwenden. Bei Einsatz anderer Versionen können die Bedienungsschritte und Bildschirmdarstellungen abweichen. 1 Doppelklicken Sie im Ordner [Programme] auf den Eintrag [GarageBand].
A-300_500_800C_g02.book 21 ページ 2014年7月25日 金曜日 午後1時58分 Was Sie mit dem A-PRO machen können Spielen Wenn Sie auf der Tastatur des A-PRO spielen, können Sie vom A-PRO aus die Sounds in Ihrem Klangerzeuger umschalten. Sie können auch gleichzeitig zwei Sounds zusammen (DUAL) oder separat (SPLIT) spielen. Näheres erfahren Sie unter „Spielen (Play-Modus)“ (S. 41).
A-300_500_800C_g02.book 22 ページ 2014年7月25日 金曜日 午後1時58分 Einsatz von A-PRO Editor A-PRO Editor ist eine Software, mit der Sie Control Maps (Steuerzuordnungen) (S. 21) für die A-PRO-Serie auf Ihrem Computer erstellen und Einstellungen für das Keyboard vornehmen können. Auf der graphischen Benutzeroberfläche können Werte und Einstellungen bequem bearbeitet werden.
A-300_500_800C_g02.book 23 ページ 2014年7月25日 金曜日 午後1時58分 Einsatz von A-PRO Editor Zuweisungen der MIDI-Ports Um Control Maps zwischen A-PRO Editor und dem A-PRO-Keyboard zu übertragen, müssen Sie die von A-PRO Editor verwendeten MIDI-Ports angeben. * Wenn der A-PRO über USB angeschlossen ist, sind die Port-Zuweisungen wie folgt.
A-300_500_800C_g02.book 24 ページ 2014年7月25日 金曜日 午後1時58分 Einsatz von A-PRO Editor Die Einträge in den Fenstern Hauptfenster Fenster für die Zuweisung von Meldungen 1 2 3 4 1 7 2 3 4 6 8 5 * Die Einträge im Fenster hängen vom Bedienelement und der Art der zuzuweisenden Meldung ab. 1 Title Sie können der momentan bearbeiteten Control Map einen Namen zuweisen. Für den Namen der Control Map können nur alphanumerische Zeichen bestehend aus einem Byte verwendet werden.
A-300_500_800C_g02.book 25 ページ 2014年7月25日 金曜日 午後1時58分 Einsatz von A-PRO Editor 3 Bereich für die Zuweisung von Meldungen Hier können Sie den Wert der verschiedenen Parameter der MIDI-Meldung angeben, die Sie in der Liste Assign Message ausgewählt haben 2 . Näheres zu den Parametern jeder MIDI-Meldung finden Sie auf „Die Parameter der Meldungen“ (S. 33). 4 Output Port Hier wird der USB-Port angegeben, über den die MIDI-Meldungen an einen über USB angeschlossenen Computer ausgegeben werden.
A-300_500_800C_g02.book 26 ページ 2014年7月25日 金曜日 午後1時58分 Einsatz von A-PRO Editor 5 Einstellungen für die Tastaturbereiche Keyboard-Set-Fenster 1 2 Gibt die untere Grenze des UPPER-Parts und die obere Grenze des LOWER-Parts an. 3 4 5 6 [Transmit], [Receive] Klicken Sie auf [Transmit] (Senden), wenn Sie ein Keyboard-Set auf dem A-PRO speichern möchten. Klicken Sie auf [Receive] (Empfangen), wenn Sie ein Keyboard-Set vom A-PRO laden möchten.
A-300_500_800C_g02.book 27 ページ 2014年7月25日 金曜日 午後1時58分 Einsatz von A-PRO Editor Menüs File-Menü Options-Menü Menü Erläuterung New Erzeugt eine neue Control Map. In der neuen Control Map sind keine MIDI-Meldungen irgendwelchen Bedienelementen zugewiesen. Open Lädt eine Control Map, die im SMF-Format gespeichert wurde. Näheres erfahren Sie unter „Laden einer auf Ihrem Computer gespeicherten Control Map“ (S. 32).
A-300_500_800C_g02.book 28 ページ 2014年7月25日 金曜日 午後1時58分 Einsatz von A-PRO Editor Kurzbefehle Sie können die folgenden Kurzbefehle für A-PRO Editor verwenden.
A-300_500_800C_g02.book 29 ページ 2014年7月25日 金曜日 午後1時58分 Einsatz von A-PRO Editor Verwenden von Control Maps Zuweisung von MIDI-Meldungen Hier erfahren Sie, wie Sie einzelnen Bedienelementen eine MIDI-Meldung zuweisen können. 1 2 3 Klicken Sie im Hauptfenster auf das Symbol des Bedienelements, dem Sie eine MIDI-Meldung zuweisen möchten. Verwenden Sie im Fenster für die Zuweisung von Meldungen das Feld Assign Message, um die Art der MIDI-Meldung auszuwählen, die Sie zuweisen möchten.
A-300_500_800C_g02.book 30 ページ 2014年7月25日 金曜日 午後1時58分 Einsatz von A-PRO Editor Prüfen der zugewiesenen MIDI-Meldungen Mit einer der folgenden beiden Methoden können Sie die zugewiesenen MIDIMeldungen überprüfen. Anzeige Bedeutung NO ASSIGN Betrachten einer Zuweisungsliste Note Wenn Sie Ihren Web-Browser verwenden möchten, um eine Zuweisungsliste der aktuellen Control Map zu betrachten, wählen Sie im [File]-Menü den Befehl [View Assign List].
A-300_500_800C_g02.book 31 ページ 2014年7月25日 金曜日 午後1時58分 Einsatz von A-PRO Editor Empfangen einer Control Map vom A-PRO Senden einer Control Map zum A-PRO Wenn Sie die in A-PRO Editor bearbeiteten Control-Map-Einstellungen im A-PROKeyboard verwenden möchten, gehen Sie wie folgt vor, um die Control-Map-Daten zum A-PRO-Keyboard zu senden.
A-300_500_800C_g02.book 32 ページ 2014年7月25日 金曜日 午後1時58分 Einsatz von A-PRO Editor Speichern einer Control Map auf Ihrem Computer Laden einer auf Ihrem Computer gespeicherten Control Map Control-Map-Einstellungen, die Sie in A-PRO Editor bearbeitet haben, können nicht nur direkt zwischen A-PRO-Keyboard und Ihrem Computer übertragen werden, sie lassen sich auch auf Ihrem Computer als Datei im SMF-Format speichern. Zum Speichern einer SMF-Datei gehen Sie vor wie folgt.
A-300_500_800C_g02.book 33 ページ 2014年7月25日 金曜日 午後1時58分 Einsatz von A-PRO Editor Die Parameter der Meldungen Die im Fenster für die Zuweisung von Meldungen angezeigten, einstellbaren Einträge hängen ab von der ausgewählten MIDI-Meldung. Dieser Abschnitt beschreibt die für jede MIDI-Meldung einstellbaren Einträge. Die Parameterwerte sind in dezimaler Form angegeben. Näheres zum Settings-Feld erfahren Sie unter „Fenster für die Zuweisung von Meldungen“ (S. 24).
A-300_500_800C_g02.book 34 ページ 2014年7月25日 金曜日 午後1時58分 Einsatz von A-PRO Editor Channel Message Polyphonic Key Pressure Control Change Program Change Weisen Sie eine Polyphonic-Key-Pressure-Meldung zu. Weisen Sie eine Controller-Meldung zu. Weisen Sie eine Programmwechselmeldung zu (mit fester Programmnummer). Geben Sie die folgenden Parameter ein. Geben Sie die folgenden Parameter ein. Geben Sie die folgenden Parameter ein.
A-300_500_800C_g02.book 35 ページ 2014年7月25日 金曜日 午後1時58分 Einsatz von A-PRO Editor Channel Message Program Change (Min-Max) Bank Select + Program Change Program Change – Dec Weisen Sie eine Programmwechselmeldung zu (mit variabler Programmnummer). Weisen Sie eine Bank-Select-Meldung und eine Programmwechselmeldung zu (alle Werte festgelegt). Weisen Sie die Dekrementieren-Funktion für Programmwechsel zu (PC DEC).
A-300_500_800C_g02.book 36 ページ 2014年7月25日 金曜日 午後1時58分 Einsatz von A-PRO Editor Channel Message Program Change – Inc RPN NRPN Weisen Sie die Inkrementieren-Funktion für Programmwechsel zu (PC INC). Dadurch wird eine Programmwechselnummer gesendet, die jeweils um eins höher ist als die zuletzt im Programmwechselmodus des A-PRO gesendete Programmnummer. Weisen Sie eine Registrierte Parameternummer zu. Weisen Sie eine Nicht Registrierte Parameternummer zu. Geben Sie die folgenden Parameter ein.
A-300_500_800C_g02.book 37 ページ 2014年7月25日 金曜日 午後1時58分 Einsatz von A-PRO Editor Channel Message System Realtime/F6 Encoder Simulate Weisen Sie eine Funktion zu, die einen Drehregler (Encoder) simuliert. Weisen Sie eine Echtzeit-Systemmeldung oder F6 (Tune Request). Geben Sie die folgenden Parameter ein. Wählen Sie bei System Realtime/F6 das Feld Status, um die zuzuweisende Meldung auszuwählen.
A-300_500_800C_g02.book 38 ページ 2014年7月25日 金曜日 午後1時58分 Einsatz von A-PRO Editor System Ex. Tabelle 1: Im Feld für die Eingabe von Meldungen verwendete Sonderzeichen Weisen Sie eine systemexklusive Meldung zu (System Ex.). Sie können bis zu 24 Bytes eingeben. Geben Sie die folgenden Parameter ein. Eintrag Die folgenden Beschränkungen gelten für die Eingabe. * Die Meldung muss mit „F0“ beginnen und mit „F7“ enden. * Sie können nicht mehr als eine systemexklusive Meldung eingeben.
A-300_500_800C_g02.book 39 ページ 2014年7月25日 金曜日 午後1時58分 Einsatz von A-PRO Editor Free Message Tempo Weisen Sie eine MIDI-Meldung zu. Sie können bis zu 24 Bytes eingeben. Sie können mehr als eine MIDI-Meldung eingeben, falls gewünscht. Weisen Sie eine Temposteuerung für MIDI-CLOCK-Meldungen zu. Es können keine Parameter angegeben werden. * Diese Funktion arbeitet nicht, falls sie einer Taste zugewiesen wurde. Geben Sie die folgenden Parameter ein.
A-300_500_800C_g02.book 40 ページ 2014年7月25日 金曜日 午後1時58分 Einsatz von A-PRO Editor Verwenden von Keyboard Sets Keyboard Set empfangen Keyboard Set senden Wenn Sie ein Keyboard-Set bearbeiten möchten, gehen Sie wie folgt vor, um die Keyboard-Map-Daten vom A-PRO zu laden, so dass sie bearbeitet werden können. 1 Verwenden Sie die Tasten [SPLIT]/ [DUAL]/[LOWER] zur Auswahl des zu bearbeitenden Keyboard-Sets.
A-300_500_800C_g02.book 41 ページ 2014年7月25日 金曜日 午後1時58分 Spielen (Play-Modus) Verwenden Sie den Play-Modus, wenn Sie auf der Tastatur des A-PRO spielen oder mit seinen Bedienelementen Ihre Software oder Tonerzeuger steuern möchten. Im Wesentlichen bietet der A-PRO zwei Betriebsarten. Praktische Funktionen für das Spiel Hier finden Sie einige Funktionen, die Sie beim Spiel praktisch finden werden.
A-300_500_800C_g02.book 42 ページ 2014年7月25日 金曜日 午後1時58分 Spielen (Play-Modus) Angeben des aktuellen Kanals (MIDI-Sendekanals) Hier erfahren Sie, wie Sie den aktuellen Kanal angeben können, auf dem die Spieldaten vom Keyboard gesendet werden. Was ist der aktuelle Kanal? Was ist OMNI? Der aktuelle Kanal ist der MIDI-Übertragungskanal für Tastatur und Bender-Hebel. * Jedes Bedienelement kann einen eigenen Sendekanal haben.
A-300_500_800C_g02.book 43 ページ 2014年7月25日 金曜日 午後1時58分 Spielen (Play-Modus) Auswählen von Sounds (PROGRAM CHANGE/ BANK) Sie können Programmwechsel (Program-Change-Meldungen) senden, um vom A-PRO aus die Sounds Ihres Klangerzeugers umzuschalten. Um auf einen Sound einer anderen Bank umzuschalten, verwenden Sie zuerst den Bank-Modus, um eine Bank-Select-Meldung zum Umschalten der Bank zu senden. Senden Sie dann den Programmwechsel.
A-300_500_800C_g02.book 44 ページ 2014年7月25日 金曜日 午後1時58分 Spielen (Play-Modus) Auswählen der Sounds für UPPER und LOWER Die Tastatur des A-PRO besteht aus zwei Bereichen: UPPER (oberer Bereich) und LOWER (unterer Bereich), denen Sie jeweils unterschiedliche Sounds zuweisen können. Auswählen des UPPER-Sounds Auswählen des LOWER-Sounds Der LOWER-Sound wird auf der gesamten Tastatur gespielt. Der UPPER-Sound wird auf der gesamten Tastatur gespielt.
A-300_500_800C_g02.book 45 ページ 2014年7月25日 金曜日 午後1時58分 Spielen (Play-Modus) Überlagern zweier Sounds (DUAL) Getrenntes Spiel zweier Sounds (SPLIT) Durch Drücken der SPLIT-Taste können Sie den UPPER-Sound im Tastaturbereich von C4 und darüber spielen, während Sie gleichzeitig den LOWER-Sound im Bereich H3 und darunter spielen können. Durch Drücken der DUAL-Taste können Sie gleichzeitig die Sounds für LOWER und UPPER auf der gesamten Tastatur spielen.
A-300_500_800C_g02.book 46 ページ 2014年7月25日 金曜日 午後1時58分 Spielen (Play-Modus) Einstellen der Anschlagdynamik (VELOCITY) Normalerweise werden Notenmeldungen mit einem Velocity-Wert gesendet, die der Kraft entspricht, mit der Sie auf der Tastatur spielen. Falls gewünscht kann der A-PRO auch Noten mit festem Velocity-Wert senden, unabhängig von der Dynamik Ihres Spiels. Diese Funktion ist besonders praktisch, wenn Sie bei einer festen Velocity in Ihre DAW-Software aufnehmen möchten.
A-300_500_800C_g02.book 47 ページ 2014年7月25日 金曜日 午後1時58分 Spielen (Play-Modus) Unterdrücken des Sendens der Bedienelemente (PRM MUTE) Sie können die Bedienelemente „stummschalten“, so dass keine MIDI-Meldungen gesendet werden, wenn Sie ein Bedienelement betätigen.
A-300_500_800C_g02.book 48 ページ 2014年7月25日 金曜日 午後1時58分 Zuweisung von MIDI-Meldungen (EDIT-Modus) Im A-PRO können Sie jedem der 44 Bedienelemente MIDI-Meldungen zuweisen: [B1]–[B4], [R1]–[R9], [L1]–[L9], [S1]–[S9], [A1]–[A8], HOLD (P1), EXPRESSION (P2), BENDER, MODULATION, und AFTERTOUCH. Im Edit-Modus nehmen Sie diese Zuweisungen der MIDI-Meldungen vor. Dieser Abschnitt der Anleitung beschreibt, wie Sie, nur mithilfe des A-PRO, die MIDI-Meldungen den Bedienelementen zuweisen können.
A-300_500_800C_g02.book 49 ページ 2014年7月25日 金曜日 午後1時58分 Zuweisung von MIDI-Meldungen (EDIT-Modus) Notenzuweisungen Hier erfahren Sie, wie Sie einem Bedienelement eine Notenmeldung zuweisen können. Zusätzlich zum Einsatz während des Spiels (klingende Noten) lassen sich Notenmeldungen auch zur Steuerung von DAW-Software verwenden.
A-300_500_800C_g02.book 50 ページ 2014年7月25日 金曜日 午後1時58分 Zuweisung von MIDI-Meldungen (EDIT-Modus) Aftertouch-Zuweisung Hier erfahren Sie, wie Sie einem Bedienelement eine Aftertouch-Meldung zuweisen können. Mit A-PRO Editor können Sie Aftertouch-Meldungen für einzelne Noten (Polyphonic Key Pressure) sowie für den MIDI-Kanal (Channel Pressure) zuweisen (S. 34).
A-300_500_800C_g02.book 51 ページ 2014年7月25日 金曜日 午後1時58分 Zuweisung von MIDI-Meldungen (EDIT-Modus) Control Change-Zuweisung Hier erfahren Sie, wie Sie einem Bedienelement eine Controller-Meldung zuweisen können. MIDI-Sendekanal Controller-Nummer Port Tastenmodus 1–16 0–127 (00–7FH) PORT1 (fest) UNLATCH, LATCH, INCREASE 1 Drücken Sie gleichzeitig die Tasten [ACT] und [ 2 Bewegen Sie ein wenig dasjenige Bedienelement, dem Sie eine Controller-Meldung zuweisen möchten. ].
A-300_500_800C_g02.book 52 ページ 2014年7月25日 金曜日 午後1時58分 Zuweisung von MIDI-Meldungen (EDIT-Modus) Program Change-Zuweisung Hier erfahren Sie, wie Sie einem Bedienelement eine Programmwechsel-Meldung zuweisen können. MIDI-Sendekanal BANK MSB BANK LSB Programmwechselnummer Port 1–16 X X 0–127 (00–7FH) PORT1 (fest) 1 Drücken Sie gleichzeitig die Tasten [ACT] und [ 2 Bewegen Sie ein wenig dasjenige Bedienelement, dem Sie eine Programmwechsel-Meldung zuweisen möchten. ].
A-300_500_800C_g02.book 53 ページ 2014年7月25日 金曜日 午後1時58分 Zuweisung von MIDI-Meldungen (EDIT-Modus) RPN-/NRPN-Zuweisung Hier erfahren Sie, wie Sie einem Bedienelement eine RPN- oder NRPN-Meldung zuweisen können. Bereich für Data Entry MSB (Controlle Nr. 6) Bereich für Data Entry LSB (Controller Nr. 38) Port 0–127 (00–7FH) nicht gesendet PORT1 1 Drücken Sie gleichzeitig die Tasten [ACT] und [ 2 Bewegen Sie ein wenig dasjenige Bedienelement, dem Sie eine RPN/NRPN-Meldung zuweisen möchten. ].
A-300_500_800C_g02.book 54 ページ 2014年7月25日 金曜日 午後1時58分 Zuweisung von MIDI-Meldungen (EDIT-Modus) Tempozuweisung Sie können einem Bedienelement die MIDI-CLOCK-Geschwindigkeit (20–250) zuweisen. Damit die MIDI CLOCK gesendet wird, muss MIDI CLOCK eingeschaltet sein („ON“). 0„MIDI CLOCK ON/OFF“ (S. 64) 1 Drücken Sie gleichzeitig die Tasten [ACT] und [ 2 Bewegen Sie ein wenig den Regler, dem Sie die Temporegelung zuweisen möchten. ]. Wenn es sich um eine Taste handelt, drücken Sie sie.
A-300_500_800C_g02.book 55 ページ 2014年7月25日 金曜日 午後1時58分 Zuweisung von MIDI-Meldungen (EDIT-Modus) Tastenmodus-Einstellung Einstellung der Virtual center click Wenn Sie im Edit-Modus eine Meldung einer Taste zuweisen, wie unter „Zuweisen einer MIDI-Meldung am A-PRO-Keyboard“ (S. 48) beschrieben, können Sie die Art festlegen, wie die Taste funktionieren soll (den „Tastenmodus“).
A-300_500_800C_g02.book 56 ページ 2014年7月25日 金曜日 午後1時58分 Zuweisung von MIDI-Meldungen (EDIT-Modus) Praktische Funktionen Kopieren einer Zuweisung Zuweisung löschen (NO ASSIGN) Mit dieser Funktion kann die einem Bedienelement zugewiesene Meldung auf ein weiteres Bedienelement kopiert werden.
A-300_500_800C_g02.book 57 ページ 2014年7月25日 金曜日 午後1時58分 Systemeinstellungen (EDIT-Modus) Dieser Abschnitt beschreibt, wie Sie Systemeinstellungen für den A-PRO vornehmen. Die Systemeinstellungen enthalten die folgenden Einträge. Kategorie LCD Eintrag Inhalt Standardeinstellung Siehe Seite LCD CONTRAST Stellt den LCD-Kontrast ein. 5 S. 59 KEYBOARD VELOCITY CURVE Gibt an, wie die Velocity sich entsprechend der Anschlagdynamik ändert (Velocity-Kurve). 1-MEDIUM S.
A-300_500_800C_g02.book 58 ページ 2014年7月25日 金曜日 午後1時58分 Systemeinstellungen (EDIT-Modus) Kategorie Sonstige 58 Eintrag Inhalt Standardeinstellung Siehe Seite H-ACTIVITY ON/OFF Schalten Sie dies ein, wenn Sie bestimmte Anwendungen nutzen (wie z. B. Pro Tools LE). Wenn eingeschaltet, wird das Signal „90 00 7F“ in Intervallen von ca. 500 ms von „A-PRO 2“ übermittelt. OFF S. 69 L9 FUNCTION Gibt die Funktion der [HOLD]-Taste an. HOLD S.
A-300_500_800C_g02.book 59 ページ 2014年7月25日 金曜日 午後1時58分 Systemeinstellungen (EDIT-Modus) Einstellen des LCD-Kontrasts LCD CONTRAST Wenn sich der Text im Display schlecht ablesen lässt, können Sie den Kontrast wie folgt einstellen. Die Displayhelligkeit hängt von Umgebungseinflüssen ab wie z. B. der Temperatur. 1 Drücken Sie gleichzeitig die Tasten [ACT] und [ 2 Wählen Sie mit dem [VALUE]-Drehregler die Option „LCD CONTRAST“, und drücken Sie die Taste [ENTER].
A-300_500_800C_g02.book 60 ページ 2014年7月25日 金曜日 午後1時58分 Systemeinstellungen (EDIT-Modus) Einstellungen für die Tastatur KEYBOARD VELOCITY CURVE Hier erfahren Sie, wie Sie die Velocity-Kurve ändern können, die angibt, wie der gesendete Velocity-Wert der Stärke Ihres Tastenanschlags entspricht. 1 Drücken Sie gleichzeitig die Tasten [ACT] und [ 2 Wählen Sie mit dem [VALUE]-Drehregler die Option „KEYBOARD/ PAD“, und drücken Sie die Taste [ENTER]. 3 4 ].
A-300_500_800C_g02.book 61 ページ 2014年7月25日 金曜日 午後1時58分 Systemeinstellungen (EDIT-Modus) KEYBOARD AFTERTOUCH CURVE KEYBOARD PORT SET Hier erfahren Sie, wie Sie angeben können, wie die Tastatur auf Aftertouch reagiert. 1 Drücken Sie gleichzeitig die Tasten [ACT] und [ 2 Wählen Sie mit dem [VALUE]-Drehregler die Option „KEYBOARD/ PAD“, und drücken Sie die Taste [ENTER]. 3 4 Hier erfahren Sie, wie Sie angeben können, von welchem Port Spieldaten von Tastatur und Bender-Hebel gesendet werden. ].
A-300_500_800C_g02.book 62 ページ 2014年7月25日 金曜日 午後1時58分 Systemeinstellungen (EDIT-Modus) KEYBOARD ACTIVE PART SHIFT KEY LATCH Hier erfahren Sie, wie Sie den/die Part(s) angeben können, welche(r) vom [VALUE]Drehregler sowie den Bedienelementen BENDER, MODULATION, AFTERTOUCH, HOLD und EXPRESSION beeinflusst werden soll(en). 1 Drücken Sie gleichzeitig die Tasten [ACT] und [ 2 Wählen Sie mit dem [VALUE]-Drehregler die Option „KEYBOARD/ PAD“, und drücken Sie die Taste [ENTER].
A-300_500_800C_g02.book 63 ページ 2014年7月25日 金曜日 午後1時58分 Systemeinstellungen (EDIT-Modus) Einstellungen für die Pads PAD VELOCITY CURVE PAD AFTERTOUCH CURVE Hier erfahren Sie, wie Sie angeben können, in welcher Weise die Kraft Ihres Anschlags auf den Pads [A1]–[A8] die gesendete Velocity beeinflusst. 1 Drücken Sie gleichzeitig die Tasten [ACT] und [ 2 Wählen Sie mit dem [VALUE]-Drehregler die Option „KEYBOARD/ PAD“, und drücken Sie die Taste [ENTER].
A-300_500_800C_g02.book 64 ページ 2014年7月25日 金曜日 午後1時58分 Systemeinstellungen (EDIT-Modus) Einstellungen für die Clock MIDI CLOCK ON/OFF MIDI CLOCK OUTPUT PORT Hier erfahren Sie, wie Sie angeben können, ob die MIDI CLOCK gesendet wird oder nicht. 1 Drücken Sie gleichzeitig die Tasten [ACT] und [ 2 Diese Einstellung gibt den Port an, von dem die MIDI-Clock ausgegeben wird, wenn „MIDI CLOCK ON/OFF“ eingeschaltet ist.
A-300_500_800C_g02.book 65 ページ 2014年7月25日 金曜日 午後1時58分 Systemeinstellungen (EDIT-Modus) Einstellungen für USB ADVANCED DRIVER MODE Hier erfahren Sie, wie Sie den ADVANCED DRIVER MODE ein-/ausschalten können. Diese Einstellung sollte in der Regel eingeschaltet sein. Wenn Sie diese Einstellung ändern, tritt sie in Kraft, nachdem Sie den A-PRO aus- und wieder eingeschaltet haben.
A-300_500_800C_g02.book 66 ページ 2014年7月25日 金曜日 午後1時58分 Systemeinstellungen (EDIT-Modus) Einstellungen für MIDI MIDI I/F SWITCH Diese Einstellung gibt an, ob die MIDI-Anschlüsse als MIDI-Schnittstelle verwendet werden. 1 Drücken Sie gleichzeitig die Tasten [ACT] und [ 2 Wählen Sie mit dem [VALUE]-Drehregler die Option „MIDI SETTING“, und drücken Sie die Taste [ENTER]. 3 Wählen Sie mit dem [VALUE]-Drehregler die Option „MIDI I/F SWITCH“, und drücken Sie die Taste [ENTER].
A-300_500_800C_g02.book 67 ページ 2014年7月25日 金曜日 午後1時58分 Systemeinstellungen (EDIT-Modus) MIDI MERGE DESTINATION Der A-PRO besitzt einen [MIDI MERGE]-Schalter (S. 11). Hier erfahren Sie, wie Sie angeben können, welcher Port als MIDI MERGE DESTINATION (MIDI-Merge-Ziel) dient, wenn der Schalter [MIDI MERGE] eingeschaltet ist. ’Die MIDI-Merge-Funktion ist praktisch, wenn zusätzlich zum A-PRO an dessen Buchse MIDI IN ein externer MIDI-Controller angeschlossen werden soll.
A-300_500_800C_g02.book 68 ページ 2014年7月25日 金曜日 午後1時58分 Systemeinstellungen (EDIT-Modus) Control-Map-Einstellungen Einstellungen für den [VALUE]-Drehregler STARTUP MEMORY FUNCTION Hier können Sie angeben, welche Control Map aufgerufen werden soll, sobald der A-PRO eingeschaltet wird. 1 Drücken Sie gleichzeitig die Tasten [ACT] und [ 2 Wählen Sie mit dem [VALUE]-Drehregler die Option „SYSTEM SETTING“, und drücken Sie die Taste [ENTER].
A-300_500_800C_g02.book 69 ページ 2014年7月25日 金曜日 午後1時58分 Systemeinstellungen (EDIT-Modus) Sonstige Einstellungen H-ACTIVITY ON/OFF L9 FUNCTION Schalten Sie dies ein, wenn Sie bestimmte Anwendungen nutzen (wie z. B. Pro Tools LE). Wenn eingeschaltet, wird die Meldung „90 00 7F“ in Intervallen von ca. 500 ms am Port „A-PRO 2“ gesendet. 1 Drücken Sie gleichzeitig die Tasten [ACT] und [ 2 Wählen Sie mit dem [VALUE]-Drehregler die Option „SYSTEM SETTING“, und drücken Sie die Taste [ENTER].
A-300_500_800C_g02.book 70 ページ 2014年7月25日 金曜日 午後1時58分 Systemeinstellungen (EDIT-Modus) OMNI Automatisches Ausschalten nach einer gewissen Zeit (AUTO OFF) Siehe „Was ist OMNI?“ (S. 42). Wenn das Gerät nicht an einem Computer angeschlossen ist, schaltet es sich vier Stunden schaltet es sich vier Stunden nach der Bedienung oder dem Spielen automatisch aus (falls die Werkseinstellungen nicht verändert wurden).
A-300_500_800C_g02.book 71 ページ 2014年7月25日 金曜日 午後1時58分 Anhänge ] Zwei MIDI-Ports Wenn der A-PRO über USB an Ihrem Computer angeschlossen wird, kann der A-PRO zwei MIDI-Ausgangs-Ports verwenden (PORT 1 und PORT 2). Jedes Bedienelement des A-PRO kann zum Senden von MIDI-Meldungen an jeden dieser Ports zugewiesen werden. Näheres zu diesen Zuweisungen erfahren Sie unter „Verwenden von Control Maps“ (S. 29) oder „Zuweisen einer MIDI-Meldung am A-PRO-Keyboard“ (S. 48).
A-300_500_800C_g02.book 72 ページ 2014年7月25日 金曜日 午後1時58分 Anhänge Direktes Anschließen des A-PRO an einem Klangerzeuger Sie können den A-PRO direkt mit einem MIDI-Klangerzeuger verbinden, um diesen zu spielen und zu steuern. Wenn der A-PRO nicht über USB an Ihrem Computer angeschlossen ist, benötigen Sie einen als Zubehör erhältlichen Netzadapter. Sie können den passenden Netzadapter bei Ihrem Fachhändler erwerben.
A-300_500_800C_g02.book 73 ページ 2014年7月25日 金曜日 午後1時58分 Anhänge Der Standardtreiber-Modus Wechseln Sie zu diesem Modus, falls Sie den Standard-Treiber verwenden, der mit Ihrem Betriebssystem geliefert wurde. Standardtreiber installieren 1 Schalten Sie den „ADVANCED DRIVER MODE“ (S. 65) aus. 2 3 Schließen Sie alle geöffneten Programme. Schalten Sie den Netzschalter [POWER] des A-PRO aus und wieder ein. Der Treiber wird automatisch installiert.
A-300_500_800C_g02.book 74 ページ 2014年7月25日 金曜日 午後1時58分 Fehlerbehebung Falls Probleme auftreten, lesen Sie bitte zuerst diesen Abschnitt. Er enthält Informationen, die Ihnen bei der Lösung des Problems helfen können. * Informationen zur Bedienung von Windows oder Mac OS X finden Sie in der Dokumentation Ihres Computers oder Betriebssystems.
A-300_500_800C_g02.book 75 ページ 2014年7月25日 金曜日 午後1時58分 Fehlerbehebung Die Installation war beim Anschließen des A-PRO noch nicht abgeschlossen Steht der Schalter des ADVANCED-DRIVER-Modus des A-PRO möglicherweise auf OFF (Aus)? Lesen Sie „ADVANCED DRIVER MODE“ (S. 65) und stellen Sie den ADVANCED DRIVER MODE des A-PRO auf ON (Ein). Installieren Sie dann den Treiber erneut. Nach Herstellen der Verbindung kann es eine Weile dauern, bis der Computer den A-PRO erkennt. Dies ist keine Fehlfunktion.
A-300_500_800C_g02.book 76 ページ 2014年7月25日 金曜日 午後1時58分 Fehlerbehebung Probleme mit den Einstellungen Der A-PRO steht in der Anwendung oder in den Systemeinstellungen nicht zur Auswahl Wird der A-PRO von einem anderen Programm verwendet? Schließen Sie alle laufenden Anwendungen. Schalten Sie den A-PRO anschließend aus und wieder ein. Falls dadurch das Problem nicht gelöst wird, installieren Sie den Treiber erneut. 0„Treiber neu installieren“ (S.
A-300_500_800C_g02.book 77 ページ 2014年7月25日 金曜日 午後1時58分 Fehlerbehebung Probleme beim Spielen Die Wiedergabe wird durch Klickgeräusche, Dropouts usw. gestört Überprüfen Sie die Einstellung der Energieoptionen Klick- und Poppgeräusche lassen sich u. U. durch Änderung der EnergieoptionenEinstellungen beseitigen. 0„Einstellung der Energieoptionen“ (S. 81) Aktualisieren Sie den Treiber Ihrer Grafikkarte (Windows) Klick- und Poppgeräusche lassen sich evtl.
A-300_500_800C_g02.book 78 ページ 2014年7月25日 金曜日 午後1時58分 Fehlerbehebung Spielen nicht möglich Wurde der Treiber korrekt installiert? Bei der Installation des Treibers könnte ein Fehler aufgetreten sein. Installieren Sie den Treiber erneut. 0„Treiber neu installieren“ (S. 80) Haben Sie die Einstellungen für Ein-/Ausgabegeräte in Ihrer Software richtig vorgenommen? Lesen Sie nach in der Anleitung Ihrer Software sowie auf den folgenden Seiten, und geben Sie den A-PRO als Ein-/Ausgabegerät an.
A-300_500_800C_g02.book 79 ページ 2014年7月25日 金曜日 午後1時58分 Fehlerbehebung Sonstige Probleme Treiber entfernen Wenn der Computer das A-PRO nicht richtig erkennt, gehen Sie folgendermaßen vor, um den Treiber zu löschen, und installieren Sie den Treiber dann erneut wie in „Treiber installieren“ (S. 12). Anwender von Mac OS X 1 Anwender von Windows 1 2 Das A-PRO darf nicht am Computer angeschlossen sein, wenn Sie den Computer starten.
A-300_500_800C_g02.book 80 ページ 2014年7月25日 金曜日 午後1時58分 Fehlerbehebung Treiber neu installieren Einstellung der Treibersignaturoptionen (Windows XP) Falls bei der Treiberinstallation Probleme auftreten, gehen Sie wie folgt vor und installieren Sie den Treiber erneut. 1 2 Wenn Treibersignaturoptionen auf [Sperren] gesetzt ist, kann der Treiber nicht installiert werden. Nehmen Sie folgende Einstellungen vor. Löschen Sie den Treiber des A-PRO.
A-300_500_800C_g02.book 81 ページ 2014年7月25日 金曜日 午後1時58分 Fehlerbehebung Einstellung der Energieoptionen Wenn der Ton bei der Wiedergabe unterbrochen ist oder Töne fehlen, können Sie das Problem u. U. dadurch beheben, dass Sie die Einstellung der Energieoptionen des Computers ändern. Anwender von Windows XP 1 Anwender von Windows 8/Windows 7/Windows Vista 1 Öffnen Sie die „Systemsteuerung“, klicken Sie auf [System und Sicherheit] oder [System und Wartung] und klicken Sie dann auf [Energieoptionen].
A-300_500_800C_g02.book 82 ページ 2014年7月25日 金曜日 午後1時58分 MIDI-Implementationstabelle Model: A-300PRO/500PRO/800PRO Date : Jan. 16, 2010 Version : 1.00 Transmitted Function...
A-300_500_800C_g02.
A-300_500_800C_g02.book 84 ページ 2014年7月25日 金曜日 午後1時58分 Stichwortverzeichnis A C F ACT ................................................................................... 21 [ACT]-Taste ...................................................................... 8 ADVANCED DRIVER MODE ...................................... 65 ADVANCED DRIVER SWITCH ................................... 57 AFT Mode ...................................................................... 25 Aftertouch ............................
A-300_500_800C_g02.book 85 ページ 2014年7月25日 金曜日 午後1時58分 Stichwortverzeichnis L N Prüfsumme .................................................................... 38 L9 FUNCTION ........................................................ 58, 69 Laden einer auf Ihrem Computer gespeicherten Control Map .................................................................. 32 LATCH ...................................................................... 25, 55 LCD CONTRAST ..........................................
A-300_500_800C_g02.book 86 ページ 2014年7月25日 金曜日 Stichwortverzeichnis T Tempo ...................................................................... 24, 39 Temposteuerung ........................................................ 24 Tempo-Zuweisung ..................................................... 54 Title .................................................................................. 24 Tonhöhe (Pitch) ............................................................. 9 TRANSPOSE ........................
A-300_500_800C_g02.book 87 ページ 2014年7月25日 金曜日 午後1時58分 Steuern von SONAR oder SONAR LE vom A-PRO aus Der A-PRO ist kompatibel mit SONAR oder Software der SONAR-LE-Serie (hier gemeinsam einfach als „SONAR“ bezeichnet). Nach der Installation des A-PRO-Bedienoberflächen-Plug-ins können Sie ein Keyboard der A-PRO-Serie mittels der ACT-Funktion zur Steuerung von SONAR verwenden. Installationsvorgang Einstellungen für SONAR vornehmen 1 Starten Sie SONAR.
A-300_500_800C_g02.book 88 ページ 2014年7月25日 金曜日 午後1時58分 Steuern von SONAR oder SONAR LE vom A-PRO aus Vorgehensweise 1 Öffnen Sie den Bildschirm des A-PRO-Bedienoberflächen-Plug-ins. SONAR X1 oder neuer/SONAR LE Klicken Sie im SONAR-Menü auf [Hilfsmittel] - [A-PRO-1]. SONAR 8.5 oder älter Klicken Sie im SONAR-Menü auf [Extras] - [A-PRO-1]. 2 Klicken Sie im A-PRO-Bedienoberflächen-Plug-in auf die Schaltfläche [ENABLE].
A-300_500_800C_g02.book 89 ページ 2014年7月25日 金曜日 午後1時58分 Verwenden eines Gerätes der A-PRO-Serie zur Steuerung von Logic Pro/Express oder GarageBand Der A-PRO ist kompatibel mit Musikproduktions-Software von Apple, einschließlich Logic Pro/Express und GarageBand.
A-300_500_800C_g02.book 90 ページ 2014年7月25日 金曜日 午後1時58分 Verwenden eines Gerätes der A-PRO-Serie zur Steuerung von Logic Pro/Express oder GarageBand Parameter, die mit dem A-PRO gesteuert werden können Nach der Installation des zutreffenden A-PRO-Bedienoberflächen-Plug-ins (dem für Logic Pro/Express oder dem für GarageBand) auf Ihrem Mac können Sie die folgenden Parameter steuern. Nähere Informationen erhalten Sie in der Datei Readme_E.pdf, die sich im Ordner A-PRO_CSP auf der A-PRO CD-ROM befindet.
A-300_500_800C_g02.
A-300_500_800C_g02.book 92 ページ 2014年7月25日 金曜日 午後1時58分 For the U.K. IMPORTANT: THE WIRES IN THIS MAINS LEAD ARE COLOURED IN ACCORDANCE WITH THE FOLLOWING CODE. BLUE: BROWN: NEUTRAL LIVE As the colours of the wires in the mains lead of this apparatus may not correspond with the coloured markings identifying the terminals in your plug, proceed as follows: The wire which is coloured BLUE must be connected to the terminal which is marked with the letter N or coloured BLACK.
A-300_500_800C_g02.book 93 ページ 2014年7月25日 金曜日 午後1時58分 For EU Countries This product complies with the requirements of EMC Directive 2004/108/EC. For the USA FEDERAL COMMUNICATIONS COMMISSION RADIO FREQUENCY INTERFERENCE STATEMENT This equipment has been tested and found to comply with the limits for a Class B digital device, pursuant to Part 15 of the FCC Rules. These limits are designed to provide reasonable protection against harmful interference in a residential installation.
A-300_500_800C_g02.
A-300_500_800C_g02.
A-300_500_800C_g02.