at-20r/30r music atelier Nederlandstalige handleiding
VEILIG GEBRUIK VAN HET TOESTEL INSTRUCTIES TER VOORKOMING VAN BRAND, ELEKTRISCHE SCHOKKEN OF VERWONDING VAN PERSONEN Over WAARSCHUWING en U S I Het -symbool maakt de gebruiker attent op belangrijkeN instructies of waarschuwingen. De juiste betekenis van hetG Over de Symbolen OPGEPAST Wordt gebruikt voor instructies die de gebruiker wijzen op levensgevaar of WAARSCHUWING ernstige verwondingen bij onjuist symbool wordt bepaald door de tekening in de driehoek.
Belangrijke Opmerkingen 291b Behalve de items in “VEILIG GEBRUIK VAN HET TOESTEL” op p. 3, gelieve ook het volgende te lezen en in acht te nemen: Stroombron Herstellingen en data 301 45µ2 ¥ Gebruik dit toestel niet op eenzelfde stroomkring samen met apparaten die ruis veroorzaken (zoals een elektrische motor of een regelbaar lichtsysteem). ¥ Gelieve er rekening mee te houden dat alle gegevens in het geheugen van het toestel verloren kunnen gaan, wanneer het toestel wordt hersteld.
Belangrijke Opmerkingen Voor u floppy disks gebruikt Omgaan met de floppy disk drive 602 ¥ Plaats het toestel op een stevig waterpas oppervlak dat vrij is van trillingen. Als u het toestel dan toch onder een bepaalde hoek moet plaatsen, zorg dan dat de maximale hellingsgraad niet overschreden wordt. 652 ¥ Floppy disks hebben een Òwrite protectÓ-nokje dat de disk beschermt tegen toevallig uitwissen.
Eigenschappen Wij willen u graag bedanken voor uw aankoop van het Roland AT-20R/30R ÒAtelier SeriesÓ Orgel. De AT-20R/30R is een electronisch orgel met een heel arsenaal aan rijke orgelklanken. Daarenboven is het zeer gebruiksvriendelijk en toegankelijk voor leerling-muzikanten. Om jarenlang te kunnen genieten van de betrouwbaarheid en de degelijkheid van dit instrument, gelieve deze handleiding in haar geheel door te lezen.
Eigenschappen ❍ U kan Disk Styles inladen in het Interne Geheugen De Rhythm [Disk]-knop van de AT-30R bevat reeds 4 verschillende ritmes Ð die van de AT-20R bevat er slechts 2 . Deze ritmes kan u overschrijven met ritmes die u inlaadt van een music style disk. Wanneer u Rhythm data van de disk inlaadt in het interne geheugen, gaan deze niet verloren wanneer u het toestel uitschakelt. Het is handig als u vaak gebruikte disk Rhythms inlaadt in het interne geheugen.
Inhoud Veilig gebruik van het toestel..........................................................................................................................2 Belangrijke Opmerkingen ................................................................................................................................4 Eigenschappen ............................................................................ 6 Voornaamste eigenschappen..............................................................................
Inhoud Het ritme automatisch laten starten wanneer u op het Lower-klavier of op het Pedalboard speelt Ð Sync Start ............................................................................................................................. 38 Het ritme stoppen.............................................................................................................................. 39 Variatie toevoegen aan het ritme ........................................................................................
Inhoud Een specifieke track uitzetten Ñ Track Mute ............................................................................................ Een opname overdoen................................................................................................................................... Een Performance Song uitwissen (Clear) ................................................................................................... Disks formatteren.............................................................
Inhoud Registration Arranger Update (Arranger Settings Recall Timing) .......................................................105 Registration Transpose Update (Transpose Setting Recall Timing) .....................................................106 Tx MIDI Channel (MIDI Output-kanaal) .................................................................................................106 MIDI IN Mode ...............................................................................................................
Beschrijving van de panelen (AT-20R) 1 2 3 4 Part Balance Reverb Organ Orch Pedal Bass 5 Lower Organ 6 Lower Orchestral Others Solo Power Master Volume Organ 1 Lower 1 Others Pipe 1 Lower 2 Strings Piano Choir Guitar Brass Utility Display/Exit Effect Menu Oct Shift Part Transpose Value Upper Accomp Rhythm Min Bass Organ Orch Max To Lower Lower 7 8 Lower Manual Drums 9 10 Country Oldies Ballad Acoustic Latin 1 Latin 2 Pop Waltz March Disk Rotary Sound Arrang
Beschrijving van de panelen (AT-20R) 17 18 19 Upper Organ Rhythm /Song Name 20 Upper Orchestral Composer Solo Measure All Song Play Full 1 Jazz 1 Strings Piano Brass Trumpet Sax Chord Pipe 1 Beat Write Manual 1 Choir 3 2 Flute Guitar 4 Function Rename R 1 2 Track 3 Rhythm Accomp Bass Lower Save Registration Clear 4 Upper Solo Control Rec Bwd Fwd Harmony Intelligence Reset Registration 23 Play Stop 24 17 Display ( → p. 20) 18 Beat Indicator ( → p.
Beschrijving van de panelen (AT-30R) 1 2 3 Part Balance 4 Pedal Bass Reverb Org/Symph Orch Solo Lower Organ Rotary Sound 5 Lower Symphonic Lower Orchestral Others Utility Display/Exit Power Organ 1 Organ 2 String Electric 1 Pipe Organ Lower 1 Lower 2 Others Pipe 1 Theater 1 Lower 3 Strings Synth Strings Piano A.
Beschrijving van de panelen (AT-30R) 17 20 Upper Symphonic Upper Organ Rotary Sound Rhythm /Song Name Upper Orchestral Composer Solo All Song Play Full 2 Full 3 Jazz 1 Strings Synth Strings Piano Guitar Brass Trumpet Pipe 1 Pipe 2 Theater 1 Harmony Intelligence Others Choir Alternate Others Vibes Accordion Harmonica Alternate Others Flute Alternate Chorus Others Function Rename Demo Marimba Load Select Sax Chord Beat 23 22 Measure Full 1 Tempo 21 R 1 2 Track 3
Beschijving van de panelen (AT-30R) 25 26 27 Max 25 [Master Volume]-regelaar ( → p. 17) Bright 26 [Brilliance]-regelaar ( → p. 58) On/Off 27 Rotary Sound ( → p. 51) Fast/ Slow Min Mellow Master Brilliance Volume Rotary Sound [On/Off]-knop [Fast/Slow]-knop ■ Links onder het klavier ( → p.
Voor u begint Het deksel openen/sluiten fig.01-04 fig.01-02 1. Om het deksel te openen, neemt u het vast met beide handen en duwt u het naar achteren. 2. Om het deksel te sluiten, trekt u het langzaam naar voren, tot het stopt. * Let op dat uw vingers niet geklemd geraken wanneer u het deksel opent of sluit. Toezicht door een volwassene is aan te * Gebruik en kel en alleen de bijgeleverde stroomkabel.
Voor u begint 2. Druk op de [Power]-schakelaar. fig.01-06 Power Gebruik v/e hoofdtelefoon De AT-20R/30R is voorzien van een Phones jack. Zo kan u spelen zonder iemand te storen, zelfs Ôs nachts. * Dit toestel is uitgerust met een beveilingingscircuit. Na het fig.01-08 opstarten duurt het enkele seconden voordat de normale werking van het instrument begint. 3. De [Master Volume]-regelaar links van het Lower-klavier is een globale regelaar voor het volume van het hele instrument.
Voor u begint Gebruik v/e microfoon ■ Het zitbankje (enkel AT-30R) Het zitvlak van het bankje kan u openen om er bijvoorbeeld partituren in op te bergen. De AT-30R is uitgerust met een Mic jack. Als u een microfoon aansluit op de Mic In jack, kan u fig.01-13 bijvoorbeeld meezingen terwijl u speelt, of meezingen met Opgepast muziekdata (apart verkocht als SMF music data). Let op dat uw vingers niet geklemd geraken fig.01-10 wanneer u het zitbankje opent of sluit. fig.01-14 •• ••• ••• ••• 1.
Voor u begint Alle fabrieksinstellingen herstellen De basisschermen oproepen (Display-/Exit-knop) De instellingen opgeslagen in de AT-20R/30R kunnen De display van dit instrument biedt heelwat informatie. De teruggezet worden naar de fabrieksinstellingen. Deze functie AT-20R/30R heeft twee types van display: de Rhythm- heet ÒFactory Reset.Ó display en de Composer-display. U kan wisselen tussen deze 1. Zorg dat er geen floppy disk in de disk drive zit voordat u de procedure uitvoert. 2.
Spelen op de AT-20R/30R De Demo Songs beluisteren De AT-20R/30R bevat 3 Demo songs. Hieronder wordt uitgelegd hoe u de demo songs afspeelt, met al hun klanken, ritmes en automatische begeleidingen die op de AT-20R/30R beschikbaar zijn. fig.02-01 3 2 Composer All Song Play R 1 2 Track 3 Rhythm Accomp Bass Lower Reset Function Rename Demo Stop 5 1. Load Select Play Save Registration Clear 4 Upper Solo Control Rec Bwd Fwd 4 Zorg dat er geen floppy disk in de disk drive zit.
Spelen op de AT-20R/30R ● Indien het volgende scherm verschijnt Als de performance song in het toestel niet opgeslagen is op floppy disk, zal de volgende boodschap verschijnen, en zal het niet mogelijk zijn om de demo songs weer te geven. fig.02-03 Als u het niet erg vindt om deze song uit te wissen, druk dan op de [Rec]-knop. Als u deze song echter wil bewaren, druk dan op de [Reset]-knop om de procedure te annuleren, en bewaar daarna de song op een floppy disk.
Spelen op de AT-20R/30R Stemmen kiezen De AT-20R/30R kan het geluid van verscheidene instrumenten voortbrengen. Deze geluiden noemen we ÒStemmen.Ó Stemmen kiezen is erg eenvoudig. ■ Stemmen en Parts De AT-20R/30R heeft twee klavieren en ŽŽn Bass Pedalboard, zoals u in de figuur ziet. Van boven naar onder heten deze ÒUpper-klavierÓ, ÒLower-klavierÓ en ÒBass PedalboardÓ. fig.
Spelen op de AT-20R/30R ■ Functies van de Upper/Lower/Pedal Bass-keuzeknoppen (AT-20R) fig.02-05 Upper Organ Full 1 Jazz 1 Pipe 1 Lower Organ Lower 1 Pipe 1 Lower 2 Upper Orchestral Strings Piano Choir Guitar Brass Solo Trumpet Sax Flute Lower Orchestral Strings Piano Choir Guitar Brass Telkens als u op een stemknop (voice-knop) drukt, gaat de indicator aan of uit. Stemmen waarvan de knopindicator brandt, kunnen gespeeld worden.
Spelen op de AT-20R/30R ■ Functies van de Upper/Lower/Pedal Bass-keuzeknoppen (AT-30R) fig.
Spelen op de AT-20R/30R ■ De Upper- en Lower-stemmen kiezen (AT-30R) Kies de gewenste stem met de ÒOrgan-Ó, ÒSymphonic-Ó of ÒOrchestralÓ-knoppen van elk klavier (Upper/Lower). Wanneer u het orgel aanzet, speelt het Upper-klavier ÒFull Organ 1Ó en het Lowerklavier speelt ÒLower Organ1.Ó Voorbeeld: Kies “Full Organ 5” voor de Upper Organ part, “Strings 1” voor de Upper Symphonic en “Grand Piano” voor de Upper Orchestral. 1. Druk bij Upper Organ op [Full 2] (de indicator licht op).
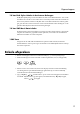
Spelen op de AT-20R/30R ●●●●●●●●●●●●●●●●●●●●●●●●●●●●●●●●●●●●●●●●●●●●●●●●●●●●●●●●●●●●●●●●●●●●●●●●●●●●●●●●●●●●●●●●●●●●●●●●●●●●●●●●●●●●●●●●●●●●●●●●●●●●●●●●●●●●●●●●●●●●●●●●●●●●●●●●●●●●●●●●●●●●●●●●●●●●●●●●●●●●●●●●●●●●● De orgelstemmen Full Organ 1 tot Full Organ 6 zijn eigenlijk voorgeprogrammeerde combinaties van verschillende orgelfragmenten die als volgt samengesteld zijn: Full Organ 1 - 80 0000 004 Full Organ 2 - 88 8000 008 Full Organ 3 - 80 8808 008 Full Organ 4 - 80 0800 000 Full Organ 5 - 85 3111 246 Fu
Spelen op de AT-20R/30R ■ De Pedal Bass Voice kiezen Wanneer u het toestel aanzet, produceert de Pedal Bass voice losse noten met de ÒOrgan Bass 1Ó-stem. De Bass voice voor het Pedalboard kiest u als volgt. fig.02-07 1 AT-20R AT-30R Pedal Bass Pedal Bass Organ 1 Organ 1 Organ 2 Pipe Organ String Electric 1 Others Others To Lower Octave Up To Lower 1 1. 2 Druk op de Pedal [Organ 1]-knop (AT-20R). De indicator licht op. of Druk op de Pedal [String]-knop (AT-30R). De indicator licht op.
Spelen op de AT-20R/30R ■ De Solo Voice kiezen Het Solo-gedeelte van het Upper-klavier is monofoon, d.w.z. de Solo-stem zal enkel de hoogste noot weergeven die op het Upper-klavier gespeeld wordt. Zo kan u volle akkoorden spelen en de gekozen Solo-stem de hoogste (solo)noten laten spelen. fig.02-11 1 1 Solo Solo AT-30R AT-20R Trumpet Sax Flute Others Trumpet Sax Flute Others Alternate 2 1. Druk op de Solo [Trumpet]-knop (indicator licht op).
Spelen op de AT-20R/30R ■ Een stem kiezen met de [Others]-knop U merkt dat er een [Others]-knop is voor elk van de ÒOrganÓ-, ÒSymphonicÓ- en ÒOrchestralÓ-gedeelten van de Upper- en Lower-stemmen, voor ÒSoloÓ voice en voor de ÒPedal BassÓ-gedeelten van de Pedal Bass voice. Door middel van de [Others]-knoppen kan u kiezen uit alle interne stemmen van de AT-20R/30R. Enkel voor AT-30R: Zoals bij de andere voice-knoppen, kan u aan de [Others]-knoppen twee stemmen toewijzen.
Spelen op de AT-20R/30R 5. Kies de gewenste stem met de [-] en [+] Value-knoppen. De naam van de gekozen stem verschijnt in de display. fig.02-10 6. Druk nogmaals op de [Others]-knop voor de part waaraan u de gekozen stem wil toewijzen. De gekozen stem wordt nu opgeslagen en wordt behouden, ook wanneer u het instrument uitschakelt. MEMO Als u deze of gelijk welke andere procedure wil onderbreken, drukt u op [Display/Exit].
Spelen op de AT-20R/30R De Volumebalans regelen (Part Balance-knoppen) Bij de AT-20R/30R kan u de volumebalans voor elke Part individueel regelen. fig.02-13 Part Balance Reverb Org/Symph Orch Solo Upper Accomp Rhythm Bass Org/Symph Orch Lower De volgende knoppen worden gebruikt om het volume van meerdere Parts te regelen.
Spelen op de AT-20R/30R De toonhoogte transponeren per octaaf (Oct Shift-knop) Octave Shift is een functie waarmee u de toonhoogte van wat u speelt, met ŽŽn of twee octaven kan verschuiven. U kan een Octave shift toepassen op de volgende 6 (of 8) Parts: Alle Upper en Lower Parts (Organ/Symphonic (enkel AT-30R)/Orchestral) De Bass Parts (Pedal Bass) De Solo Part fig.02-15 Others 1, 4 1. Utility Display/Exit Effect Menu Oct Shift Part Transpose Value 2 3 Druk op de [Oct Shift]-knop.
Spelen op de AT-20R/30R Spelen met een Human Voice (enkel AT-30R) De AT-30R bevat verschillende soorten human voices. Dit zijn klanken die sterk gelijken op het menselijk stemgeluid in bepaalde zangstijlen. ■ Een Human Voice kiezen 1. Druk op de [Others] links van de display. De indicators van alle [Others]-knoppen en [Alternate]-knoppen knipperen. 2. Druk op de [Others]-knop van de part waaraan u een van de human voice-types wil toewijzen.
Spelen op de AT-20R/30R Drums en geluidseffecten spelen op het klavier ■ Drums spelen op het volledige Lower-klavier (Manual Drums) Op het Lower-klavier kan u verscheidene drumklanken spelen (drum set). In dit geval worden de Lower-stemmen niet meer weergegeven. fig.02-18 AT-20R AT-30R Lower Manual Drums 1. Manual Drums Druk op de [Manual Drums]-knop (de indicator licht op). Speel op het Lower-klavier en luister naar de verschillende drumklanken.
Spelen op de AT-20R/30R ■ Het type van Drum Set kiezen U kan kiezen uit 8 types van drum set en 1 type van geluidseffect. Wanneer u een andere drum set kiest, dan verandert het geluid voor elke noot op het klavier. Wanneer u het toestel aanzet, wordt de STANDARD drum set gekozen. Probeer eens een andere Drum Set of de Sound Effect set te kiezen. MEMO In de ÒDrum Set ListÓ (zie p. 115) ziet u welk drumgeluid of geluidseffect er door welke noot gespeeld wordt. fig.
Gebruik van de Rhythm-functies (Music Style) De AT-20R/30R biedt de mogelijkheid om te spelen met ritmische begeleiding. Een ritme kiezen De AT-20R bevat 32 types van ritmes en automatische begeleidingen (Music Styles). Ze zijn ingedeeld in 10 groepen. De AT-30R bevat 52 Music Styles, ingedeeld in 12 groepen. fig.
Gebruik van de Rhythm-functies (Music Style) Ritmes spelen - Het ritme starten en stoppen Er zijn twee manieren om het ritme te starten: 1. Manueel: druk op een knop, 2. Automatisch: speel een noot op het Lower-klavier of Pedalboard (Syncro Start). U kan het ritme laten beginnen na een Intro, of laten eindigen na een Ending. fig.
Gebruik van de Rhythm-functies (Music Style) 2. Druk op [Intro/Ending]. De indicator van de [Intro/Ending]-knop knippert. 3. Speel op het Lower-klavier of op het Pedalboard. De Intro wordt gespeeld en het ritme begint. Terwijl de Intro speelt, brandt de indicator van de [Intro/Ending]-knop, tot de Intro afgelopen is, waarna de indicator uitgaat. ❍ De Intro kort en simpel maken 1. Druk op [Sync Start] zodat de indicator oplicht. 2. Druk op [To Variation] of op [To Original].
Gebruik van de Rhythm-functies (Music Style) Variatie toevoegen aan het ritme U kan variatie aanbrengen in het ritme door het arrangement te veranderen of door van ritmepatroon te wisselen. fig.03-04(P.
Gebruik van de Rhythm-functies (Music Style) Ritme en automatische begeleiding spelen De Arranger-functie van de AT-20R/30R kan aan elk ritme een automatische begeleiding toevoegen. Op basis van het gekozen ritme voegt de Arranger-functie automatisch een begeleiding toe die past bij het akkoord dat u op het Lower-klavier speelt. fig.03-05) AT-30R AT-20R Arranger Lower Hold Leading Bass On / Off Advanced Chord Arranger Intelli On/Off 1. Druk op de Arranger [On/Off]-knop (de indicator licht op.
Gebruik van de Rhythm-functies (Music Style) Akkoorden spelen met Easy Fingering (enkel AT-30R) ÒChord IntelligenceÓ is een functie die vanzelf de correcte begeleidingsakkoorden speelt op het moment dat u een toets van een akkoord indrukt op het Lower-klavier, tijdens de automatische begeleiding. Om bv. een C-akkoord te spelen op het Lower-klavier, moet u meestal de drie toetsen C, E en G indrukken; maar met Chord Intelligence hoeft u slechts de C-toets in te drukken om een begeleiding in C te spelen.
Gebruik van de Rhythm-functies (Music Style) Leading Bass-functie (enkel AT-30R) Wanneer u automatische begeleiding gebruikt en de [To Lower]-knop van de Pedal Bass Part staat op ON, dan speelt de Bas normaal gezien de grondnoot (tonica) van het akkoord dat u op het Lower-klavier speelt. Als de Leading Bass-functie aan staat, dan wordt de laagste noot van het akkoord dat u speelt op het Lower-klavier, gebruikt als basnoot (de onderste noot van het akkoord).
Gebruik van de Rhythm-functies (Music Style) Een simpele manier om de automatische begeleiding in te stellen — One Touch Program Naast het ritme kan u ook een automatische begeleiding laten spelen. De AT-20R/30R is voorzien van een handige [One Touch Program]-knop. Wanneer u op deze knop drukt, wordt de Arranger-functie geactiveerd en de klanken die het best passen bij het geselecteerde ritme/automatische begeleiding, worden gekozen.
Gebruik van de Rhythm-functies (Music Style) ■ Paneelinstellingen oproepen die bij het ritme passen Voor elk ritme (Music Style) van de AT-20R/30R zijn er 2 types van beschikbare paneelinstellingen, die geschikt zijn voor gebruik met dat ritme (Music Style). Deze kunnen opgeslagen worden onder de Registration-knoppen [1] Ð [2]. NOTE Als u deze procedure uitvoert, dan verliest u de registraties die tevoren onder de Registrationknoppen [1] Ð [2] zaten. Als u ze wil behouden, volg dan de procedure op p.
Gebruik van de Rhythm-functies (Music Style) Een ritme (Music Style) van een disk gebruiken De AT-20R bevat 32 interne ritmes (Music Styles). De AT-30R bevat er 52. Bijkomende ritmes (Music Styles) vindt u op de bijgeleverde Music Style disk. Een ritme (Music Style) van een Music Style disk kiest u als volgt. ■ Een floppy disk inbrengen en uitwerpen NOTE 1. Als u de disk drive voor de eerste maal gebruikt, lees dan de belangrijke opmerkingen op p. 5 .
Gebruik van de Rhythm-functies (Music Style) ■ Disk Rhythms inladen in het interne geheugen De [Disk]-knop bevat reeds 2 (AT-20R) of 4 (AT-30R) ritmes, maar deze kan u vervangen door ritmes van een Music Style disk. Ritmes die u van een disk inlaadt in het interne geheugen, gaan niet verloren wanneer u het toestel uitschakelt. Het is handig als u de Disk Rhythms die u vaak gebruikt, in het interne geheugen inlaadt. fig.
Gebruik van de Rhythm-functies (Music Style) 6. Druk op de Rhythm [Disk]-knop om de bestemming van het ritme te bevestigen. fig.03-17 Om deze procedure te annuleren, drukt u op [Display/Exit]. 7. Druk opnieuw op de Rhythm [Disk]-knop om het inladen van het ritme in het interne geheugen te starten. Terwijl het ritme wordt ingeladen in het interne geheugen, verschijnt het volgende scherm. fig.03-18 Wanneer het ritme in het geheugen zit, verschijnt het basisscherm opnieuw.
Effecten toevoegen aan een stem (voice) Met de AT-20R/30R kan u verscheidene effecten toevoegen aan elke stem (voice), en kan u verschillende speeltechnieken gebruiken om uw performance expressiever te maken. Harmonie toevoegen aan een melodie — Harmony Intelligence Harmony Intelligence is een functie die harmonie toevoegt aan een enkele noot die gespeeld wordt op het Upper-klavier, waarbij de harmonie afhangt van het akkoord dat op het Lower-klavier wordt gespeeld.
Effecten toevoegen aan een stem (voice) Hoe worden de gespeelde noten weergegeven door de verschillende Harmony Intelligence-types? Type Hoe worden de gespeelde noten weergegeven? Traditional Type A Solo & Upper Strings Type A Solo & Upper Harp Type B Ñ Broadway Type A Solo & Upper Octave 1 Type A Solo & Upper Octave 2 Type A Solo & Upper (enkel AT-30R) (enkel AT-30R) ❍ Hoe worden de noten weergegeven door de verschillende Harmony Intelligence-types Type A (Solo & Upper) Type B fig.
Effecten toevoegen aan een stem (voice) Rotary-effect Rotary is een effect dat het geluid van roterende luidsprekers simuleert. U hebt de keuze uit twee instellingen: Fast en Slow. Het Rotary-effect kan worden toegepast op de volgende klanken. ¥ Stemmen toegewezen aan de knoppen van de bovenste rij van ÒUpper OrganÓ en ÒLower Organ.Ó MEMO Op sommige klanken kan het Rotary-effect niet worden toegepast. Meer details vindt u in de ÒVoice ListÓ (zie p. 115). fig.
Effecten toevoegen aan een stem (voice) MEMO U kan de functie van de Rotary Sound [Fast/Slow]-knop toewijzen aan een van de voetschakelaars aan weerszijden van de Expressiepedaal (p. 103). De expressiepedaal van de AT-20R heeft enkel aan de rechterzijde een voetschakelaar. Chorus-effect (enkel AT-30R) Chorus is een effect dat een geluid veel ruimer laat klinken, zodat ŽŽn instrument klinkt alsof het er meerdere zijn.
Effecten toevoegen aan een stem (voice) Reverb-effect Reverb is een effect dat een gevoel van ruimtelijkheid aan het geluid geeft, waardoor het net lijkt alsof u in een grote of kleine concertzaal speelt, in een grote of een kleine kamer, een kleine club, enz. fig.04-07 Part Balance Reverb Org/Symph Orch Solo Upper Accomp Rhythm Bass Org/Symph Orch Lower 1. Druk op de Reverb [ ▲ ] of [ ▼ ]-knoppen uiterst links in het Part Balance-gedeelte om de globale hoeveelheid Reverb te regelen.
Effecten toevoegen aan een stem (voice) Sustain-effect (AT-30R) Met Sustain bepaalt u of een stem aanhoudt of wegsterft nadat de toetsen gelost zijn. Het Sustain-effect kan tegelijkertijd op de Upper- (behalve de Solo Part), Lower- en Pedal Bass voices worden toegepast. fig.04-08 Pedal Bass Lower Upper Sustain 1. MEMO 54 Druk op de Sustain-knop voor het klavier waarop u Sustain wil toepassen (indicator licht op). De lengte van de Sustain kan voor elk klavier apart gewijzigd worden (p. 101).
Gebruik van de Play-functies De Bass Voice spelen op het Lower-klavier — [To Lower]-knop Door middel van de [To Lower]-knop kan u de Pedal Bass voice laten klinken door de grondnoot (zie p. 117) van een akkoord te spelen op het Lower-klavier in het gedeelte dat de Lower voice speelt. NOTE Als er geen enkel deel van het Lower-klavier de Lower voice speelt (de [Manual Drums]-knop staat op ON), dan weerklinkt de Pedal Bass voice niet. fig.
Gebruik van de Play-functies Transponeren (Transpose-knop) Deze functie laat u toe om het klavier naar een andere toonaard te transponeren in stapjes van een halve toon. Zo kan u bijvoorbeeld in de vertrouwde C majeur-toonaard spelen en uw muziek laten weerklinken in een toonaard naar uw keuze. fig.06-01 Others Utility Display/Exit Effect Menu Oct Shift Part Transpose Value 1, 3 2 1. Druk op de [Transpose]-knop (de indicator knippert). 2.
Gebruik van de Play-functies Het globale volume regelen met een expressiepedaal U kan het globale volume regelen met een expressiepedaal. Wanneer u de expressiepedaal indrukt, neemt het volume toe. Het volume neemt af als u de pedaal in de andere richting beweegt. fig.06-03 Het volume neemt af Het volume neemt toe MEMO U kan ook bepalen of de expressiepedaal het volume wel of niet aanstuurt tijdens de opname van muziekdata (p. 92).
Gebruik van de Play-functies De helderheid van het geluid regelen (enkel AT-30R) Met de Brilliance-slider regelt u de helderheid van het geluid. Voor een helderder geluid duwt u de slider naar voren. Voor een zachter geluid, trekt u de slider naar achteren (naar u toe). fig.06-06 Bright Mellow Brilliance NOTE Deze instelling wordt niet opgeslagen in de Registration. Gebruik van de voetschakelaar(s) De AT-30R is voorzien van 2 voetschakelaars, 1 aan elke kant van de expressiepedaal.
Gebruik van de Registration-knoppen Met de AT-20R/30R kan u klank- en paneelinstellingen opslaan onder de Registrationknoppen. Er zijn 8 Registration-knoppen (op de AT-20R zijn er slechts 4), en onder elk van hen kan u een set paneelinstellingen opslaan, zodat u in totaal 8 (bij de AT-20R, vier) verschillende paneelinstellingen kan registreren. Elke set paneelinstellingen die opgeslagen zit onder een Registration-knop, noemen we een ÒRegistration.
Gebruik van de Registration-knoppen Een Registration oproepen ■ Hoe roept u een Registration op? ❍ Stemmen (voices) en andere paneelinstellingen oproepen 1. Druk op een Registration-knop [1]–[8] (of [1] – [4]). ❍ Naast de paneelinstellingen, ook instellingen voor Ritme en Automatische Begeleiding oproepen 1. Houd een Registration-knop [1]–[8] (of [1] – [4]) enkele seconden ingedrukt.
Gebruik van de Registration-knoppen Automatisch registreren wanneer u van paneelinstelling verandert Wanneer de [Manual]-knop op ON staat (indicator brandt), worden alle paneelinstellingen die u maakt, automatisch opgeslagen in de [Manual]-knop,zodat de voordien opgeslagen Registration wordt bijgewerkt. Als u overgaat naar een preset Registration [1]Ð [8] (of [1] Ð [4]), kan u naar de vorige paneelinstellingen terugkeren door op de [Manual]-knop te drukken. fig.
Gebruik van de Registration-knoppen 1. Zorg dat de disk drive een disk bevat die geformatteerd (p. 77) is door de AT-20R/30R. 2. Druk op de [Registration]-knop (de indicator licht op). 3. Druk tegelijkertijd op de [Load]- en de [Function]-knop. 4. Verplaats de cursor met de [-] en [+] Composer Select-knoppen, en kies een karakter met de [Bwd]/[Fwd]-knoppen. fig.07-05 U kan kiezen uit de onderstaande reeks karakters. spatie ! Ò # % & Ô ( ) * + , - .
Gebruik van de Registration-knoppen ■ Enkel de naam van een Registration kopiëren Onderstaande procedure legt uit hoe u enkel de naam van een Registration kan kopi‘ren zonder de performance data te kopi‘ren. 1. 2. 3. Plaats de floppy disk met de Registration die u wil kopiëren in de disk drive. Druk op de [Registration]-knop zodat de indicator oplicht. Kies met de Composer Select [-] en [+]-knoppen de Registration waarvan u de naam wil kopiëren. 4. Druk tegelijkertijd op [Load] en [Function]. 5.
Gebruik van de Registration-knoppen Registration Sets opslaan op Floppy Disk (Save-knop) EŽn enkele floppy disk kan tot 99 sets data bevatten, waarbij de instellingen van de Registration-knoppen [1] Ð [8] (of [1] Ð [4]) beschouwd worden als ŽŽn set. We raden aan dat u complexe paneelinstellingen of Registrations die u wenst te behouden, opslaat op disk. Als u Registrations die u cre‘ert op een AT-20R/30R, opslaat op een floppy disk, dan kan u ze later weer oproepen of op een andere AT-20R/30R gebruiken.
Gebruik van de Registration-knoppen ❍ Als u de data wil bewaren zonder de Registration set die reeds op de disk staat 1. Druk op [Reset] om de procedure te annuleren. Het herschrijven van de Registration wordt geannuleerd. 2. 3. Kies met de [-] en [+] Composer Select-knoppen een nummer waarbij “- - -” bovenaan rechts in de display verschijnt. Druk op [Save] om de Registration set op te slaan. Wanneer de data opgeslagen zijn, verschijnt de basisdisplay opnieuw.
Gebruik van de Registration-knoppen ■ Een Individuele Registration inladen U kan gelijk welke individuele Registration inladen naar gelijk welke Registration-knop. 1. Plaats de floppy disk met de Registration in de disk drive. 2. Druk op de [Registration]-knop (de indicator licht op). 3. 4. 5. Kies met de [-] en [+] Composer Select-knoppen de Registration set die u wenst in te laden. Druk op de [Function]-knop. Kies met de [Bwd]/[Fwd]-knoppen het nummer van de Registrationknop die u wenst in te laden.
Gebruik van de Registration-knoppen Een eerder opgeslagen Registration set wissen Deze paragraaf legt uit hoe u een Registration set die opgeslagen werd op floppy disk, uitwist. 1. Plaats de floppy disk in de disk drive. 2. Druk op de [Registration]-knop (de indicator licht op). 3. 4. Kies met de Composer Select [-] en [+]-knoppen de Registration set die u wil uitwissen. Druk tegelijkertijd op [Function] en [Save]. De volgende display verschijnt. fig.
Gebruik van de Registration-knoppen Gebruik van Registrations gemaakt op een ouder model (enkel AT-30R) Registrations die gemaakt zijn op een ouder model van de Atelier-serie (AT-90/80/30), kan u ook op de nieuwere modellen van de Atelier-serie gebruiken. Wanneer een Registration die werd gemaakt op een ouder model, in een nieuwer model wordt ingeladen, wordt ze omgezet naar een Registration voor het nieuwere model.
Gebruik van de Registration-knoppen Als het ritme dat door de Registration gebruikt wordt, niet in het interne geheugen wordt gevonden, dan verschijnt het nummer van de bijgeleverde Music Style disk die dat ritme bevat (zie onderstaand scherm). Noteer het nummer van de Music Style disk. fig.07-20 Het nummer van de Registration-knop die het ritme gebruikt dat niet gevonden wordt in het interne geheugen van de AT-30R Nummer van de bijgeleverde Music Style disk 7. Druk op [Rec].
Uw performance opnemen en weergeven Met de Composer van de AT-20R/30R kan u wat u op het instrument speelt (in digitale vorm) opnemen. fig.08-01 Composer All Song Play Load Select Function Rename Demo Save Clear R 1 2 Track 3 4 Rhythm Accomp Bass Lower Upper Solo Control Rec Bwd Fwd Reset Play Stop Registration Wat is een Track (spoor)? De Composer werkt zoals een bandrecorder met de mogelijkheid om zeven aparte tracks op te nemen.
Uw performance opnemen en weergeven Performances opnemen (Rec-knop) fig.08-02 Composer All Song Play R 1 2 Track 3 Rhythm Accomp Bass Lower Reset Function Rename Demo 1. Load Select Stop Play 4 3 Save Registration Clear 4 Upper Solo Control Rec Bwd Fwd 2 Kies de nodige paneelinstellingen om de performance op te nemen. Indien er een floppy disk in de disk drive zit, druk dan op de Eject-knop (p. 46) en verwijder de floppy disk. 2.
Uw performance opnemen en weergeven NOTE Indien u op [Rec] drukt wanneer er een song van de floppy disk geselecteerd is, dan wordt de geselecteerde song volledig ingeladen in de AT-30R en gaat de Composer naar de recording standby mode. Als u een nieuwe song wil opnemen, kies dan eerst ÒNEW SONGÓ met de [-] en [+] Composer Select-knoppen, voordat u op [Rec] drukt. Of u kan ook de disk uit de floppy disk drive verwijderen, voordat u op [Rec] drukt. fig.08-03 ● Indien het volgende scherm verschijnt fig.
Uw performance opnemen en weergeven Een Performance Song weergeven (Play-knop) fig.08-06 Composer All Song Play R 1 2 Track 3 Rhythm Accomp Bass Lower Reset 1 Function Rename Demo 1. Load Select Stop Play 3 2 Save Registration Clear 4 Upper Solo Control Rec Bwd Fwd Druk op [Reset] om terug te keren naar het begin van de eerste maat. De plaats van waar de weergave zal starten, keert terug naar het begin van maat 1.
Uw performance opnemen en weergeven Een specifieke track uitzetten — Track Mute De knopindicators van de tracks waarop performances zijn opgenomen, branden. Door de incicators van deze track-knoppen uit te zetten,kan u tijdelijk het geluid uitschakelen. Dit noemen we ÒTrack Mute.Ó Voorbeeld: Het geluid uitzetten voor de Upper Part fig.08-07 1. R 1 2 Track 3 4 Rhythm Accomp Bass Lower Upper Solo Control Druk op een track-knop waarvan de indicator brandt, zodat die uitgaat.
Uw performance opnemen en weergeven Een opname overdoen Als u tijdens de opname een fout hebt gemaakt in uw performance, dan kan u een deel van de muziekdata in de track opnieuw opnemen. NOTE Als u de opname wil overdoen met andere instellingen voor de voices, tempo, part balance, wis dan de opgenomen song uit (p. 72) en doe de opname nogmaals over. Indien de Control track nog steeds data bevat van voor u de opname overdeed, dan kunnen het volume of de klanken veranderen tijdens de weergave. fig.
Uw performance opnemen en weergeven MEMO U kan punch-in recording (p. 87) gebruiken om enkel het gedeelte dat u bepaalt opnieuw op te nemen. Een Performance Song uitwissen (Clear) Als u uw opname wil te niet doen en van voor af aan wil herbeginnen,dient u de eerder opgenomen data uit te wissen. fig.08-09 1 Composer All Song Play Load Select Rename Demo R 1 2 Track 3 Rhythm Accomp Bass Lower Reset Function Stop Play Save Registration Clear 4 Upper Solo Control Rec Bwd Fwd 2 1.
Uw performance opnemen en weergeven Disks formatteren Voordat u een floppy disk (nieuw of gebruikt) op de AT-20R/30R kan gebruiken, dient u ze eerst te formatteren (klaarmaken). Floppy disks moeten ÒgeformatteerdÓ (ge•nitialiseerd) worden voordat de AT-20R/30R ze kan gebruiken om data op te slaan. ÒFormatterenÓ betekent dat alle data op de disk uitgewist worden en dat het format van de floppy disk ingesteld wordt op het format van het toestel.
Uw performance opnemen en weergeven 3. Druk op [Function]. 4. Kies “Disk Utility” met de [-] en [+] Composer Select-knoppen. 5. Druk op [Rec]. 6. Kies “Format Disk” met de [-] en [+] Composer Select-knoppen. 7. Druk op [Rec]. fig.08-13 Er verschijnt een boodschap die u vraagt om te bevestigen. fig.08-14 Druk op [Reset] om de procedure te annuleren. 8. Druk nogmaals op [Rec] om het formatteren uit te voeren. Tijdens het formatteren verschijnt de volgende display. fig.
Uw performance opnemen en weergeven De naam van een Performance Song veranderen (Rename) Aan een performance song die u opneemt, wordt er automatisch een naam toegewezen. U kan deze naam echter veranderen in iets met meer betekenis. fig.08-16 1, 3 Composer All Song Play Load Select Rename Demo R 1 2 Track 3 Rhythm Accomp Bass Lower Reset Function Stop Play Save Registration Clear 4 Upper Solo Control Rec Bwd Fwd 2 1. 2. Druk tegelijkertijd op [Load] en [Function].
Uw performance opnemen en weergeven Performance Songs opslaan op floppy disk (Save-knop) De opgenomen performance data verdwijnen wanneer u de AT-20R/30R uitschakelt. Als u die performance data wil behouden, moet u ze opslaan op een floppy disk. Als de performance data nog nooit op een floppy disk werden opgeslagen, verschijnt er een Ò Ó-symbool in de display. Wanneer de performance data op een floppy disk is opgeslagen, wordt dit symbool niet meer afgebeeld. fig.08-20 fig.
Uw performance opnemen en weergeven 4. Druk op [Save] om het format-type te bevestigen. Tijdens het opslaan van performance data op de floppy disk, verschijnt de volgende display. fig.08-22 NOTE MEMO Muziekdata die werden opgeslagen in Atelier format, kunnen niet correct worden weergegeven op andere instrumenten dan die van de Atelier-serie. Meer details over het SMF format vindt u in ÒOpslaan in SMF FormatÓ (p. 82).
Uw performance opnemen en weergeven ■ Opslaan in SMF Format Met de AT-20R/30R kan u data opslaan in SMF format. Performance data die u hebt opgenomen met de organ sound generator van de Atelier, kan u makkelijk editen op een externe sequencer. Anderzijds, aangezien de klankgenerator van het Atelier-orgel aangestuurd kan worden via MIDI In, kan u data die werden opgeslagen in SMF format, afspelen op uw externe sequencer. U kan de Atelier dus bespelen via MIDI. MEMO 1.
Uw performance opnemen en weergeven Performance Songs inladen in de AT-20R/30R Om een performance song die opgeslagen is op floppy disk, te editen (p. 95) of opnieuw op te nemen, moet u eerst de song inladen in het instrument. fig.08-25 2 3 Composer All Song Play R 1 2 Track 3 Rhythm Accomp Bass Lower Reset 2. 3. Function Rename Demo 1. Load Select Stop Play Save Registration Clear 4 Upper Solo Control Rec Bwd Fwd Plaats de correcte floppy disk in de disk drive.
Uw performance opnemen en weergeven MEMO NOTE Als u een andere sonfg dan Atelier performance songs (SMF song files, enz.) inlaadt, dan wordt de Rhythm (drum) Part automatisch in de Rhythm track ingeladen en worden de andere Parts ingeladen in de Accomp en Bass tracks. Als het inladen geannuleerd wordt omdat het geheugen vol is, dan verschijnt de volgende boodschap in de display. fig.
Uw performance opnemen en weergeven Performance Songs van floppy disk weergeven Naast het weergeven van de muziek die u op het instrument hebt opgenomen en hebt opgeslagen op een floppy disk, kan u met de AT-20R/30R ook nog een hele reeks song files, die in de handel verkrijgbaar zijn, weergeven.
Uw performance opnemen en weergeven Performance Songs van de disk uitwissen Volg de onderstaande stappen om een performance song die opgeslagen is op een floppy disk, uit te wissen. 1. Plaats de floppy disk in de disk drive. 2. Druk op [Function]. 3. Kies “Disk Utility” met de [-] of [+] Composer Select-knoppen. 4. Druk op [Rec]. 5. Kies “Delete Song” met de [-] of [+] Composer Select-knoppen. 6. Druk op [Rec]. fig.08-13 fig.08-29 Om de procedure te annuleren, drukt u op [Reset]. 7. 8.
Uw performance opnemen en weergeven Een deel van uw opname overdoen — Punch-in Recording Nadat u een performance hebt opgenomen,is het mogelijk om een welbepaald deel van de opname over te doen. Bij deze methode luistert u naar de opgenomen performance en neemt u enkel het gewenste deel opnieuw op. Deze opnamemethode noemen we ÒPunch-in Recording.Ó Om Punch-in Recording te gebruiken, kan u... ¥ Het item ÒPunch In/OutÓ van het Funtion-menu aanzetten en het gedeelte dat u opnieuw wil opnemen, afbakenen.
Uw performance opnemen en weergeven 7. 8. Druk op [Rec]. Kies “for” (het aantal maten dat u opnieuw wil opnemen) met de [Bwd] / [Fwd]-knoppen. fig.08-34 9. Druk op [Function] of op [Display/Exit]. ❍ Opname overdoen terwijl u de song beluistert 10. 11. 12. Druk op [Rec] om naar recording standby mode te gaan. Druk op de Track-knop van het spoor dat u opnieuw wil opnemen (de indicator knippert). Druk op [Play]. Wanneer u op [Play] drukt, tikt de metronoom twee aftelmaten voordat de opname begint.
Uw performance opnemen en weergeven Meerdere lagen over elkaar opnemen in een bepaald gedeelte — Loop Recording U kan meermaals over een bepaald gedeelte opnemen om meervoudige performances op te bouwen. Deze opnamemethode noemen we ÒLoop Recording.Ó Deze methode is handig wanneer u de verschillende drumgeluiden van de Rhythm part individueel wil opnemen. NOTE ÒLoop RecordingÓ kan enkel gebruikt worden voor het opnemen van de Rhythm part. fig.
Uw performance opnemen en weergeven ❍ Het aantal maten bepalen voor Loop Recording Met de fabrieksinstellingen gebeurt Loop Recording over ŽŽn maat. In het Functionmenu kan u het aantal maten waarover de Loop Recording zal plaatsvinden, instellen. 1. Druk op de [Function]-knop. 2. Kies “Loop Recording” met de [-] en [+] Composer Select-knoppen. fig.08-36 Aantal maten voor Loop Recording 3. 4. Kies het aantal maten voor de Loop Recording met de [Bwd]- en [Fwd]-knoppen.
Instellingen voor de Composer (Function-knop) Count-in Recording Volume van de Metronoom Deze instelling (ON/OFF) bepaalt of de metronoom al dan Volg de onderstaande stappen om het volume van de niet twee aftelmaten tikt nadat u bij een opname op [Play] metronoom te regelen. hebt gedrukt. (De aftelling helpt u om in het tempo te komen, 1. Druk op [Function]. voordat u begint te spelen.) 1. Druk op [Function]. 2. Kies “Count-In Rec” met de [-] en [+] Composer Select-knoppen 2. Kies “Metronome Vol.
Instellingen voor de Composer (Functie-knop) De maatsoort instellen Deze instelling bepaalt welke maatsoort er gebruikt wordt bij de opname van performance songs. Teller Noemer 1 of hoger (noemer x 2-1) 2, 4, 8, 16 1. Druk op [Function]. 2. Kies “Beat” met de [-] en [+] Composer Selectknoppen. FIG.09-05 Hoe werkt de Expressiepedaal ? (Exp. Source) Bepaal hoe de expressiepedaal zal functioneren wanneer uw performance wordt opgenomen en wanneer ATELIER song files worden weergegeven.
Instellingen voor de Composer (Function-knop) ■ Functie tijdens de weergave Hiermee bepaalt u of de expressiepedaal al dan niet werkt Individuele kanalen van Performance Data uitzetten terwijl er ATELIER song files worden weergegeven. 1. Druk op [Function]. 2. Kies “Exp. Source” met de [-] of [+] Composer Select-knoppen. Bij performance data of SMF data (apart verkocht) kan u individuele kanalen uitzetten (Channel Mute).
Instellingen voor de Composer (Functie-knop) Songteksten op het scherm tonen of verbergen In sommige music files is de songtekst opgenomen en deze teksten kan u op het scherm bekijken. U kan deze lyricsfunctie in- en uitschakelen. 1. Druk op [Function]. 2. Kies “Lyric” met de [-] en [+] Composer Selectknoppen. FIG.09-11 3. Met de [Bwd] / [Fwd]-knoppen schakelt u de lyric display in (tekst wordt getoond) of uit (tekst niet getoond).
Edit-menu (Song Files editen) Song files die u opneemt, kan u editen (bewerken) door fig.10-03 middel van vijf verschillende functies. De volgende edit-functies zijn voorzien. Om de handeling te annuleren, drukt u op [Reset]. Delete measure (p. 95) Delete Track (p. 96) Erase (p. 97) Copy (p. 98) Quantize (p. 99) 5. Druk op [Rec]. 6. Met de [Bwd]/[Fwd]-knoppen stelt u “from” in (de eerste maat die u wil verwijderen). fig.
Edit-menu (Song Files editen) De opname van een Track verwijderen (Delete Track) 6. Met de [Bwd]/[Fwd]-knoppen kiest u de track die u wil verwijderen. ig.10-08 Met deze functie kan u de opname verwijderen van een track die u bepaalt. Wat is een Track (spoor)? De AT-20R/30R heeft zeven tracks. Op deze tracks worden de volgende performance data opgenomen.
Edit-menu (Song Files editen) Een opname wissen (Erase) U kan in een bepaald fragment een bepaald onderdeel van de performance wissen, zonder dat de song daardoor korter wordt. Dit noemen we de ÒEraseÓ-functie. Als alternatief voor de methode waarbij u alle performance data in een bepaald gedeelte uitwist, kan u de volgende onderdelen van de performance wissen.
Edit-menu (Song Files editen) Copy Recording (Copy) fig.10-18 Met deze functie kan u een deel van een opgenomen song kopi‘ren naar een andere maat in dezelfde track. * Als er op de kopieerbestemming reeds een opname aanwezig is, 9. Druk op [Rec]. dan wordt die uitgewist. 10.Met de [Bwd] / [Fwd]-knoppen stelt u “for” in (het aantal maten dat gekopieerd wordt). Voorbeeld: U wil de maten 5Ð7 kopi‘ren naar maat 8 fig.10-15 1 2 3 4 5 6 7 1 2 3 4 5 6 7 fig.10-19 8 9 10 1.
Edit-menu (Song Files editen) Onnauwkeurigheden in de timing corrigeren (Quantize) 11.Druk op [Rec]. Quantize is een functie die de timing van noten corrigeert 12.Met de [Bwd] / [Fwd]-knoppen stelt u “Res” in (de timing waarop de noten moeten worden gezet). volgens een opgegeven resolutie. fig.10-25 Voorbeeld: zelfs als u met een timing van kwartnoten wil spelen, is het mogelijk dat de noten een fractie vroeger of later vallen dan de precieze kwartnootintervallen.
De Effecten instellen Het Reverb-type kiezen U kan de Reverb- en Sustain-effecten naar wens instellen, door hun parameterwaarden aan te passen. Deze waarden kan u wijzigen in de volgende 3 menuÕs: U kan kiezen uit de volgende acht Reverb-types: fig.11-04 Reverb Type (p. 100) Reverb Depth (p. 101) Sustain Effect (p. 101) (niet bij AT-30R) Sustain Length (p. 101) fig.11-01 Others Utility Display/Exit Effect Menu Oct Shift Part 1, 5 Transpose Value 2 3 4 1. Druk op [Effect]. 2.
De Effecten instellen De Reverb-diepte wijzigen De Sustain-lengte wijzigen De diepte van de Reverb kan u instellen (0Ð10) voor de De lengte van de Sustain (SHORT, MIDDLE (Medium) of volgende 16 Parts. U kan voor elke Part een aparte instelling LONG) kan voor het Upper- en Lower-klavier en het Bass maken. Pedalboard onafhankelijk ingesteld worden. U kan dus een fig.11-05 aparte instelling maken voor elk klavier. fig.11-06 Part Accomp (Automatische Begeleiding behalve Bas), Rhythm, M.Drums, A.
Andere instellingen (Utility-knop) U kan de instellingen voor de volgende 19 items (menuÕs) aanpassen. Initial Touch Initial Touch ON/OFF 1. Druk op [Utility]. 2. Kies het gewenste menu met de [ Menu-knoppen. ] en [ ] Solo Mode Bepalen hoe de Solo voice klinkt 3. Voor “Initial Touch” of “Tx MIDI Channel” kiest u het klavier of de part met de [ ] en [ ] Part-knoppen. Voor “PC Number” selecteert u de instellingen met de [ ] en [ ] Part-knoppen.
Andere instellingen (Utility-knop) Pedal Bass Mode (Hoe u op het Bass Pedalboard kan spelen) U kan de baspedalen instellen om ofwel meerdere noten Registration Shift (Met de rechter voetschakelaar de Registration-knoppen doorlopen) tegelijkertijd te spelen, of om alleen enkelvoudige noten te Met de rechter voetschakelaar kan u de registrations in spelen. volgorde oproepen. fig.12-06 fig.12-07 MONOPHONIC Alleen enkelvoudige noten. POLYPHONIC Meerdere noten tegelijkertijd mogelijk.
Andere instellingen (Utility-knop) Functie Beschrijving Damper Pedal Assignment ROTARY FAST/SLOW Kies ÒFASTÓ of ÒSLOWÓ voor de Rotary-snelheid. Hiermee bepaalt u op welk klavier het effect van de Damper GLIDE Terwijl de voetschakelaar ingedrukt is, zakt de toonhoogte tijdelijk, en keert geleidelijk terug naar het normale niveau wanneer u de voetschakelaar loslaat. fig.12-10 BREAK Hiermee stopt u het ritme gedurende ŽŽn maat LEADING BASS De Leading Bass-functie (p.
Andere instellingen (Utility-knop) Manual Drums Set begeleiding in C te spelen. fig.12-29 Met deze instelling kan u kiezen uit de volgende 8 Drum Sets of ŽŽn Sound Effects Set. fig.12-14 Instellingen STANDARD, ROOM, POWER, ELECTRONIC, TR-808, JAZZ, BRUSH, ORCHESTRA, SOUND EFFECTS ➔ De klanken die toegewezen zijn aan de toetsen, verschillen naargelang van welke Manual Drum Set er gekozen is. Voor details, zie ÒDrum Set ListÓ.
Andere instellingen (Utility-knop) opgeroepen wanneer u een Registration-knop zover dit nodig is. (Voor details, zie p. 109) [1] Ð [8] (of [1] Ð [4]) enkele seconden ingedrukt fig.12-22 houdt. Als u snel op de Registration-knop drukt, worden enkel de paneelinstellingen (voice, enz.) die geen verband houden met Rhythm en Automatische Begeleiding aangepast.
Andere instellingen (Utility-knop) Ch MODE 1 MODE 2 1Ð8 GS GS 9 GS Manual Drums 10 GS GS 11 GS Niets 12 GS Lower 13 GS Upper 14 GS Pedal Bass 15 GS Niets De basistoonhoogte van een instrument is meestal de 16 GS Solo, Control toonhoogte van de middelste A-noot. Met de ÒMaster TuneÓ- Instelling Bank MSB (Bank Select MSB) 0-127 Bank LSB (Bank Select LSB) 0-127 PC Num (PC Number) 1-128 Kies de instellingen met de [ ] en [ ] Part-knoppen.
Externe apparaten aansluiten De aansluitingen maken Als u een extern instrument op de AT-20R/30R wil aansluiten, dan moet u dit hoofdstuk beslist lezen. Als u de AT-20R/30R door middel van kabels met andere Namen en Functies van Jacks en Connectors apparatuur wil verbinden, volg dan de onderstaande 1 defecten en/of schade aan luidsprekers en andere apparaten. stappen om de aansluitingen te maken.
Externe apparaten aansluiten ■ Een computer aansluiten De AT-20R/30R is voorzien van een Computer-connector. Door deze aan te sluiten op de seri‘le poort van uw computer, kan u muziekdata verzenden en ontvangen. Aangezien de AT-20R/30R muziekdata kan opslaan in SMF ❍ Aansluiting op een IBM PC Sluit met een computerkabel (apart verkocht) de Computerconnector van de AT-20R/30R aan op de COM1 of COM2 seri‘le poort van de IBM PC. Zet de Computer-schakelaar op ÒPC-2.
Externe apparaten aansluiten ❍ MIDI In-connector Voorbeeld voor de aansluiting: Performance-boodschappen van een extern MIDI-apparaat worden hier ontvangen. Deze binnenkomende boodschappen kunnen het ontvangende MIDI-instrument opdragen om bepaalde klanken te spelen of om van tone te veranderen.
Problemen oplossen Wanneer u op de [Power]-schakelaar drukt, start het toestel niet op. Het Rotary-effect wordt niet toegepast. ❍ De stroomkabel is niet correct aangesloten (p. 17). ❍ Op sommige klanken kan het Rotary-effect niet toegepast worden (zie Voice List). U hoort geen geluid. Het Chorus-effect wordt niet toegepast. ❍ De [Master Volume]-slider staat te laag (p. 18). ❍ Er is een hoofdtelefoon aangesloten (p. 18).
Problemen oplossen Performance data worden niet weergegeven ❍ Terwijl het Function-menu in de display staat (met uitzondering van Channel Mute), is er geen weergave mogelijk. Als u performance data wil weergeven, druk dan opnieuw op [Function] om het Function-menu (p. 91) te verlaten. ❍ De [Master Volume]-knop, die het globale volume regelt, staat veel te hoog (p. 18). Sommige toetsen (van bepaalde klaviergedeelten) klinken raar ❍ U hebt dezelfde voice, met hetzelfde bereik, toegewezen aan meerdere parts.
Boodschappen in de display ■ E.00 fig.E.00 Betekenis: ¥ Ter bescherming van het auteursrecht, kan deze music file niet bewaard worden als SMF format. ¥ Wanneer u de file wil bewaren als Atelier format, kan u enkel op een originele disk opslaan. ■ E.01 ■ E.11 fig.E.11 Betekenis: ¥ Er is onvoldoende ruimte op de floppy disk om de data te kunnen opslaan. Bewaar de data op een andere floppy disk of verwijder de muziekdata van de disk. ■ E.12 fig.E.12 fig.E.
Boodschappen in de display ■ E.30 fig.E.30 Betekenis: ¥ De Rhythm data zijn te omvangrijk en kunnen niet ingeladen worden. ¥ De performance data zijn te omvangrijk en kunnen niet ingeladen worden. ¥ Aangezien het interne geheugen vol is, is opnemen of editen niet mogelijk. ■ Andere fig.ot-01 Betekenis: ¥ De interne instellingen (Registrations, enz.) zijn verloren gegaan, omdat het instrument een 2-tal weken niet werd aangezet.
Voice List, Drum Set List, Style list, Chord List, ... AT-20R AT-30R ❍ Voice List: zie Engelstalige handleiding p. 103 ❍ Voice List: zie Engelstalige handleiding p. 111 ❍ Drum Set List: zie Engelstalige handleiding p. 104, 105 ❍ Drum Set List: zie Engelstalige handleiding p. 112, 113 ❍ Style List: zie Engelstalige handleiding p. 106 ❍ Style List: zie Engelstalige handleiding p. 114 ❍ Chord List: zie Engelstalige handleiding p. 107, 108 ❍ Chord List: zie Engelstalige handleiding p.
Instellingen die behouden blijven na het uitschakelen Instellingen die opgeslagen worden bij het uitschakelen [Harmony Intelligence]-knop (ON/OFF) Paneelinstellingen Rhythm type De [Chorus]-knop (ON/OFF) (enkel AT-30R) Function-menu Metronoomgeluid Lyric ON/OFF Utility-menu Rotary [Fast/Slow]-knop (ON/OFF) Sustain-knoppen (ON/OFF) (enkel AT-30R) [Intro/Ending]-knop (ON/OFF) [Sync Start]-knop (ON/OFF) [Advanced]-knop (ON/OFF) [Variation]-knop (ON/OFF) (enkel AT-30R) [Chord Intelli]-knop (ON/OFF) (enke
Glossarium Akkoord akkoord waarbij andere noten de laagste toonhoogte hebben, Twee of meer noten met verschillende toonhoogte die gelijk- noemen we Òinversies.Ó tijdig klinken. Akkoorden bestaande uit drie noten noemen we ÒdrieklankenÓ. Dit is het meest elementaire type van akkoord. Mute Een geluid of klank uitschakelen.
Glossarium De klankgenerator van de ATELIER-serie De ATELIER-serie is uitgerust met GM-/ GS-klankgenerators. General GM System Het General MIDI system is een reeks aanbevelingen die tracht om een manier aan te reiken om de beperkingen van merkgebonden ontwerpen te overstijgen en om de MIDIcapaciteiten van geluidsproducerende apparaten te standaardiseren. Geluidsproducerende apparaten en muziekdata die voldoen aan de General MIDI-standaard, dragen het General MIDI-logo.
Technische Specificaties AT-20R AT-20R:Music Atelier Klavier Upper 49 toetsen; Lower 61 toetsen; Pedalboard 13 noten Voices (108 Voices) Upper Organ: Full, Jazz, Pipe enz. Upper Orchestral: Arranger-functie Arranger On/Off, Start/Stop, Intro/Ending, Sync Start, Fill In (Variation/Original), Advanced/Basic, One Touch Program Aantal Registration-geheugens 4 Composer Tracks: 7 Nootcapaciteit : ongev. 40,000 noten Strings, Piano, Brass, Choir, Guitar enz. Lengte v/d song: max.
Technische Specificaties AT-20R Computer-connector Stroombron AC 117 V, AC 230 V or AC 240 V Stroomverbruik 80 W (AC 117 V) 65 W (AC 230 V) 65 W (AC 240 V) Afwerking Traditional Walnut Afmetingen Console (Inclusief partituurhouder) : 1146 (B) x 567 (D) x 471 (H) mm 45-1/8 (B) x 22-3/8 (D) x 18-9/16 (H) inches Onderstel (Inclusief Pedalboard) : 1152 (B) x 515 (D) x 748 (H) mm 45-3/8 (B) x 20-5/16 (D) x 29-1/2 (H) inches Totaal (Inclusief partituurhouder en Pedalboard) : 1152 (B) x 567 (D) x 1219 (H) mm
Technische Specificaties AT-30R AT-30R:Music Atelier Effecten Rotary Sound, Chorus, Reverb, Sustain, Glide Klavier Upper 49 toetsen; Lower 61 toetsen; Pedalboard 13 noten Voices (150 Voices) Upper Organ: Full, Jazz, Pipe, Theater enz.
Technische Specificaties AT-30R Pedalen Accessoires Demperpedaal Zitbankje Expressiepedaal Handleiding Twee voetschakelaars (toewijsbaar) 3.
Index A I Akkoord .....................................................................41Ð42 Arrangement ...................................................................40 Arranger ....................................................................41, 44 Automatische Begeleiding ......................................41, 44 Initial Touch ..................................................................102 Inladen Disk Rhythm ..............................................................
Index Hoe u op het Bass Pedalboard kan spelen ..........103 Punch-in Recording .......................................................87 Q Quantize ..........................................................................99 R Registration .....................................................................59 Bewaren .....................................................................64 Gemaakt op een ouder model ................................68 Inladen ................................................