
Organ Owner's Manual
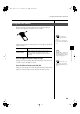


Table Of Contents
- USING THE UNIT SAFELY
- IMPORTANT NOTES
- Main Features
- Contents
- Panel Descriptions
- Before You Start Playing
- About the Display
- Selecting and Playing Sounds
- Listening to the Demo Songs
- Selecting Voices
- Creating Organ Sounds (Vintage Organ)
- Performing with an Active Expression Voice
- Adjust the Volume Balance
- Transpose the Pitch in Octave Units (Octave Shift)
- Sustaining Notes Played on the Lower Keyboard
- Playing Drums from the Entire Lower Keyboard (Drums/SFX)
- Using the Lower Keyboard to Play the Bass Voice (Bass Split)
- Using the Lower Keyboard to Play the Bass Voice (Pedal [To Lower] button)
- Using the Rhythm Performance
- Selecting a Rhythm
- Playing Rhythm
- Changing a Tempo of Rhythm and Automatic Accompaniment
- Playing a Countdown Sound When the Intro Ends
- Playing Rhythm and Automatic Accompaniment
- Adding Variety to the Rhythm or Automatic Accompaniment
- Turning Chord Intelligence On/Off
- Using the Leading Bass Function
- A Simple Way to Make Automatic Accompaniment Settings (One Touch Program)
- Using a Rhythm from a USB Memory
- Copying Rhythms
- Deleting Saved Rhythm
- Using the Registration Buttons
- Using the Performance Functions
- Adding Various Effects to a Voice
- Record and Playback Your Performance
- What is a Track Button?
- Playing Back Performance Songs Stored on USB Memory and SMF Music Files
- Silencing a Specific Track (Track Mute)
- Recording a Performance
- Playing Back a Performance Song
- Add a Count Sound to Match the Timing (Count In)
- Recording Each Part Separately
- Re-Recording
- Erasing a Performance Song
- Changing the Name of a Performance Song (Rename)
- Saving Performance Songs
- Loading Performance Songs Into the ATELIER
- Deleting Performance Songs Stored on “Favorites” or the USB Memory
- Layering a New Recording onto SMF Music Files
- Using Song with a Different Tempo Than That of the Performance Song
- Copying Performance Song
- Enjoying VIMA TUNES Songs
- Listening to Songs from Music CD
- Various Other Settings
- Folder Settings
- Adjusting How the Instrument Responds
- Performance Function Settings
- Rhythm Settings
- Registration Settings
- Composer Settings
- Switching the Display of Lyrics On or Off (Lyrics)
- Changing the Key When Playing Back Songs (Playback Transpose)
- Changing the Metronome Setting (Metronome)
- Adjusting the Metronome Volume (Metronome Volume)
- Changing the Sound of the Metronome (Metronome Sound)
- Setting the Beat (Beat)
- Silencing a Specific Track (Track Mute)
- Muting Individual Channels of Performance Data (Channel Mute)
- Setting the Type of CD To Be Played Back (CD/Audio Type)
- Adjusting the Timing of a Player Piano CD’s Piano Sound and Accompaniment (CD/Audio Sync)
- Other Settings
- Restoring the User Memory to the Original Factory Settings (User Memory Reset)
- Restoring All Settings Other Than the User Memory to the Original Factory Settings (Panel Reset)
- Formatting a USB Memory (Format)
- Connecting with External Devices
- Troubleshooting
- Error Message
- Chord List
- Glossary
- Music Files That the ATELIER Can Use
- Settings That Are Stored After the Power Is Turned Off
- MIDI Implementation Chart
- Main Specifications
- Demo Song List
- Index
69
Using the Performance Functions
Using the Performance Functions
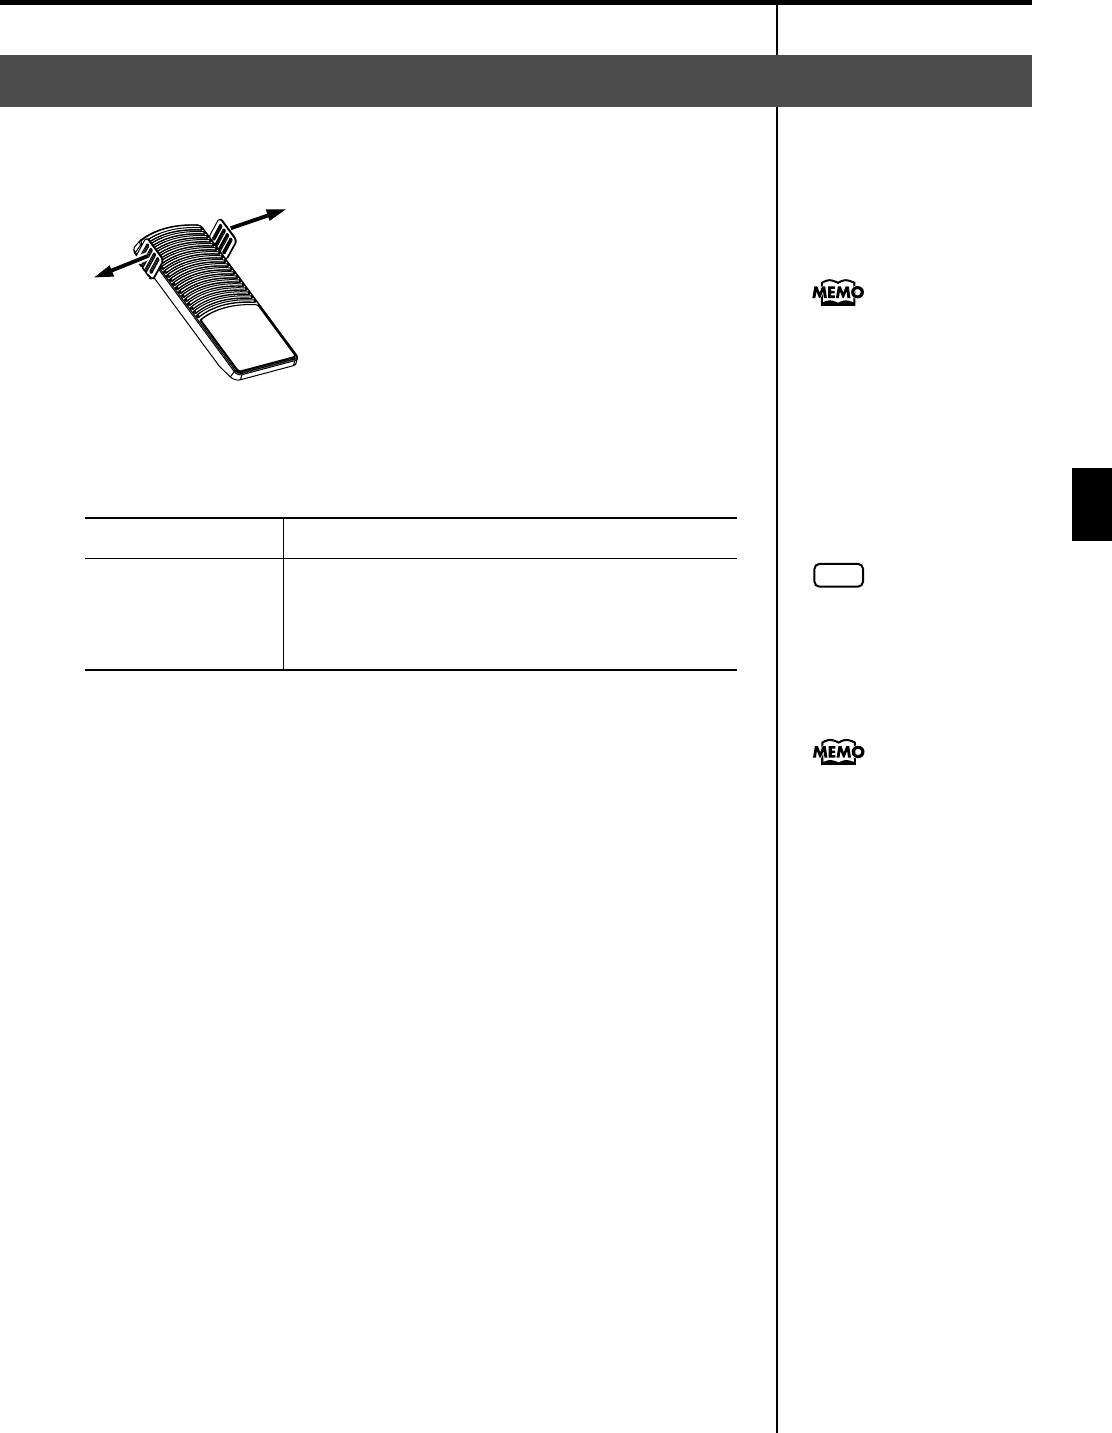
On each side of the expression pedal are two Foot Switches. Different
functions are assigned to each of these two foot switches.
fig.06-07
With the factory settings, the following functions are assigned to the left and
right Foot Switches.
Press the right Foot Switch toward the right.
If Rotary is turned on, the Rotary effect will switch between “Fast” and “Slow”
each time you press the Right Foot Switch.
Press the left Foot Switch toward the left.
While you are pressing the Foot Switch, the pitch will be temporarily lowered.
When you release the Left Foot Switch, the pitch will return to normal.
Using the Foot Switch
Right Foot Switch
Switch the Rotary effect between Fast/Slow.
Left Foot Switch
Glide (an effect by which the pitch is lowered by a
semitone while the foot switch is pressed, and is
returned to what is originally was when you release
your foot).
You can also change the
function assigned to the Foot
Switch.
Please refer to “Changing the
Function of the Foot Switch” (p.
70).
NOTE
The Glide effect is applied only
to the upper part. However, it
won’t be applied to the Vintage
Organ in the upper part.
You can store functions to be
assigned to the foot switch to
individual Registration buttons
(p. 70).
AT-75_e.book 69 ページ 2008年8月21日 木曜日 午前10時9分