* 5 1 0 0 0 1 9 7 5 1 - 0 1 *
Before using this unit, carefully read the sections entitled: “USING THE UNIT SAFELY” (p. 8), and “IMPORTANT NOTES” (p. 10). These sections provide important information concerning the proper operation of the unit. Additionally, in order to feel assured that you have gained a good grasp of every feature provided by your new unit, Owner’s manual should be read in its entirety. The manual should be saved and kept on hand as a convenient reference. Copyright © 2011 ROLAND CORPORATION All rights reserved.
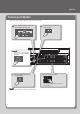
Quick Start Trying Out the Sounds Let’s try playing various instrumental sounds. Producing Sound 11. 22. Make connections. Connect the AC adaptor and headphones (sold separately) (p. 23). 33. Press the [Power] switch to turn on the power. While playing the keyboard, use the [Master Volume] knob to adjust the volume. On Off AC adaptor Headphones MEMO • You can also connect speakers (sold separately) and listen to the ATELIER’s sound through speakers (p. 23).
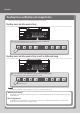
Quick Start Performing with Rhythms Here’s how to enjoy listening to rhythms in various styles while you play. 11. Press a Rhythm button to select the desired rhythm group (p. 58). 22. Use the Value [-] [+] buttons to select a rhythm. MEMO You can use the Tempo [ ] [ ] buttons to change the tempo of the rhythm. 33. Press the [Start/Stop] button to start the rhythm. 4. 4 Play along with the rhythm. Press the [Start/Stop] button once again to stop the rhythm.
Quick Start Recalling Voices and Rhythms with a Single Button Here’s how you can recall settings for voices and rhythms by pressing a single button. Recalling voices and other panel settings 11. Press and immediately release one of the registration [1]–[8] buttons. The voices and other panel settings will be recalled. Recalling voices and other panel settings as well as rhythm and tempo 11. Press and hold one of the Registration [1]–[8] buttons for several seconds.
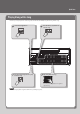
Quick Start Playing Along with a Song Here’s how you can play back one of the songs that are built into the ATELIER, and perform along with the song. 11. 33. Press the [Song] button. Press the [Play/Stop] button to play back the song. 22. 4. 4 Use the Value [-] [+] buttons to select a song. Play along with the song. Press the [Start/Stop] button once again to stop the song. MEMO You can also play back songs from USB memory or a CD (p. 88, p. 109).
About WARNING and CAUTION Notices Used for instructions intended to alert the user to the risk of death or severe injury should the unit be used improperly. Used for instructions intended to alert the user to the risk of injury or material damage should the unit be used improperly. * Material damage refers to damage or other adverse effects caused with respect to the home and all its furnishings, as well to domestic animals or pets.
USING THE UNIT SAFELY In households with small children, an adult should provide supervision until the child is capable of following all the rules essential for the safe operation of the unit. Protect the unit from strong impact. (Do not drop it!) Do not force the unit’s power-supply cord to share an outlet with an unreasonable number of other devices.
IMPORTANT NOTES Power Supply • Do not connect this unit to same electrical outlet that is being used by an electrical appliance that is controlled by an inverter (such as a refrigerator, washing machine, microwave oven, or air conditioner), or that contains a motor. Depending on the way in which the electrical appliance is used, power supply noise may cause this unit to malfunction or may produce audible noise.
IMPORTANT NOTES Before Using USB Memories Using USB Memories • Carefully insert the USB memories all the way in—until it is firmly in place. • Never touch the terminals of the USB memories. Also, avoid getting the terminals dirty. • USB memories are constructed using precision components; handle the USB memories carefully, paying particular note to the following.
Contents Quick Start. . . . . . . . . . . . . . . . . . . . . . . . . . . . . . . . . . . . . . . . . . 4 Trying Out the Sounds . . . . . . . . . . . . . . . . . . . . . . . . . . . . . . . . . . . . . . . . . . . . 4 Performing with Rhythms . . . . . . . . . . . . . . . . . . . . . . . . . . . . . . . . . . . . . . . . . 5 Recalling Voices and Rhythms with a Single Button. . . . . . . . . . . . . . . . . 6 Playing Along with a Song. . . . . . . . . . . . . . . . . . . . . . . . . . . . . . . . . . . . .
Contents Adjusting the Volume of the Vintage Organ (VintageOrganVolume). . . . . . . . . . . . . . . . . . . . . . . . . . . . . . . . . . . . 92 Changing the USB Memory Setting (USB Memory Mode) . . . . . . . . . . . . . . . . . . . . . . . . . . . . . . . . . . . . . 104 Selecting the Parts to which Vibrato or Chorus will be Applied (Vibrato/Chorus Part) . . . . . . . . . . . . . . . . . . . . . . . . . . . . . 92 MIDI Settings . . . . . . . . . . . . . . . . . . . . . . . . . . . . . . . . . . . . .
Panel Descriptions Top Panel 1 5 6 3 7 9 2 10 11 12 13 14 8 4 19 15 16 22 1 23 17 18 Solo voice select buttons (p. 29) 6 Solo part [Alternate] button (p. 29) Level [ ] [ ] buttons (p. 35) [To Lower] button (p. 47) 7 Vintage Organ buttons (p. 32) 8 [Power] switch (p. 22) This switch turns the power on/off. 4 [Master Volume] knob (p. 22) This knob adjusts the overall volume. 5 D Beam (p. 44) You can apply effects to the sound by positioning your hand above the D Beam controller.
Panel Descriptions Panel Descriptions 25 26 10 Lower voice select buttons (p. 29) 13 These buttons let you select the lower voice and adjust the volume of the lower voice. Lower part [Alternate] button (p. 29) Level [ ] [ ] buttons (p. 35) 11 Upper voice select buttons (p. 29) These buttons let you select the upper voice and adjust the volume of the upper voice. Upper Organ part, Upper Orchestral part [Alternate] button (p. 29) Level [ ] [ ] buttons (p. 35) 12 [Music Assistant] button (p.
Panel Descriptions 1 5 6 3 7 9 2 10 11 12 13 14 8 4 19 15 16 22 17 23 18 21 [Utility] button (p. 90) This button takes you to the Utility menu. [Display/Exit] button This button returns you to the previous screen or cancels an operation. ][ ] buttons Menu [ These buttons select parameters. Value [-] [+] buttons These buttons select a song or rhythm, or edit the value of a setting. Display (p. 23) This shows information such as the rhythm name or song title. 19 [Load] button (p.
Panel Descriptions 25 Panel Descriptions 26 23 24 Rhythm select buttons (p. 58) 26 Registration buttons (p. 67) These buttons select and play rhythms. Use these buttons to recall or store registrations. Rhythm button Tempo [ ] [ ] buttons (p. 62) Arranger [On/Off] button (p. 62) Auto [Fill in] button (p. 63) Variation [1]–[4] buttons (p. 63) [Intro/Ending] button (p. 60) [Start/Stop] button (p. 60) [Write] button [Manual] button Registration [1]–[8] buttons Rotary sound buttons (p.
Panel Descriptions Rear Panel 1 3 2 5 1 4 6 9 7 8 USB (MIDI) connector Connect your computer for transferring performance data (p. 113). 2 MIDI connectors Connect an external MIDI device here to transfer performance data (p. 113). 3 Input jacks You can connect an audio source here (p. 111).
Panel Descriptions Other Connectors Panel Descriptions 1 2 1 USB Memory connector This port lets you connect separately available USB memory or a CD drive. You can use USB memory to store a registration set or a song that you’ve recorded on the ATELIER (p. 68). You can also connect a CD drive and play back a music CD or a CD-ROM that contains SMF music files (p. 109). 2 Phones jack Connect your headphones here (p. 24).
Getting Ready Placing the ATELIER on the Stand If you place the ATELIER on a stand, you must use the KS-G8 or the KS-12 (sold separately). NOTE! • When placing the ATELIER on the stand, be careful not to pinch your fingers between the instrument and the stand. • When lifting the ATELIER onto the stand, make sure to enlist the help of at least one other person.
Attaching the Music Rest 1. Remove the two music rest fastening screws from the rear panel. Connecting the AC adaptor 1. Make sure that the [POWER] switch is off (outward position). 2. Connect the included AC adaptor to the DC In jack located on the ATELIER’s rear panel, and plug the power cord into an electrical outlet. Getting Ready AC adaptor Power cord Indicator 2. Tighten the two screws to fasten the music rest in place.
Turning the Power On/Off * Once the connections have been completed, turn on power to your various devices in the order specified. By turning on devices in the wrong order, you risk causing malfunction and/or damage to speakers and other devices. Turning the Power Off 1. Turn the [Master Volume] knob all the way toward the left to minimize the volume. 2. Press the [Power] switch to turn it off. * Before switching the power on/off, always be sure to turn the volume down.
Connections Viewing the basic screen The ATELIER has three types of basic display screen: the Rhythm Screen, the Composer Screen and the Registration Screen. Connecting to Output Device You can connect the ATELIER to output devices such as speakers, and use them to listen to the ATELIER’s sound. The ATELIER does not have built-in speakers. To have sound be reproduced, you’ll need to connect monitor speakers or a stereo set; or you can connect headphones.
Connecting Pedals Live performance Connecting a pedalboard You can connect the ATELIER to pedalboard (PK series; sold separately). * Only pedalboard units that have a PK OUT connector can be connected. Main Out jack Power amp/speaker PK In connector Mixer, etc. MEMO If you connect speakers or an external reverb unit to the AUX Out jacks, you’ll be able to much more readily express the expansiveness of the stereo sound field and add more of a sense of presence to your music (p. 112).
Setting up the pedalboard Set up the pedalboard as shown below. For the PK-25A Getting Ready Position the pedalboard so that the lower keyboard’s A4 key is aligned with the center of the PK-25A’s expression pedal. Position the pedalboard so that the ATELIER’s rear panel is aligned with the PK-25A’s rear panel. For the PK-7A Position the pedalboard so that the lower keyboard’s C5 key is aligned with the center of the PK-7A’s expression pedal.
Connecting expression pedals and pedal switches Using the USB Memory Songs you record on the ATELIER and registration sets you create can be copied to separately available USB memory for safekeeping. You can connect an expression pedal (EV-7; sold separately) and pedal switches (DP series; sold separately) to the Pedal jacks on the rear panel. You can also play back SMF music files saved on USB memory (p. 88). MEMO If you’re using new USB memory, you’ll need to initialize (format) it on the ATELIER.
Listening to the Demo Songs The ATELIER contains 10 demo songs. Here’s how to play the demo songs, and fully appreciate the sounds, Rhythms, and Automatic Accompaniment that are available with the ATELIER. 1 5 Getting Ready 2 3 4 1. Press the [Registration] button and [Media] button simultaneously. 2. Press the Value [-] [+] buttons to select a demo song. 3.
Performing Selecting Sounds (Voices) The ATELIER is able to produce the sounds of various instruments. These sounds are called “Voices.” About the Voices and Parts The ATELIER is a two-manual instrument. These two manuals are called the “upper keyboard” and the “lower keyboard.” The voices of each keyboard are organized into several parts according to their character. The upper keyboard has three parts: Upper Vintage Organ, Upper Organ, and Upper Orchestral.
Functions of the Voice Buttons With the exception of the pedal bass buttons, two voices of the same category are assigned to each button. If a voice of a different category is assigned, the voice names of the two voices are printed on the button. These two voices will alternate each time you press the [Alternate] button. [Alternate] button Selected voice Unlit The voice printed on the button is selected. Lit Another voice of the same category as the voice printed on the button is selected.
Selecting a voice of the [Others] button Each part has an [Others] button. By using the [Others] button you can select voices other than organ, such as violin or flute. 1. Press the [Others] button for the Part for which you wish to specify a voice. The voice name appears in the display. 2. While the voice name is shown in the display screen, use the Value [-] [+] buttons to select the desired voice. The indicator of the selected [Others] button will blink.
Recalling Panel Settings by Choosing a Keyword (Music Assistant) The ATELIER contains panel settings appropriate for various well-known songs from around the world. By choosing a keyword that suits the feel of your song, you can easily recall a rhythm accompaniment and melody voices. Choose a keyword, and then try playing the keyboard. Press the [Music Assistant] button. Performing 1. The Music Assistant screen appears. 2. Use the Value [-] [+] or Menu [ ][ ] buttons to choose a keyword.
Creating Organ Sounds (Vintage Organ) The Vintage Organ button lets you add vintage organ sounds to the upper and lower parts. In addition, you can also use the harmonic bars to modify the selected sound as desired. The ATELIER provides nine harmonic bars each for the upper keyboard and lower keyboard parts, and two harmonic bars for the pedalboard part. Each harmonic bar is assigned a sound of a different footage (pitch), and by layering these sounds you can create a variety of organ tones.
Playing a Vintage Organ Voice 1. Press the Vintage Organ [On/Off] button so its indicator is lit. Each time you press the button, the indicator will alternate between ON (lit) and OFF. Performing The Vintage organ screen appears. 2. Slide the harmonic bars that you want to hear. When a harmonic bar is pulled out all the way (8), the volume is loudest. When it is pushed in all the way (0), there will be no sound.
Adjusting the rate at which the percussion decays You can shorten the decay time of the percussion sound. 1. Press the Percussion [Fast Decay] button to switch the indicator between lit/unlit. Percussion [Fast Decay] Button Explanation Lit The percussion sound will disappear quickly. The percussion will have a sharper attack. Unlit The percussion sound will disappear slowly. The percussion will have a more gentle attack.
Adjust the Volume Balance The ATELIER allows you to adjust the volume balance individually for each Part. Performing The following buttons are used to adjust the volume of a multiple number of Parts. Button Part Automatic Accompaniment (except Bass) Accomp/SMF [ ] [ ] button Playback of performance songs from something other than the ATELIER performance songs (for example: SMF music files) Rhythm performance Drums/SFX Manual Percussion Pedal Level [ ] [ ] button 1.
Transposing to a Different Key (Key Transpose) You can transpose the key of a performance without having to shift the position of your fingers on the keyboard. This feature is called “Key Transpose.” For example: you may play in the familiar C major scale while your music will sound in any key of your choice. 1. Press the Transpose [-] [+] buttons. Each press of the Transpose [-] [+] buttons transposes the key a semitone. The transpose value is displayed in the screen.
Transpose the Pitch in Octave Units (Octave Shift) The pitch of the sound played by the keyboard can be adjusted in one-octave steps. This function is called “Octave Shift.” You can individually specify Octave Shift for each of the following parts. • Upper Organ part • Upper Orchestral part • Lower part • Pedal part • Solo part Press the [Utility] button. 2. Press the Menu [ 3. Press the [Utility] button. 4. Use the Menu [ Part 5. ][ ][ Performing 1. ] buttons to select “Octave Shift.
Adding Effects to a Voice The ATELIER allows you to apply various effects to the sounds you play from the keyboard. Adding Harmony to a Melody (Harmony Intelligence) Harmony appropriate for the chord you play in the lower keyboard can be added to the highest note played in the upper keyboard. This function is called “Harmony Intelligence.” When you press the [Harmony Intelligence] button, the voice most suitable for the selected harmony intelligence will be selected automatically. 1.
Adding Modulation to the Sound (Rotary Effect) Rotary is an effect which simulates the sound of rotating speakers. There is a choice of two settings: Fast and Slow. Performing 1. Select the voice to which you wish to apply the Rotary effect. 2. Press the Rotary Sound [On/Off] button (confirm that its indicator is lit). The Rotary effect will be applied to the voice. 3. Press the Rotary Sound [Fast/Slow] button to switch between Rotary Fast (Lit) and Rotary Slow (Unlit).
Adding Resonance to the Sound (Sustain Effect) Sustain allows you to add a Sustain effect or decay to each voice after the keys are released. The Sustain effect can be added simultaneously to the Upper (except the Solo Part), Lower, and Pedal voices. * The Sustain effect will not be applied to the Solo part and vintage organ part voice. 1. Press the [Utility] button. 2. Press the Menu [ 3. Press the [Utility] button. 4. Press the Menu [ ][ ][ ] buttons to select the “Sustain.
Adding Reverberation to the Sound (Reverb Effect) Reverb is an effect that adds a sense of spaciousness to the sound, creating the illusion of playing in a concert hall. Press the Reverb [ ] [ ] buttons to adjust the overall Reverb amount. Performing 1. When you press the Reverb [ ] button, additional Reverb is applied. Pressing the Reverb [ ] button decreases the Reverb level. When you press the Reverb [ ] [ ] buttons, the Reverb level will be shown in the display.
Changing the wall type By changing the type of reverb you can experience the feeling of performing in various different locations, and by changing the Wall Type (wall material) you can make further adjustments to the way in which reverberation occurs. 1. Press the [Utility] button. 2. Press the Menu [ 3. Press the [Utility] button. 4. Press the Menu [ 5. Press the Value [-] [+] buttons to select a Wall type. ][ ][ ] buttons to select “Reverb.” ] buttons to select “Wall Type.
Making the Sound Distort (Overdrive Effect) The Overdrive effect makes the sound distort. 1. Press the [Utility] button. 2. Use the Menu [ 3. Use Value [-] [+] to adjust the amount of distortion. ][ ] buttons to select “Overdrive.” Explanation 0–12 Higher values apply the Overdrive effect more strongly. Performing Settings To return to the basic screen, press the [Display/Exit] button. MEMO For details on voices to which the overdrive effect can be applied, refer to “Voice & Rhythm List.
Using the D Beam Controller to Modify the Sound By positioning your hand above the D Beam controller located on the front panel, you can easily modify the sound or produce sound effects. This is a useful way to make your live performance even more expressive. 1. Press either the D Beam [Pitch], [Filter], or [Volume] button, so its indicator is lit. Pressing the button cycles the illumination status of the indicator between lit (red), lit (green), and unlit.
Using the Lower Keyboard Effectively You can divide the lower keyboard into two or more sections and play solo voices, play the pedal bass voice, or combine a variety of uses for even more versatility. For example, the following applications are possible. Using the lower keyboard to play the solo voice Press the Solo [To Lower] button in the Solo section to Play the Solo voice to the Lower keyboard (p. 48).
Using the lower keyboard to play drum sounds and solo voice Press the [Drums/SFX] button, and then press the Solo [To Lower] button (p. 47, p. 50). Drums/SFX Manual Percussion Bass Lower Solo By changing the combination of voices that are played on the Lower keyboard, and by changing the Solo Split Point (p. 47) and Bass Split Point (p. 48), you can create the following types of setup.
Playing the Solo Voice on the Lower Keyboard (Solo To Lower) Normally, the solo voice will sound on the upper keyboard. By using the Solo [To Lower] button, you can play the solo voice in the righthand side of the lower keyboard that includes the B4 key. The state in which the keyboard is divided in this way is called “split,” and the location at which the keyboard is divided to play the solo voice in the lower keyboard is called the “Solo Split Point.” Performing 1.
Using the Lower Keyboard to Play the Bass Voice (Bass Split) By using the “Bass Split” function you can play the bass voice in the left-hand side (including C3) of the lower keyboard. The location at which the lower keyboard is divided in this way, to play the pedal bass voice, is called the “Bass Split Point.” 1. Select a Pedal Bass voice (p. 29). 2. Press the [Utility] button. 3. Press the Menu [ 4. Use the Value [-] [+] buttons to turn ”Bass Split” on. ][ ] buttons to select “Bass Split.
Playing a Lower Voice with Percussion Instrument Sounds and a Voice Phrase (Manual Percussion) You can play various drum sounds and sound effects using the bottom 15 keys of the Lower keyboard. This is convenient when you wish to play the Lower voice together with drum sounds or sound effects. The keys for Drum sounds or Sound Effects 1. Performing 15 keys Lower keyboard Press the [Manual Percussion] button (indicator lights).
Playing Drums from the Entire Lower Keyboard (Drums/SFX) You can use the Lower keyboard to play various drum sounds (drum set). In this case, the Lower voices will no longer sound. 1. Press the [Drums/SFX] button (indicator lights). Play the Lower keyboard and listen to the various drum sounds on each key. The [Drums/SFX] button will alternate between on (lit) and off each time it is pressed. * For some drum sets, there will be keys that do not sound.
Using the Lower Keyboard to Play the Bass Voice (Pedal To Lower) By using the Pedal [To Lower] button, you can sound the Pedal Bass voice by playing the root note (p. 122) of a chord on the Lower keyboard in the area that is playing the Lower voice. Select a Pedal Bass voice (p. 29). 2. Press the Pedal [To Lower] button (indicator lit). Performing 1. When you play a chord in the area of the Lower keyboard that sounds the Lower voice, the Pedal Bass voice will also be heard and will play the root note.
Realistically Expressing Acoustic Instrument Performances (SuperNATURAL Voices) Acoustic instruments are noted for their richly varied tonal changes and the diversity of their performance techniques; these are indispensable elements that produce the distinctive charm of such instruments. “SuperNATURAL voices” are special voices that are able to realistically express the sounds and performance techniques of these acoustic instruments.
Selecting the SuperNATURAL voice of the [Others] button 1. Press the Solo part [Others] button. The display will show the voice name. Performing The indicator of the selected [Others] button will light. 2. While the display shows the voice name, use the Value [-] [+] buttons to select a SuperNATURAL voice. The indicator of the Solo [Others] button will blink. SuperNATURAL voices have an “N.” at the beginning of their name. If you decide to cancel the procedure, press the [Display/Exit] button. 3.
Playing a SuperNATURAL Voice When you play a SuperNATURAL voice, its tone quality will change appropriately when you play legato or staccato passages. In addition, using the foot switches or D Beam while you perform can apply a variety of effects to the sound, making your performance expression even richer and more realistic. If you want to use the foot switches while performing, assign the foot switch functions (L Foot Switch, R Foot Switch) to “N.CONTROL 1” and “N.CONTROL 2” (p. 93).
Adjusting the Overall Volume Using an Expression Pedal You can use a pedalboard (PK series; sold separately) or expression pedal (EV-7; sold separately) to adjust the ATELIER’s overall volume. Stepping down on the expression pedal will increase the volume; releasing the pedal will decrease the volume. Decrease the volume Increase the volume MEMO • Even as you release your foot from the expression pedal and lower the volume, the lower-range portion will linger on.
Performing with an Active Expression Voice For “Active Expression Voices,” operating the expression pedal will control not only the volume but also the tone, or may add additional sounds. MEMO If you want to use an expression pedal, you’ll need to connect a pedalboard (PK series; sold separately) or an expression pedal (EV-7; sold separately) (p. 26). 1. Press the [Others] button of the Part to which you want to assign an Active Expression voice. The voice name appears in the display.
Using the Foot Switch There are two foot switches located at either side of the expression pedal on the pedalboard (PK series; sold separately). These two foot switches are assigned the following functions. Right foot switch Left foot switch Performing When the power to the ATELIER is turned on, the following functions are assigned to the left and right foot switches.
Performing with Rhythms The ATELIER lets you enjoy playing along with a rhythmic accompaniment. Selecting a Rhythm The ATELIER provides 210 types of Rhythms and Automatic Accompaniments (Music Styles). The four buttons shown below are known as the “Rhythm buttons.” They allow you to select a rhythm from eight different groups, which are organized according to musical genre. Each rhythm button corresponds to two groups. By pressing a button that is lit, you can select that button’s other group.
Selecting Rhythms Stored in User Memory or USB Memory Here’s how to play rhythms that are stored in user memory or USB memory. You can select these rhythms by choosing the User group. MEMO With the factory settings, rhythms are already stored in user memory. 1. If you want to select rhythms from USB memory, connect your USB memory to the USB Memory connector. 2. Press the Rhythm [Ballad/User] button a number of times to select the user group. The Rhythm select screen appears.
Playing Rhythm There are two ways to start the rhythm. You can press the [Start/Stop] button to start the rhythm, or you can use Synchro Start to have the rhythm start when you play the lower keyboard or the pedalboard. You can also make the rhythm start with an intro, or stop with an ending. Starting with an added intro 1. Press the [Intro/Ending] button. 2. Press the [Start/Stop] button. The [Intro/Ending] button indicator will light. The Intro is played and the Rhythm starts.
Stopping the Rhythm Stopping with an ending 1. Press the [Intro/Ending] button. An Ending is played, then the Rhythm stops. While the Ending is playing, the [Intro/Ending] button indicator will light, until the Ending finishes the button indicator will be turned off. Stopping without an ending 1. Press the [Start/Stop] button. The Rhythm stops without an Ending being played. Performing with Rhythms Stopping with the ending short and simple 1. Press the Variation [1] button. 2.
Changing a Tempo of Rhythm and Automatic Accompaniment You can change the tempo of the Rhythm or Automatic Accompaniment. 1. Press the Tempo [ ][ ] buttons to change the tempo (speed) of the Rhythm or Automatic Accompaniment. Button Explanation Tempo [ ] button The tempo becomes slower Tempo [ ] button The tempo becomes faster The value of the tempo currently set (20–500 beats per minute) can be checked in the display. You can also check the tempo by viewing the Beat indicator.
Adding Variety to the Rhythm or Automatic Accompaniment You can add variety to the rhythm or automatic accompaniment by changing the rhythm pattern of the rhythm. Performing with Rhythms 1. Press the Auto [Fill In] button (indicator lights). A fill-in will automatically be added when you press a Variation [1]–[4] button to change the accompaniment or rhythm arrangement.
A Simple Way to Make Automatic Accompaniment Settings (One Touch Program) When using the Arranger function (p. 62) for automatic accompaniment, you can also use the “One Touch Program” function to automatically select panel settings that are appropriate for the selected rhythm. By pressing the [One Touch Program] button, you can make the following settings. • Panel settings (e.g.
Deleting a Rhythm from User Memory or USB Memory You can delete rhythms stored in User memory or USB memory. 1. Select the rhythm you want to delete (p. 58). 2. Press the [Load] button and [Save] buttons simultaneously. The following display appears. Performing with Rhythms To cancel the procedure, press the [Reset] button. 3. Press the [Rec] button. While the Rhythm is being deleted, the following screen will be displayed. When saving is complete, the Rhythm select screen reappears.
Storing Your Performance Settings (Registration) The ATELIER allows you to store sound settings and panel settings such as 8 in the Registration buttons. There are a total of 8 Registration buttons, and one set of panel settings can be stored in each, allowing you to register a total of 8 different panel settings. A “registration,” which consists of a collection of panel settings, can be stored at each of the registration buttons.
Storing Registrations 1. Make all the panel settings that you wish to store. 2. While holding down the [Write] button, press one of the Registration [1]–[8] buttons. The panel settings will be stored in the selected Registration button. * If you’ve made panel settings, but haven’t saved them, and then call up a registration, the panel settings that you didn’t save will be discarded.
Saving Registration Sets With the settings of Registration buttons [1]–[8] considered as one set, you can store the registration set to USB memory or User memory. We recommend that complex panel settings or Registrations you wish to keep be saved on USB memory. Furthermore, when you save registrations created on the ATELIER to USB memory, you can call up their settings on other ATELIER Series instruments and use the registrations the same way. 1. Prepare to save the performance data.
8. 9. Press the Value [-] [+] buttons to select the format in which the data will be saved. Display Explanation ORIGINAL Save formats that can be used with the AT-350C. When saved in this format, the data can also be used by AT-S series, AT-900, AT-900C AT-800, AT-300, AT-100, AT-75, AT-45 and AT-15 devices. R-SERIES Save formats that can be used with AT-R Series devices. Press the [Save] button. Saving of the registration data will begin.
Loading Previously Saved Registration Sets Into the ATELIER Here’s how to recall a previously saved Registration set from the User memory or USB memory into the memory of the ATELIER. Registrations can be selected in the following three ways. Loading a Set of Registrations You can load a “set” (a collection of settings for Registration buttons [1]–[8]) from USB memory or user memory. Loading an Individual Registration (p. 71) Recall the settings of one of the Registration [1]–[8] buttons.
Loading an Individual Registration Recall the settings of one of the Registration [1]–[8] buttons. 1. If you want to load a registration from USB memory, connect your USB memory to the USB Memory connector. 2. Press the [Registration] button to make the indicator light. The Registration Select screen appears. 3. Press the [Media] button to select the desired media. If you want to load from the registration of USB memory, select “USB Memory.
Recalling the Order that the Registrations are Saved (Load Next) You can recall Registrations in the order in which they were saved on the USB memory or User memory. This function is called “Load Next.” When you will be performing live, you can save Registration sets to USB memory in the order in which you will be performing. Then while you perform, you can recall the next Registration set easily and smoothly.
Deleting a Set of Registrations Here’s how to delete a Registration set that was saved to a USB memory, or User memory. 1. Prepare the registration that you want to delete. If you want to delete registration data from the USB memory, connect the USB memory to the USB Memory connector. 2. Press the [Registration] button to make the indicator light. The Registration select screen appears. 3. Press the [Media] button to select the desired media.
Recording Your Performance You can record your own performance to see how you sound, or you can play along with a recorded performance. The ATELIER lets you record in the following ways. Recording format SMF recording (p. 75) Explanation Records the song in SMF format. You’ll be able to record and play back parts individually, using the ATELIER’s distinctive functionality. Records the song in audio format. Audio recording (p.
Recording in SMF Format Here’s how a song you perform can be recorded in SMF format. 3 6 4 5 7 2 Recording Your Performance Preparing to record 1. Select the panel settings needed for recording the performance. 2. Press the [Rec] button. The [Rec] button indicator will light, and the [Play/Stop] button will blink. 3. Press the Value [-] [+] buttons to select ”SMF.” Starting and stopping recording 4. Press the [Play/Stop] button to start recording.
Listening to the recorded performance 6. Press the [Reset] button. The location at which playback will start will return to the beginning of the first measure (bar). If you wish to begin playback from the middle of the song, press the [Bwd] button or [Fwd] button to move to the measure from which you wish to begin playback. 7. Press the [Play/Stop] button to start playback. After playback reaches the end of the performance, it will stop automatically.
Advanced Recording Methods Recording each part separately In this method, each part (track button) is recorded one after another: first the bass part, then the Lower part, etc. If there are any previously recorded performances, you can listen to them as you record additional parts. 4 5 6 3 2 Select the panel settings needed for recording the performance. 2. Press the [Bwd] button or the [Fwd] button to select the desired measure (bar) when you start recording. Recording Your Performance 1.
Re-recording You can record over recorded performance data. 3 4 1. 5 2 1 Press the [Bwd] button or the [Fwd] button to select the desired measure (bar) when you start recording. If you wish to start recording from the beginning of the song, press the [Reset] button. 2. Press the [Rec] button to enter recording standby mode. The [Rec] button indicator will light, and the [Play/Stop] button and the unrecorded track buttons will blink. The track buttons that are already recorded will light. 3.
Layering a new recording onto SMF music files You can load commercially available SMF music files into the ATELIER, and record your own performance on top of it. During recording, the data you’ve loaded will be played back, while you record your performance. 4 2 3 Recording Your Performance 1. 5 Prepare the SMF music files. If you’re using SMF music files from USB memory, connect it to the USB Memory connector. 2. Press the [Song] button (confirm that its indicator is lit).
Re-recording using performance data from a USB memory If you want to re-record performance data from a USB memory, you must first load that performance data into the ATELIER’s internal memory. 4 2 5 3 1. Prepare the performance data. 2. Press the [Song] button (confirm that its indicator is lit). Connect the USB memory to the USB Memory connector. The Song Select screen appears. 3. Press the [Media] button to select “USB Memory.” 4.
Saving Performance Songs The performance data that you recorded will disappear when the power of the ATELIER is turned off. If you wish to keep the performance data, you can save it on a USB memory, or “Favorites” (internal memory). If the recorded performance data has not been saved, the display will show the “ performance data. ” symbol. This symbol will disappear when you save the 6 4 6 8 1. 7 9 Recording Your Performance 2 5 3 Prepare to save the performance data.
6. Give the performance data a name. Press the Menu [ ][ ] buttons to move the cursor, and press the Value [-] [+] buttons to select a character. Button Explanation Select a character. The following characters can be selected. Value [-] [+] buttons space ! “ # % & ’ ( ) * + , - . / : ; = ? ^ _ A B C D E F G H I J K L M N O P Q R S T U V W X Y Z a b c d e f g h i j k l m n o p q r stuvwxyz0123456789 [Reset] button Delete a character. [Rec] button Inserts a space. 7.
If the following screen appears If you select a number at which performance data has already been saved, the following screen appears. If you wish to update the contents of the performance data 1. Press the [Rec] button. If you want to save your performance as new data without overwriting the existing data 1. Press the [Reset] button to stop the Save operation. 2.
Erasing Performance Data If you wish to discard your recording and re-record from the beginning, or if you wish to record a new performance, you must erase the previouslyrecorded data. 2 1 3 1. Press the [Display/Exit] button a number of times to access the composer screen. 2. Press the [Load] and [Save] buttons simultaneously. The following message, asking you to confirm your choice, will be displayed. To cancel the procedure, press the [Reset] button. 3.
Recording in Audio Format Here’s how to record your performance in audio format. * Performances recorded in audio format are saved on a USB memory. If you want to record audio, you must connect your USB memory to the USB Memory connector. 4 6 9 8 3 Recording Your Performance 5 7 Preparing to record 1. Connect your USB memory to the USB Memory connector (p. 26). 2. Select the panel settings needed for recording the performance. 3. Press the [Rec] button.
Naming your performance data 7. Press the Menu [ ][ ] buttons to move the cursor, and press the Value [-] [+] buttons to select a character. Button Explanation Select a character. The following characters can be selected. Value [-] [+] buttons _ABCDEFGHIJKLMNOPQRSTUVWXYZ0123456789 [Reset] button Delete a character. [Rec] button Inserts a character. * You can’t specify “_” (underline) as the first character. Saving the performance data 8. Once you’ve given it a name, press the [Save] button.
Changing the Name of Performance Data You can change the name of performance data that’s been recorded in audio format. 2 4 3 Load the performance data that is to be given a name change (p. 80). 2. Press the [Display/Exit] button a number of times to access the composer screen. 3. Press the [Save] button. 4. Press the Menu [ ][ Recording Your Performance 1. 5 ] buttons to move the cursor, and press the Value [-] [+] buttons to select a character. Button Explanation Select a character.
Playing Performance Data from User Memory or a USB memory Here’s how to play back performance data that’s been saved in user memory or on a USB memory. 4 2 3 5 6 1. Prepare the song that you want to play back. 2. Press the [Song] button so its indicator is lit. If you want to play back performance data from a USB memory, connect it to the USB Memory connector. The song select screen appears. 3. Press the [Media] button to choose the media.
Deleting a Saved Performance Songs You can delete performance data that was saved onto a “Favorites,” or USB memory. If you want to delete a song in USB memory, connect your USB memory to the USB Memory connector before you continue. 4 3 1 2 Recording Your Performance 5 1. Press the [Song] button (confirm that its indicator is lit). The Song select screen appears. 2. Press the [Media] button to select the media. 3.
Detailed Settings for Various Functions Basic Operations in the Utility Screen In the Utility screen you can make various settings related to performance and recording. 1 3 2 5 4 Selecting the parameter to edit 1. Press the [Utility] button. The [Utility] button’s indicator will light, and the Utility screen appears. 2. Use the Menu [ ][ ] buttons to select the parameter that you want to edit.
Settings you can change Parameter Octave Shift Page p. 100 Octave Shift: Lower Copy Song p. 101 Octave Shift: Upper Organ Copy Registration p. 102 Octave Shift: Upper Orchestra Copy Rhythm p. 103 Octave Shift: Solo Format Media p. 104 Sustain: Upper Melody p. 110 Recommended Tone p. 111 Metronome p. 97 Metronome Volume p. 97 Metronome Sound p. 97 p. 37 Sustain: Pedal Length: Upper Media Utility VIMA TUNES p. 40 Metronome Length: Lower Length: Pedal Beat p.
Adjusting How the Instrument Responds Adjusting the Volume of the Vintage Organ (VintageOrganVolume) You can adjust the volume of the Vintage Organ sound to regulate the volume balance relative to the other sounds. Value Explanation 0–12 Increasing the value will increase the volume of the Vintage Organ sound. Selecting the Parts to which Vibrato or Chorus will be Applied (Vibrato/Chorus Part) For the vintage organ voices, you can choose the parts to which the vibrato or chorus effect (p.
Changing the Pedalboard Polyphony (Pedal Bass Mode) You can set the Bass Pedalboard to play simultaneous multiple notes or single notes only. Value Explanation MONOPHONIC Only single notes can be played. POLYPHONIC Multiple notes can be played. Performance Settings Changing the Foot Switch Functions (L Foot Switch, R Foot Switch) You can select the functions that are assigned to the foot switches of the pedalboard (PK series; sold separately).
Changing the Pitch Bend Range (Pitch Bend Range) This setting allows you to choose the maximum amount of Pitch change (range) permissible when using Pitch Bend (p. 44). The range can be set anywhere between 1–12 (in semitone units; with a maximum of one octave). Value Adjusting the Depth of the Expression Pedal (Exp. Curve) You can set the amount of effect applied when you step on the expression pedal.
Rhythm Settings Producing Chords with Simple Fingering (Chord Intelligence) “Chord Intelligence” is a feature that intelligently plays the correct accompaniment chords the moment you play a key specifying a chord on the Lower keyboard during Automatic Accompaniment. To play a C chord on the Lower keyboard, for example, you usually have to press down the three keys C, E, and G; but with Chord Intelligence, you only have to press the C Key to initiate a C chord accompaniment.
Adjusting the Volume Balance of the Arranger (AccompPartBalance) You can adjust the volume balance of each part. 1. Press the [Utility] button. 2. Use the Menu [ ] [ ] buttons to select “AccompPartBalance.” Registration Settings Using the Foot Switch to Switch Registrations (Registration Shift) A foot switch of the pedalboard (PK series; sold separately) can be assigned the function of successively switching registrations. Each time you press the foot switch, the registration will be changed.
Registration Arranger Update (Arranger Update) You can specify how the settings related to Rhythm performances and Automatic Accompaniment will be recalled when you press a Registration [1]–[8] button. Value Explanation DELAYED Settings related to Rhythm performances and Automatic Accompaniment will be recalled when you hold a Registration button for several seconds. If you quickly press the Registration button, only the panel settings (voice, etc.
Silencing a Specific Track (Track Mute) Here’s how to individually mute tracks of SMF format performance data. 1. Press the [Utility] button. 2. Using the Menu [ 3. Press the Value [-] [+] buttons to select the track that you wish to mute. ][ ] buttons, select “Track Mute.” Performance data recorded in SMF format has seven tracks. On each of the tracks, a certain type of performance is recorded, as shown below. 4.
Muting Individual Channels of Performance Data (Channel Mute) You can mute (silence) individual channels of performance data of SMF music files (commercially available). 1. Press the [Utility] button. 2. Press the Menu [ 3. Press the Value [-] [+] buttons to select the channel that you wish to mute. ][ ] buttons to select “Channel Mute.” From the left, these are “1 Ch. (channel 1), 2 Ch. ... 15 Ch., and 16 Ch.
Media Settings Changing the name of a folder Creating a Folder in USB Memory or User Memory (Create Folder) You can create folders in a connected USB memory device or in user memory. Here’s how to rename a folder. * If the folder name includes Japanese characters, you won’t be able to rename the folder. 1. Press the [Registration] button. 2. In the Registration select screen, select the folder that you want to rename. 3. Press the [Save] button. 4.
Copying Performance Song (Copy Song) Performance songs and SMF music files from USB memory can be copied to “Favorites” (User memory). If performance data saved in USB memory is stored in “Favorites,” the stored performance song will not disappear even when you turn off the power. It is convenient to load frequently-used performance song into “Favorites.” Performance songs saved in “Favorites” can also be copied to USB memory. 11. Press the [Utility] button to copy the song.
Copying Registrations (Copy Registration) 10. Press the Value [-] [+] buttons to select the copy destination number. Registrations from USB memory can be copied to user memory. If a registration saved in USB memory is stored in user memory, the stored registration data will not disappear even when you turn off the power. It is convenient to load frequently-used registration into User memory. Registrations saved in user memory can also be copied to USB memory.
Copying Rhythms (Copy Rhythm) User memory already contains rhythms, but you can replace these rhythms with rhythms from USB memory. Rhythms copied from the USB memory into User memory will not be lost even if the power is turned off. It is convenient to copy frequentlyused Rhythms into User memory. 10. Press the Value [-] [+] buttons to select the copy destination number. To cancel the procedure, press the [Display/Exit] button. 11. Press the [Utility] button to copy the rhythm.
Formatting a USB Memory (Format Media) The process of preparing USB memory so that they can be used with the ATELIER is called “initialization” (formatting). If the media format does not match the ATELIER’s, you will not be able to use that media with the ATELIER. 1. Connect the USB memory to the USB Memory connector. 2. Press the [Utility] button. 3. Press the Menu [ 4. Press the [Utility] button. 5. Press the Menu [ 6. Press the [Utility] button. ][ ][ ] buttons to select “Media Utility.
MIDI Settings Selecting the MIDI Transmit Channel (Tx MIDI Channel) When you use the MIDI connectors of the ATELIER to transmit musical data to external devices, for each keyboard (Upper, Lower, and Pedal) you can specify the channel on which your playing will be transmitted as MIDI messages. You can modify these Tx (Transmit) MIDI settings as needed. Parameter Channel Solo, Upper, Lower, Pedal, Drums, M.
Other Settings Using the V-LINK function (V-LINK) Adjust the Standard Pitch (Master Tune) The basic pitch of an instrument is generally considered as the pitch of the middle A note. The “Master Tune” parameter lets you adjust this basic pitch to match the pitch of any other instruments that are playing together with the ATELIER. Value 415.3 Hz – 466.2 Hz (0.
Restoring the User Memory to the Original Factory Settings (User Memory Reset) Restoring All Settings Other Than the User Memory to the Original Factory Settings (Panel Reset) You can restore the User memory to their original factory settings. This function is called “User Memory Reset.” All settings other than the User memory can be returned to their factory settings. This function is called “Panel Reset.” 1. Turn down the volume to the minimum level, then turn off the power. 1.
Restoring All the Factory Default Settings (Factory Reset) The settings stored in the ATELIER can be returned to their factory settings. This function is called “Factory Reset.” 1. Turn down the volume to the minimum level, then turn off the power. 2. While holding down the [One Touch Program] button, press the [Power] switch to turn the power on. * Do not turn off the power while the following screen is displayed. When factory reset is completed, the basic screen reappears.
Connections with Other Equipment Connecting a CD Drive and Playing Songs Listening to Songs from Music CD You can connect a CD drive to the ATELIER and use it to play music CDs. This lets you perform or sing along with the backing of a music CD. You can connect a commercially available CD drive, and use it to play back music CDs or CD-ROMs on which SMF music files are saved. * You can’t copy music CD songs to “Favorites”. * It will take a certain amount of time until a music CD can be selected.
Enjoying Karaoke with a Music CD (Center Cancel) Using a Song’s Melody as a Guide (Guide) You can reduce the playback volume of the melody within SMF music files. You can minimize the vocal sounds of a commercially available music CD, and sing the vocal part yourself. This is a convenient way to enjoy karaoke or practice soloing with a favorite music CD. * For some songs, the vocal sound may not be eliminated completely. 1. Connect a commercially available CD drive to the USB Memory connector. 2.
Enjoying VIMA TUNES Songs The ATELIER can play back separately available VIMA CD-ROMs (VIMA TUNES). This allows you to play back VIMA TUNES songs while you enjoy performing with recommended sounds. Connecting an Audio Device and Playback Sounds Here’s how to connect an audio device and play back its sounds through headphones or speakers. VIMA TUNES MEMO Use audio cables with phone plugs to make this connection.
Changing the Speaker Connection Settings By connecting speakers or an audio system to the Aux Out jacks, you can play the reverberation portion of the sound through your speakers. You can also connect an external reverb device and use it to apply reverb. Since the manually played sounds other than organ sounds can be output separately, this is convenient when you connect the ATELIER to a mixer to adjust the overall volume balance.
Connecting a Computer Connecting MIDI Devices The following become possible once you connect a USB cable (available separately) between the USB (MIDI) connector located to the lower left of the ATELIER and the USB connector of your computer. • You can use the ATELIER to play sounds from SMF music files played back with MIDI software. • By exchanging MIDI data with sequencer software, you can save songs recorded with the ATELIER to your computer, and enjoy a variety of musical control and editing features.
Example connection: Playing a MIDI sound module from the ATELIER MIDI connectors MIDI cable MIDI IN MIDI device Making the connections 1. Turn the volume all the way down on the ATELIER and on the device you’re about to connect. 2. Switch off the power to the ATELIER and the device you’re about to connect. 3. Use a MIDI cable (sold separately) to connect the MIDI connectors to each other. 4. Switch on the power to the ATELIER and the connected device. 5.
Troubleshooting If you suspect a malfunction, please read this section first. Power does not turn on Problem Cause Action Page When you press the [Power] switch, the power doesn’t come on AC adaptor is not connected correctly. Connect the AC adaptor is correctly. p. 21 Page Problems with the screen display Problem Cause Action Nothing appears on screen The ATELIER uses a liquid-crystal screen, so text may not be displayed when the ambient temperature is below freezing.
Troubleshooting Problems with the sound Problem Cause Action Page When the human voice “Jazz Scat” is selected, playing dynamics do not change the sound The setting of “Initial Touch” is turned OFF. Turn “Initial Touch” on. p. 92 Rotary effect is not be applied Some sounds do not allow the rotary effect to be applied. This is not a malfunction. --- Overdrive effect is not be applied Some sounds do not allow the overdrive effect to be applied. This is not a malfunction.
Troubleshooting Registrations do not switch correctly Problem Cause Action Page The Rhythm does not change when you press the Registration buttons The settings at which Registrations are recalled (Registration Arranger Update) has been set to “DELAYED.” Set the timing at which the arranger settings are called up (Registration Arranger Update) to “INSTANT.” p. 97 Rhythm or automatic accompaniment does not sound right Problem Rhythm does not sound Cause Action Page Rhythm Lock is on.
Troubleshooting Problems with playback functions Problem Cause Action Page Moving your hand over the D Beam controller does not produce a sound If a D Beam button is lit in red, moving your hand above the D Beam controller will apply an effect to the sound you play from the keyboard. Press the D Beam button once again so the button is lit in green. p. 44 The damper pedal affects only the Lower keyboard. The damper pedal does not affect the Upper Keyboards and Bass pedalboard.
Error Message Error Message Meaning Copy Protected. Can’t Save. To protect the copyright, this music file cannot be saved as SMF format. Write-Protected Media The protect tab of the storage media is set to the Protect (write prohibit) position. Move the tab to the Write (write permit) position and try the operation again. Can’t Save This Song. You can only play the music files. It cannot be saved on a storage media Master Disk This storage media does not allow initialization or saving.
Chord List symbol: Indicates the constituent not of chord. symbol: Chord shown with an “ ”can be played by pressing just the key marked with the “ .
Chord List F# G A B F#maj7 Gmaj7 A Amaj7 B maj7 Bmaj7 F#7 G7 A 7 A7 B 7 B7 F#m Gm A m Am B m Bm F#m7 Gm7 A m7 Am7 B m7 Bm7 F#dim Gdim A dim Adim B dim Bdim F#m7 5 Gm7 5 A m7 5 Am7 5 B m7 5 Bm7 5 F#aug Gaug A aug Aaug B aug Baug F#sus4 Gsus4 A sus4 Asus4 B sus4 Bsus4 F#7sus4 G7sus4 A 7sus4 A7sus4 B 7sus4 B7sus4 F#6 G6 A 6 A6 B 6 B6 F#m6 Gm6 A m6 Am6 B m6 Bm6 maj7 Chord List B Appendices A 121
Glossary Arrangement This refers to changes that have been made in an original tune, by adding a new accompaniment or by changing the instruments used. Automatic accompaniment Automatic Accompaniment is automatic accompaniment when just a few keys in the lower section of the keyboard are pressed to specify the chord.
Stored Items Settings that are stored after the power is turned off Solo Split Point Bass Split (ON/OFF) Bass Split Point Sustain ON/OFF Arranger Update Sustain Length Auto Std Tempo (Auto Standard Tempo) Tx MIDI Channel Aux Out Mode Initial Touch (Initial Touch Sensitivity) D Beam Sensitivity Vintage Organ Type Ez Touch Vintage Organ Volume Exp.
Main Specifications ATELIER Combo AT-350C: Music ATELIER Keyboard Sound Generator Rhythm Upper 49 keys (C3–C7) Lower 64 keys (Waterfall keyboard, A1–C7) Initial Touch Upper, Lower (10 levels for each) Sound Generator Conforms to GM2/GS/XGlite Max.
Main Specifications Weight 25.5 kg / 56 lbs 4 oz (including Music Rest) 24.
Index A I AC adaptor . . . . . . . . . . . . . . . . . . . . . . . . . . . . . . . . . . . . . . . . . . . . . . . . . . . . . . . . . . . . 21 AccompPartBalance. . . . . . . . . . . . . . . . . . . . . . . . . . . . . . . . . . . . . . . . . . . . . . . . . . . . 96 Accomp/SMF [ ] [ ] button. . . . . . . . . . . . . . . . . . . . . . . . . . . . . . . . . . . . . . . . . . . 35 Active Expression Voice . . . . . . . . . . . . . . . . . . . . . . . . . . . . . . . . . . . . . . . . . . . . . . . .
Index Percussion [Fast Decay] button. . . . . . . . . . . . . . . . . . . . . . . . . . . . . . . . . . . . . . . . . 34 Phones jack. . . . . . . . . . . . . . . . . . . . . . . . . . . . . . . . . . . . . . . . . . . . . . . . . . . . . . . . 19, 24 Pitch Bend Range. . . . . . . . . . . . . . . . . . . . . . . . . . . . . . . . . . . . . . . . . . . . . . . . . . . . . . 94 [Pitch] button. . . . . . . . . . . . . . . . . . . . . . . . . . . . . . . . . . . . . . . . . . . . . . . . . . . . . . . . . .
Information AFRICA EGYPT Al Fanny Trading Office 9, EBN Hagar Al Askalany Street, ARD E1 Golf, Heliopolis, Cairo 11341, EGYPT TEL: (022)-417-1828 REUNION MARCEL FO-YAM Sarl 25 Rue Jules Hermann, Chaudron - BP79 97 491 Ste Clotilde Cedex, REUNION ISLAND TEL: (0262) 218-429 SOUTH AFRICA T.O.M.S. Sound & Music (Pty)Ltd. 2 ASTRON ROAD DENVER JOHANNESBURG ZA 2195, SOUTH AFRICA TEL: (011) 417 3400 Paul Bothner(PTY)Ltd.
For EU Countries For China 129
For EU Countries This product complies with the requirements of EMC Directive 2004/108/EC. For the USA FEDERAL COMMUNICATIONS COMMISSION RADIO FREQUENCY INTERFERENCE STATEMENT This equipment has been tested and found to comply with the limits for a Class B digital device, pursuant to Part 15 of the FCC Rules. These limits are designed to provide reasonable protection against harmful interference in a residential installation.
* 5 1 0 0 0 1 9 7 5 1 - 0 1 *