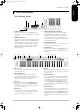
AX-7_UK Page 1 Sunday, October 21, 2001 2:12 PM ENGLISH r mg AX-7 ENGLISH MIDI Keyboard Controller Owner’s Manual ENGLISH ENGLISH Thank you, and congratulations on your choice of the Roland AX-7 MIDI Keyboard Controller. The AX-7 is a powerful, easy-to-operate, dedicated shoulder keyboard for MIDI sound modules (whether or not they are GM2/GM/GS compatible). Please take the time to read through this Owner’s Manual.
AX-7_UK Page 2 Sunday, October 21, 2001 2:12 PM Using the unit safely Used for instructions intended to alert the user to the risk of death or severe injury should the unit be used improperly. Used for instructions intended to alert the user to the risk of injury or material damage should the unit be used improperly. * Material damage refers other adverse effects respect to the home furnishings, as well animals or pets.
AX-7_UK Page 3 Sunday, October 21, 2001 2:17 PM r AX-7 Owner’s Manual ENGLISH Important notes In addition to the items listed under “USING THE UNIT SAFELY” (page 2), please read and observe the following: Repairs and data • The AX-7 can be operated using batteries or an optional adaptor. Be careful to insert the batteries the right way around. If you prefer to use an adaptor, be sure to purchase a Roland ACA model. • Before connecting the AX-7 to other devices, turn off the power to all units.
AX-7_UK Page 4 Sunday, October 21, 2001 2:12 PM The AX-7 in a nutshell 1. The AX-7 in a nutshell Four keyboard modes The AX-7’s 45-note keyboard can be used in Layer, Split, and Whole modes. Perfect control The AX-7 puts you in control of all things MIDI in your keyboard rig. Velocity sensitivity, D Beam Controller, Expression Bar, and Touch Controller are built in – and can be set for the Upper and Lower sections independently.
AX-7_UK Page 5 Sunday, October 21, 2001 2:12 PM r AX-7 Owner’s Manual ENGLISH 2. Panel descriptions ‘Neck’ (control) section A C B D A START/STOP button This button allows you to transmit MIDI Start and Stop messages to start or halt playback of an external sequencer. C EXPRESSION BAR/TOUCH CONTROLLER Press the Expression Bar to generate Modulation messages (CC01) and/or Aftertouch. Behind the Expression Bar (the “big switch”), you will find a ribbon strip. That is the Touch Controller.
AX-7_UK Page 6 Sunday, October 21, 2001 2:12 PM Panel descriptions M ENTER button Press this button to confirm a setting or a selection. O DOWN/UP buttons These buttons duplicate the DOWN/UP PATCH buttons. N EXIT button Press this button to leave the currently selected EDIT level, or to ignore the value you just set (thus returning to the previously set value). P Strap pin This is where you need to attach one end of the supplied strap.
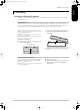
AX-7_UK Page 7 Sunday, October 21, 2001 2:12 PM r AX-7 Owner’s Manual ENGLISH 3. The basics Inserting or replacing the batteries The AX-7 can be powered either by batteries or an optional AC adaptor. For live use, batteries are by far more convenient, however. Battery replacement Note: Avoid using new batteries together with old ones. In addition, avoid mixing different types of batteries (e.g. regular carbon and alkaline batteries).
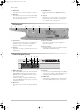
AX-7_UK Page 8 Sunday, October 21, 2001 2:12 PM The basics Connecting the AX-7 Note: Switch off both the AX-7 and the external instrument(s) before establishing or breaking the MIDI connections. The AX-7 is a MIDI controller. It contains no soundgenerating circuits of its own. You need to connect it to at least one external MIDI instrument in order to hear what you are playing. See right for the basic connections. MIDI OUT AX-7 (transmits MIDI messages) MIDI IN Module, synthesizer, etc.
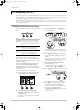
AX-7_UK Page 9 Sunday, October 21, 2001 2:12 PM r AX-7 Owner’s Manual ENGLISH 4. Keyboard modes Your AX-7 has three buttons that allow you to select one of four Keyboard modes. The KEYBOARD MODE determines how many zones and/or MIDI channels can be used simultaneously. Whole Upper C6 F2 B5 ENGLISH E2 different MIDI instruments via separate channels (Lower and Upper). Press the [SPLIT] button to select this mode.
AX-7_UK Page 10 Sunday, October 21, 2001 2:12 PM Configuring the AX-7 5. Configuring the AX-7 Your AX-7 comes with a great many MIDI parameters, or message types, that can be transmitted so as to control your MIDI rig to your liking. Most of the following parameters can be set for the Upper and Lower sections independently – and most of them can be saved to a Patch memory (see p. 17). Note: The available EDIT parameters will be presented in the order they can be selected.
AX-7_UK Page 11 Sunday, October 21, 2001 2:12 PM r AX-7 Owner’s Manual Note: See page 17 if you wish to save the settings you have just made as a Patch. ENGLISH (8) Press [EXIT] yet again to leave the EDIT mode. You will achieve the same result by pressing the lighting EDIT button (it then goes dark). CONTROL parameters As stated above, this is where you will find all parameters that are related to the AX-7’s performance functions.
AX-7_UK Page 12 Sunday, October 21, 2001 2:12 PM Configuring the AX-7 Select LL if all note messages of the section in question are to be transmitted with more or less the same velocity value. Extreme differences in dynamics (hitting very hard and very soft) will, however, allow you to trigger velocity switches if the receiving MIDI instrument supports that feature. This setting is thus not the same as “off” on other instruments – but it is very similar.
AX-7_UK Page 13 Sunday, October 21, 2001 2:12 PM r AX-7 Owner’s Manual Function CC71 Harmonic Content (Resonance) CC72 Release Time CC73 Attack Time CC74 Brightness (Cutoff) CC75 Decay Time CC76 Vibrato Rate CC77 Vibrato Depth CC78 Vibrato Delay ‘Freeze’ function Getting the D Beam to play the notes you want [8] bch (Battery Check) This parameter allows you to check the voltage of the batteries (0~100).
AX-7_UK Page 14 Sunday, October 21, 2001 2:12 PM Configuring the AX-7 DATA parameters The DATA parameters represent MIDI messages you can use for configuring the receiving MIDI instrument up to a certain point by specifying things like its main and expression volume, its Reverb and/or Chorus depth, etc. These are “static” settings that are transmitted whenever you select a Patch.
AX-7_UK Page 15 Sunday, October 21, 2001 2:12 PM r AX-7 Owner’s Manual [8] mod (MIDI mode) Upper, Lower [9] dmp (Bulk Dump) MIDI OUT ENGLISH This is not really a parameter but a function that allows you to transmit the settings of the 128 Patches (see also page 17) to an external MIDI instrument as SysEx data chunks. In most instances, the recipient will be a sequencer. Here is what you need to do in order to archive the AX-7’s settings: (1) Switch off the AX-7 and the sequencer.
AX-7_UK Page 16 Sunday, October 21, 2001 2:12 PM Configuring the AX-7 PRG CHG parameters As can be inferred from the assigned buttons ([3]~[6] and [9] have no function), this EDIT level in fact consists of two groups: the first three parameters can be set for both zones independently, while the last two apply to the AX-7 as a whole. Nevertheless, even these parameters are saved along with the remaining settings (see p. 17). See page 10 for how to select and set these parameters.
AX-7_UK Page 17 Sunday, October 21, 2001 2:12 PM r AX-7 Owner’s Manual ENGLISH 6. Miscellaneous Transpose ENGLISH Your AX-7 comes with a TRANSPOSE function you may want to use for playing songs in difficult keys. To set the desired transposition interval: You can also set the interval with the [DOWN]/ [UP] buttons. Pressing them simultaneously (1) Hold down the [TRANSPOSE] button and wait recalls the default value (1).
AX-7_UK Page 18 Sunday, October 21, 2001 2:12 PM Miscellaneous Selecting Patches (1) If you haven’t yet saved your current settings, do it now (see above). (2) Leave the currently selected EDIT mode by pressing [CONTROL], [DATA], or [PRG≈CHG] (depending on which of these buttons lights). (3) Use the [A/B] and [1]~[8] buttons to select the desired Patch memory. You can also use [DOWN]/[UP]. If, after selecting Patch b88, you press [UP] yet again, you return to Patch A11.