
User`s manual


Chapter 2 Preparation
11
2-2 Installing the Rotary Axis Unit
Installing the Rotary Axis Unit
CAUTION
Before you carry out this operation, switch off the power to the cutting machine.
Failing to do so may result in sudden movement of the cutting machine, causing the hands
or fingers to become caught and resulting in injury.
CAUTION
When installing the rotary axis unit, be careful not to let it drop or fall.
Doing so may result in injury.
Procedure
➊
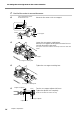
If a tool is installed, then remove it.
➋
Switch on the power to the cutting machine to start it.
The VIEW light illuminates and the table moves back toward the
front.
➌
Turn off the processing machine and unplug the power cord.
➍
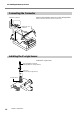
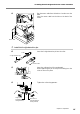
Remove the table from the cutting machine.
➎
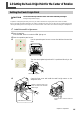
Attach the rotary axis unit.
Use the mounting screws for the table to secure it in place.
Line up the holes on the rotary axis unit shown in
the figure with the holes on the cutting machine
also shown in the figure, then attach.
Table
Hexagonal wrench
(included with the cutting machine)
Rotary axis unit