
User Manual


Panel Descriptions
(continued)
17
Advanced UsesRecording Listening Deleting Creating a CD Editing an SD Appendices
Convenient
Functions
Information
/ Display
Checking /
Preparations
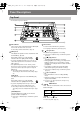
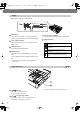
fig.unit02-e.eps
EXT MIC (L, R) jacks (XLR/TRS combo type)
Connect external mics to these jacks.
These XLR connectors can supply phantom power.
☞
“Connecting the External Mics for Recording” (Page 45)
☞
“Using Phantom Power” (Page 49)
* This instrument is equipped with balanced (XLR/TRS)
type jacks. Wiring diagrams for these jacks are shown
below. Make connections after first checking the wiring
diagrams of other equipment you intend to connect.
PLUG IN POWER MIC jack
Connect a plug in power mic to this jack.
☞
“Connecting the External Mics for Recording” (Page
45)
Ground Terminal
Connect this to an external electrical ground.
[MIC LEVEL] Switch
This selects how the mic input level is to be
adjusted.
☞
“Recording Acoustic Instruments or Vocals” (Page 41)
☞
“Adjusting the Input Level Automatically (Auto Level
Function)” (Page 44)
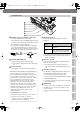
LINE IN (L, R) jacks
Connect an electronic piano, keyboard, cassette
deck, etc. to these jacks.
☞
“Recording an Electronic Instrument” (Page 50),
“Recording a Cassette or Digital Audio Player” (Page
52)
LINE OUT (L, R) jacks
Use this jack to output analog audio signals to an
external speaker system or electronic piano.
☞
“Connecting External Speakers” (Page 123)
You can choose the audio signal that will be output
from the LINE OUT jack.
☞
“Selecting the Audio Source that’s Sent from the LINE
OUT Jack” (Page 124)
PHONES jack
You can connect a set of headphones to this jack.
* If headphones are connected, there will be no sound
from the speakers.
☞
Step 4 on “Recording with the Internal Mics” (Page
41)
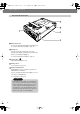
Left Side Panel
1: GND2: HOT
3: COLD
TIP: HOT
RING: COLD
SLEEVE: GND
Depending on the circumstances of a particular setup,
you may experience a discomforting sensation, or
perceive that the surface feels gritty to the touch when
you touch this device, microphones connected to it, or
the metal portions of other objects, such as mics. This is
due to an infinitesimal electrical charge, which is
absolutely harmless. However, if you are concerned
about this, connect the ground terminal with an
external ground. When the unit is grounded, a slight
hum may occur, depending on the particulars of your
installation. If you are unsure of the connection method,
contact the nearest Roland Service Center, or an
authorized Roland distributor, as listed on the
“Information” page.
Unsuitable places for connection
●
Water pipes (may result in shock or electrocution)
●
Gas pipes (may result in fire or explosion)
●
Telephone-line ground or lightning rod (may be
dangerous in the event of lightning)
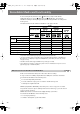
Switch
position
Explanation
MANUAL
The [MIC] knob will adjust the mic’s
input level.
AUTO
The mic input level will be adjusted
automatically. Operating the [MIC]
knob will not affect the input level.
CD-2u_SD-2u_e.book 17 ページ 2013年1月24日 木曜日 午前11時34分