
User Manual


Recording a Cassette or Digital Audio Player
(continued)
53
Advanced UsesRecording Listening Deleting Creating a CD Editing an SD Appendices
Convenient
Functions
Information
/ Display
Checking /
Preparations
6
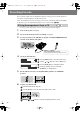
Press the [ ] (Record) button to enter recording-standby mode.
fig.rec-intmic04-e.eps
7
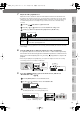
Press the [ ] (Play) button to begin recording.
8
Play back your audio device (e.g., cassette deck).
The song being played will be recorded.
9
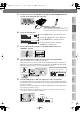
Press the [ ] (Stop) button to stop recording.
fig.rec-intmic06-e.eps
The recorded song will be added to the end of the SD memory card or CD-R/RW disc.
If you want to listen to the song you recorded, press the [ ] (Play) button
immediately after you stop recording.
Blinking
Remote control
Lit
Remote control
Remote control
●
Sound will not be produced from the speakers while in recording-standby mode or while
recording. If you want to listen to the sound that’s being recorded, you’ll need to use
headphones. (Refer to Step 4 on Page 41.)
●
When turning the [LINE] knob, you may hear a faint noise when the input level changes,
but this is not a malfunction.
●
When connection cables with resistors are used, the volume level of equipment connected
to the inputs (EXT MIC (L, R), LINE IN) may be low. If this happens, use connection cables
that do not contain resistors.
Important
If you’ve finished recording a CD-R/RW disc and would like to play that disc on another CD
player, you’ll need to execute the “Finalize” operation. You can finalize the CD-R/RW disc
when ejecting it. For details, refer to “Making a CD-R/RW Disc for Playback on Another CD
Player (Finalize)” (Page 99).
Important
CD-2u_SD-2u_e.book 53 ページ 2013年1月24日 木曜日 午前11時34分