
User Manual


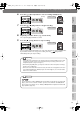


Recording Karaoke
(continued)
57
Advanced UsesRecording Listening Deleting Creating a CD Editing an SD Appendices
Convenient
Functions
Information
/ Display
Checking /
Preparations
5
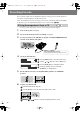
Connect your mic to the EXT MIC (L, R) jacks or PLUG IN POWER MIC jack
located on the CD-2u/SD-2u’s side panel.
fig.connect-extmic-e.eps
6
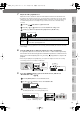
Select the External mics.
fig.menu-overdub-e.eps
Press the [MENU] button to access the menu screen.
Use the [ ] [ ] buttons to choose “MIC Select.”
Press the [ENTER] button to confirm your choice.
Use the [+] [-] buttons to choose “External,”
“Ext(MONO),” or “Plug-In Power.”
7
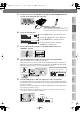
On the CD-2u/SD-2u’s left side, set the [MIC LEVEL] switch to its
“MANUAL” position.
fig.rec-intmic02.eps
8
Turn the [LINE] knob to adjust the input level at the LINE IN jacks.
Adjust the loudness of the sound you’re recording.
While playing the song to be recorded, turn the [LINE] knob to adjust the input level.
Adjust the level so that the PEAK indicator located above the [LINE] knob lights briefly
during the loudest passages of the song that’s being recorded.
fig.rec-line-e.eps
9
Turn the [MIC] knob to adjust the input level of the external mics.
As a guideline, adjust the level so that the level meter’s “-3 dB” indicator lights briefly
when audio from the connected audio device is being produced simultaneously with the
sound from the mic.
After you’ve adjusted the input level, rewind your playback device to the beginning of
the song that you want to record.
* When using the [MIC] knob or [LINE] knob, you might hear a slight noise when the recording
level changes; this does not indicate a malfunction.
fig.rec-line-e.eps
Phone type, XLR type, TRS mini type (plug-in power mic)
Types of plugs that can be connected
LouderQuieter
At this position
PEAK indicator
The level meter will move according
to the level of the audio input.
LouderQuieter
PEAK
indicator
-3dB
CD-2u_SD-2u_e.book 57 ページ 2013年1月24日 木曜日 午前11時34分