
Specifications


16
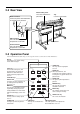
Display
This displays the various setting
menus and messages.
SETUP LED
This lights up when material is set
up. Cutting can be performed
when this is lit.
POWER LED
This lights up when the power is
switched on.
PEN FORCE Slider
This slider performs fine adjustment
of the blade force. See 3-3.
ENTER Key
This confirms menu items and
stores settings in memory.
SHEET CUT Key
This severs the material.
CURSOR Keys
TEST Key
This execute cutting test, and
confirm whether the values of
blade force, blade offset and
cutting speed are proper or not.
See 3-3.
MEMORY Key
This key calls the cutting
condition memorized.
PAUSE LED
This lights up when operation is
paused.
MENU Key
Pressing this repeatedly switches
sequentially amang the present
cutting condition, the menu mode,
and the width-display screen. See
6-3.
PAUSE Key
When pressed once, this
temporarily halts cutting in progress.
Pressing this key again releases the
paused state.
FORCE Key
This key sets the blade force.
See 3-3.
SPEED Key
This key sets the cutting speed.
See 3-3.
ORIGIN Key
This key sets the origin point.
See 3-4.
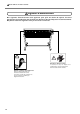
Power Connector
Connect the power cord included with
the machine to this connector.
Sheet Loading Lever
These raise and lower the
pinch rollers.
Tray
Use this to store blades.
Serial Connector
This is for connecting a
computer with a serial cable.
USB Connector
This is for connecting a
computer with a USB cable.
Brake
Sheet Sensor
2-2 Rear View
2-3 Operation Panel
For more information about the keys, see the respective reference sections and “6-3 List of Functions.”