
Specifications


25
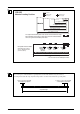
Blade Force
DOWN UP
3
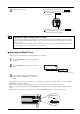
Check the state of cutting.
(1) Peel off the round section (marked by ).
When it can be peeled by itself, without disturbing the
square (marked by ), the blade force is set
appropriately.
(2) Remove the square section (marked by ).
The optimum blade pressure is correct if you can clearly
make out the lines left by the blade.
For Materials with a Strong Adhesive Layer
If you are using a material with a strong adhesive layer, the adhesive layer may adhere to itself immediately when cut. This
means that even though the material has actually been cut, it may appear as if it has not been cut, and blade force may mistak-
enly be set too high.
If a cutting test shows that the material peels easily and the blade traces on the carrier paper are optimal, then the material
is being cut. Take care not to set the blade force excessively high.
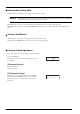
Adjusting the Blade Force
Examine the result of the cutting test and adjust the blade force accordingly.
After using the operation panel to set the blade force, if you want to raise or lower the blade force slightly, you can use the [PEN
FORCE] slider to make fine adjustment.
Move the slider to the right or left to gradually raise or lower the blade force and set it at an appropriate value.
The range of the fine adjustment using the [PEN FORCE] slider is within 30 gf up or down from the value set with the operation
panel.
When using the operation panel to set the blade force, move the [PEN FORCE] slider to its center (default) position.
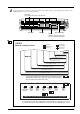
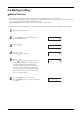
1
Set the [PEN FORCE] slider at the center (default )
position.
2
Press the [FORCE] key to display the screen in the
figure.
3
Use the [ ] and [ ] keys to adjust the numerical
value, and press the [ENTER] key to enable the
setting.
FORCE 50gf
*50gf
Setting range:
20 to 350 gf (in increments of 10 gf)
Blade force