
Specifications


42
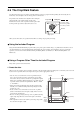
About the Origin Point and the Cuttable Area
For front loading, the [SELECT SHEET] setting made when you load the material must be set to either [ROLL] or [R-EDGE]. The
origin-point location and the area where cutting is possible are as shown below. (The figure shows the case where [ROTATE] is set
to [0 deg].)
The material is always fed toward the front of the machine as cutting proceeds. This is why the area where cutting is possible is to the
rear of the origin point. This means that even when the setting is [R-EDGE] or [ROLL], it is necessary to feed the material toward the
rear and then set a new origin point to make the required cutting area available.
With front loading, you can use either of two methods to make the required cutting area available. One is to use the [AREA] feature
on the operation panel, and the other is to use the CAMM-1 driver.
Setting the Cutting Area Using the Operation Panel
Pinch Roller
No cutting area
Pinch Roller
Front View
Material
Material
Cutting area
30 mm (1-3/16 in.)
Depends on length
when loaded
(0.0)
30 mm
(1-3/16 in.)
(0.0)
[ROLL]
Set near the left-hand pinch roller
1
Make sure the brake is released.
2
Press the [MENU] key several times until the screen
shown in the figure appears.
3
Press the [ ] key.
Press the [
] key.
Press the [
] key several times.
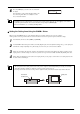
4
Press the [ ] key to change to the setting screen, then
use the [
] and [ ] keys to set the required material
length for cutting. Set the length to a negative value.
(A negative value signifies material feed toward the
back.) Set a value that is about 0.2 meters longer than
the value for the required material length in the cutting
data.
5
Press the [ENTER] key. This feeds the set length of
material toward the rear of the machine.
After material feed, the new origin point is automati-
cally set at the lower left of the cutting area made
available.
[R-EDGE]
Set at the inner left edge of the material
UNSETUP
AREA 1.0m
AREA 1.0m
*-0.5m