
Specifications


47
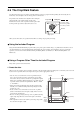
4-9 The Crop Mark Feature
Use this feature when you create stickers or the like with data created by a program in which printing data and cutting data are
interlocked, cut around figures that are already printed on the material.
Material
Crop mark: Cutting line:
Accurate cutting
around the graphic
becomes possible
Origin point
Using a Program Other Than the Included Program
Carry out the operation as described below.
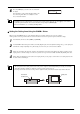
1. Create the data.
When you use the program to add crop marks to the figure, take the margins required for cutting into account when you decide on the
locations of the crop marks. Refer to the figure below to place them at appropriate locations.
Cutting area
Origin point
30 mm (1-3/16 in.)
or more
30 mm (1-3/16 in.)
or more
Width of material
Distance X
Distance Y
15 mm
(5/8 in.)
or more
15 mm
(5/8 in.)
or more
Mark 1
Mark 2
Mark 3
Mark 4
• You can choose to use either three or four crop marks. It may be
best to select four when you want to perform more-precise align-
ment or three when you want to shorten the operating time required.
When you're performing alignment using three crop marks, draw the
crop marks at the locations in the figure labeled “Mark 1,” “Mark
2,” and “Mark 3.”
• When you're using material with a large amount of feed (lengthy
material), we recommend ensuring left and right margins of about
25 mm (1 in.) each.
• Be sure to make a note of the distances between the crop marks
(distance X and distance Y in the figure at right). These need to be
entered into the machine later.
• There are no rules specifying the shape of the crop marks, but using
square-angle shapes like those shown in the figure can facilitate
alignment.
* This explanation in this section assumes you're using a shapes like
those shown in the figure at right.
Crop marks are the marks used for alignment when cutting the
printed material on the cutting machine. Saving on the
machine the locations of the crop marks oriented together with
the image makes it possible to adjust the location to cut.
When you use this feature, the operation method differs according to the program you're using.
Using the Included Program
Using the included Roland CutStudio program enables you to print, together with the image, crop marks that the machine's sensors
can automatically detect, then perform alignment automatically and carry out cutting. For information on how to perform this
operation, see the electronic-format manual (“Printing and Cutting Guide” (for Windows) or “Macintosh Cutting Guide” (for
Macintosh).)