
Specifications


58
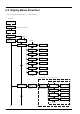
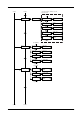
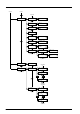
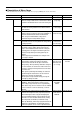
Description of Menu Items
This describes the items and functions available when you press [MENU] and enter the menu mode.
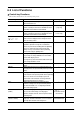
Menu Function Range Default
UNSETUP This cancels material setup (unsetup). – –
CONDITION FORCE This sets the force of the blade when the material is cut. 20 to 350 gf 50 gf
Make the setting suitable for the material and the blade (10 gf step)
installed in consideration of the result of the cutting test.
SPEED This sets the speed of the blade when the material is 1 to 85 cm/s 20 cm/s
cut. Make the setting suitable for the material and the (1 cm/s step)
blade installed.
OFFSET This sets the amount of offset for the blade during 0 to 1.000 mm 0.250 mm
cutting. Perform a cutting test and set the conditions to (0.025 mm step)
match the loaded material and the installed blade.
When using the included blade, cutting can be
performed using the factory-default settings.
UPSPEED This sets the speed of movement when the blade is AUTO/ AUTO
raised and moves to the next position for cutting during 10 to 50 cm/s
a cutting operation. (10 cm/s step)
ROTATE This rotates the cutting coordinate origin by 90 degrees. 0deg/90deg 0deg
The default setting is [0deg], which means that the
origin is at the bottom left of the material. Setting this
to [90deg] moves the origin to the bottom right of the
material, thereby rotating the cutting pattern by 90
degrees.
* Don’t forget that the coordinate axis changes when
the origin is rotated.
AREA This moves the material by the length to be cut before 24.9 m toward the 1.0 m toward
actual cutting is performed, making it possible to front to 24.9 m the front
ensure that the material will not slip or come loose toward the rear
during cutting. When performing continuous cutting on (0.1 m step)
the same material, this can also be used to make sure
that there is enough remaining material to cut the data
that will be sent.
When you are performing front loading, this feeds the
specified length of material to the rear to ensure the
cutting area, and shifts the origin point.
You can pause or stop material feed by pressing the
[PAUSE] key during execution.
QUALITY This sets the cutting quality. Ordinarily this is left set to NORMAL/ NORMAL
NORMAL]. When rapid cutting is desired, such as HI-SPEED/
when cutting a large material, set this to [HI-SPEED]. HEAVY
When load is large, or if the material is not cut smoothly,
or when small text is to be cut attractively, set this to
[HEAVY].
CROPMARK
This is used when creating stickers or the like by cutting
SENSOR MODE/ SENSOR MODE
material on which alignment marks (crop marks) have been
TOOL MODE/
printed around figures. When using the included program,
MANUAL
select either [SENSOR MODE] or [TOOL MODE]. For more
information, refer to the electronic-format manual (“Printing
and Cutting Guide” (for Windows) or “Macintosh Cutting
Guide” (for Macintosh).) When using a program other than the
included one, select [MANUAL]. For information on how to
perform this operation, refer to “4-9 The Crop Mark Feature.”