
User`s manual


33
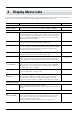
MENU Explanation Default
Feed the loaded material
AREA
This moves the material by the length to be cut before actual cutting is performed,
making it possible to ensure that the material will not slip or come loose during
cutting. When performing continuous cutting on the same material, this can also
be used to make sure that there is enough remaining material to cut the data that
will be sent.
1.0 m
AREA UNIT
Sets the units used to specify length in display menu “AREA”. Units may be set to
either “METRE” or “FEET”.
METRE
PREFEED
Set to on for automatic material feed at cutting. If this is set to on, when cutting
data is sent from the computer, the plotter will automatically execute cutting after a
1 m (39-3/8") feed. After the material is loaded be sure to feed the material by the
length needed for cutting with the “AREA” function. (Some data may cause feed
over 1 m (39-3/8"), such as when the next point of movement is located more than
1 m (39-3/8") to the rear.)
* If the “AREA” function is used to feed the material in advance, the material will
not be automatically fed even when “PREFEED” is set to on.
OFF
Align the axis
3
CROPMARK
This is used when cutting materials with alignment marks (crop marks) printed
around the graphics, such as for making stickers or seals. The crop marks are set
as reference points and correction points, enabling the graphics to be cut with
accuracy.
-
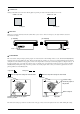
Correct for the cutting distance error based on actual measurement
CALIB
This adjusts the respective distances of the X and Y axes. Compare the actual
measurements of the cutting results with the data sent from the computer to
calculate and set the distance adjustment value.c
0.00%
Repeating the same cutting - Deletes any data in the replot buffer
REPLOT
This cuts the data in the replot buffer. Selecting "Clear" causes existing data in the
replot buffer to be deleted.
-
Selecting the instruction set
COMMAND MODE
This selection enables the type of instructions that are understood by the unit. You
can set the unit to accept either CAMM-GL III mode 1 instructions (“1”) or mode
2 instructions (“2”).
When set to “AUTO,” the CM-500/400/300 automatically detects the type of
instructions first received after turning on the power, and sets itself to accept those
instructions.
To change the type of instructions, first change the setting, then switch the power
to the unit off and back on again.
AUTO
Selecting the connection interface
INTERFACE
This selects the interface for connecting a computer to the CM-500/400/300. Set
this to “PARALLEL” for a parallel connection or to “SERIAL” for a serial
connection.
When set to “AUTO,” the CM-500/400/300 automatically detects whether a
parallel or serial type interface is used when data is first received after turning on
the power, and sets itself accordingly.
AUTO
Setting the protocol for a serial connection
STOP BIT
This marker tells the system when a character data set end.
1
DATA BIT
The size (length) of one block of data.
8
PARITYMODE
Parity is used to check whether data was received correctly.
NONE
BOUD RATE
Determines the speed of data transmission.
9600
HANDSHAKE
H-WIRE
Sets the handshake mode for when the CM-500/400/300 is connected the host
computer via the serial interface.