WARNING: To reduce the risk of fire or electric shock, do not expose this apparatus to rain or moisture. CAUTION RISK OF ELECTRIC SHOCK DO NOT OPEN ATTENTION: RISQUE DE CHOC ELECTRIQUE NE PAS OUVRIR CAUTION: TO REDUCE THE RISK OF ELECTRIC SHOCK, DO NOT REMOVE COVER (OR BACK). NO USER-SERVICEABLE PARTS INSIDE. REFER SERVICING TO QUALIFIED SERVICE PERSONNEL.
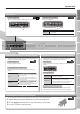
&& Contents Operation Guide. . . . . . . . . . . . . . . . . . . . . . . . . . . . . . . . . . . . . . . . . . . . . . . . . . . . 6 Panel Descriptions. . . . . . . . . . . . . . . . . . . . . . . . . . . . . . . . . . . . . . . . . . . . . . . . . 10 Practicing . . . . . . . . . . . . . . . . . . . . . . . . . . . . . . . . . . . . . . . . . . . . . . . . . . .
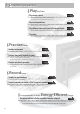
&& Look What You Can Do! && Play the Piano ee Play various sounds page 14 The LX-15 contains a wide variety of tones (sounds). You can freely select and perform using these tones. ee Play two layered tones page 15 You can layer two tones on a single key. ee Play different tones with your left and right hands page 16 You can divide the keyboard into left and right zones, and select a different tone for each zone.
Adjust Your Piano ee Adjust the keyboard touch Operation Guide && page 19 You can adjust the touch sensitivity of the keyboard to match your own playing style. Panel Descriptions ee Add reverberation to the sound page 18 You can add reverberation (ambience) to create the sensation of performing in a concert hall.
&& Operation Guide Adding Reverberation (Ambience) Adjusting the Brightness of the Sound (Brilliance) You can add a pleasant reverberation to the sounds, producing the impression that you are performing in page 18 a concert hall. You can adjust the brightness of the sound you play from the keyboard or the sounds of a song you play page 19 back. To turn ambience on To turn brilliance on Press the [Ambience] button so it’s lit. Press the [Brilliance] button so it’s lit.
Operation Guide Operation Guide Tone Buttons page 14 To select a single tone Press one of the tone buttons, and then use the [–] [+] buttons. To layer two tones (dual play) page 15 Press two tone buttons. Panel Descriptions Press two Press one Press the [–] [+] buttons. Tone 2 Hold down the right-most of the lit tone button, and then use the [–] [+] buttons.
Operation Guide Using the Metronome Changing the Tempo or Time Signature Here’s how to sound the metronome. page 22 To turn the metronome on You can adjust the tempo of the metronome or song. page 22 To change the tempo Press the [Metronome] button so it’s lit. Use the [ To adjust the metronome’s volume While holding down the [Metronome] button, use the [–] [+] buttons. Display ][ ] (Slow/Fast) buttons.
Operation Guide Operation Guide Selecting the Parts that will Play Repeatedly Practicing a Portion of a Song (AB Repeat) Here’s how to select the parts that will play. page 26 Press the [Right] button so it’s lit. To select the left-hand part Press the [Left] button so it’s lit. To select the other parts Press the [Accomp] button so it’s lit. To adjust the playback volume of a part Hold down the button of the part whose volume you want to adjust, and use the [–] [+] buttons. 1. 2. 3.
&& Panel Descriptions [Power] Switch Top Lid This turns the power on/off. page 13 * With the factory settings, the LX-15’s power will automatically be switched off 30 minutes after you stop playing or operating the unit. By opening or closing the lid you can change the clarity of the sound. page 12 If the unit’s power has been turned off automatically, you can use the [Power] switch to turn the unit back on again.
Panel Descriptions USB Connector If a USB flash drive is connected, you can use it to save or play back songs. page 24 page 37 You can do the following things using a USB flash drive. If you use a commercially available USB cable to connect the LX-15’s USB connector to your computer’s USB connector, you’ll be able to do the following things. • SMF data played back by MIDI-compatible software can be sounded by the LX-15.
&& Before You Play Opening/Closing the Lid NOTE To open the lid, use both hands to lift it lightly. The lid of the LX-15 is designed to close softly even if you remove your hands from it. However, it will close quite abruptly if it has been opened only slightly. Be careful not to pinch your fingers in the gap. 1. To open the lid, use both hands to lift it. 2. To close the lid, use both hands to gently lower it. NOTE If you need to move the piano, make sure the lid is closed first to prevent accidents.
Before You Play NOTE • Once the connections have been completed (p. 11), turn on power to your various devices in the order specified. By turning on devices in the wrong order, you risk causing malfunction and/or damage to speakers and other devices. 2 Panel Descriptions • Before switching the power on/off, always be sure to turn the volume down. Even with the volume turned down, you might hear some sound when switching the power on/off. However, this is normal and does not indicate a malfunction.
&& Performing Performing with Various Sounds In addition to piano sounds, the LX-15 lets you enjoy performing with many other sounds (347 types). These sounds are called “Tones.” The Tones are divided into five groups, each of which is assigned to a different Tone button. Switching Tones Let’s start by performing with a piano tone. When you turn on the power, the “ConcertPiano” tone is selected. 1 1. 2 Press a tone button to select the tone group.
Performing Operation Guide Performing with Two Layered Tones (Dual Play) You can play two tones simultaneously from each note of the keyboard. This feature is called “Dual Play.” As an example, here’s how to layer piano and strings tones. Panel Descriptions 2 1. Before You Play 1 While holding down the Piano [Grand] button, press the [Strings] button. Both buttons will light. When you play the keyboard, you’ll hear both the piano and the strings tones.
Performing Playing Different Tones with the Right and Left Hands (Split Play) You can play different tones in the left and right sides of the keyboard, divided at a certain key. This feature is called “Split Play,” and the key at which the keyboard is divided is called the “Split Point.” 1 1. 2 While holding down the [Transpose] button, press the [Twin Piano] button. The Split screen will appear. When Split is turned on, the keyboard settings will be as follows.
Performing Operation Guide Changing the left-hand tone Panel Descriptions 1 2 Before You Play 1. While holding down the [Transpose] button and [Twin Piano] button, press a tone button. The number and name of the tone currently selected for the left-hand zone are shown. 2. While holding down the [Transpose] button and [Twin Piano] button, press the [–] [+] buttons. A different tone is selected.
Performing Adjusting the Sound to Your Taste The LX-15 lets you add reverberation or modify the brightness of the sound. Changing the clarity of the sound (opening/closing the lid) Opening the lid will make the sound more sharply defined; closing the lid produces a more mellow sound (p. 12). Adding Reverberation to the Sound (Ambience) You can add a pleasant reverberation to the sounds of the LX-15, producing the impression that you are performing in a concert hall. This effect is called “Ambience.
Performing Operation Guide Adjusting the Brightness of the Sound (Brilliance) You can adjust the brightness of the sounds played on the keyboard or played back by a song. Panel Descriptions 1 3 2 Saving your settings Press the [Brilliance] button. The [Brilliance] button will light. 2. While holding down the [Brilliance] button, press the [–] [+] buttons. The display will indicate the depth of the brilliance effect values.
Performing Dividing the Keyboard for Two-person Performance (Twin Piano) You can divide the keyboard into left and right zones so that two people can play the same range of pitches, just as though there were two pianos. This function is called “Twin Piano.” For example, you could use Twin Piano to allow a student to play along with their teacher. Conventional keyboard C1 1 1. 3 C2 C3 C4 C5 C6 C7 C8 Twin Piano C3 C4 C5 Press the [Twin Piano] button.
Performing Operation Guide Shifting the Pitch (Transpose) “Transpose” means to shift the pitches of songs and the keyboard. The Transpose function makes it easy to do the following. • You can use unchanged fingering to accompany a singer who is singing in a key different than the original music. • A song written in a difficult key with numerous sharps ( ) or flats ( ) can be performed in a key that’s easier for you to play.
&& Practicing Practicing with the Metronome You can sound the metronome while you practice. While the song plays, the metronome will sound at the tempo and time signature of the song. 1. Press the [Metronome] button. The [Metronome] button will blink, and the metronome will sound. The [Metronome] button will blink red and green according to the currently selected time signature; red indicates the strong beats, and green indicates the weak beats. 2.
Practicing Panel Descriptions 1. Operation Guide Adjusting the Metronome’s Volume While holding down the [Metronome] button, press the [–] [+] buttons. The display will indicate the metronome’s volume. 1 Value Explanation 0–10 When the volume of the metronome is set to “0,” the metronome won’t sound, but the [Metronome] button will blink.
Practicing Practicing with a Song You can practice by playing along with a song. Selecting and Playing a Song Here’s how to listen to the built-in songs. The LX-15 provides 195 built-in piano songs. You can also play back songs stored on a separately sold USB flash drive. 1. Press the [Song] button. The song screen will appear. 2. While holding down the [Song] button, use the [–] [+] buttons to select the category.
Practicing Operation Guide Playing Songs Consecutively (All Songs Play) You can consecutively play back the built-in songs or the songs saved in Favorite (internal memory) or on a USB (USB flash drive). This function is called “All Songs Play.” While holding down the [Song] button, use the [–] [+] buttons to select the category. While holding down the [Song] button, press the [ All Songs Play will be selected, and the [ ] (Play/Stop) button. ] (Play/Stop) button will blink.
Practicing Practicing One Hand at a Time (Part Mute) Here’s how to have only the selected part play back. This allows you to practice playing the left or right-hand part of a song while listening to the other hand played automatically. Part button Part Each part is assigned to the part buttons as shown in the illustration. Muting You can “mute” a specific part so that it will not be heard.
Practicing Operation Guide Repeatedly Practicing a Portion of a Song (AB Repeat) Here’s how you can repeatedly play back a specified portion of the song. You can use this function to repeatedly practice that portion. Time Press the [ 3 4 ] (Play/Stop) button. Before You Play 1. 2 1 B (Repeat End) A (Repeat Start) The song will play back. 2. 3. Panel Descriptions Section to repeat Press the [AB Repeat] button at the point where you want to start repeating (point A).
Practicing Recording the Song You’re Practicing It’s easy to record your own performances. You can play back a recorded performance to check your playing, or perform along with a recorded performance. The LX-15 lets you record in the following ways. Type of recording Explanation Parts will be separate. You can re-record a specific portion of the song. SMF recording You can overdub. * Normally, you should use SMF recording. Your performance will be recorded as audio data.
Practicing 1. 2. Operation Guide Saving a performance you’ve recorded Use the [+] button to select “Save.” Press the [Song] button. The media select screen will appear. 4. Use the [–] [+] buttons to select the save-destination media. Indication Save-destination media Favorite Internal memory USB Memory USB flash drive Press the [ Panel Descriptions 3. ] (Fast) button. A screen will appear, allowing you to select the song number of save destination. Before You Play 5.
Practicing Overdubbing a Recorded Song When recording an SMF, you can overdub each part separately. For example, you can record the left-hand and right-hand parts separately, or record along with a song. Recording each hand separately You can separately record your left-hand performance to the [Left] button and your right-hand performance to the [Right] button. You can also separately re-record each hand afterward. Getting ready to record 1. 2. Select the tone that you want to use for performing (p.
Practicing Press the [ ] (Rec) button. The [ ] (Rec) button will light, and the LX-15 will enter recording-standby mode. 2 At this time, New Song will be selected. If you decide not to record, press the [ (Rec) button once again. 5 1 3 ] Reselect the song you saved earlier by pressing the [+] button. Before You Play 2. 4 MEMO The song’s tempo and time signature will be as they were when you recorded the left hand. 3. Panel Descriptions 1.
Practicing Recording a performance you play along with a song Here’s how you can record a performance that you play along with a song. Getting ready to record 1. Select the tone that you want record (p. 14). 2. Select the song to be dubbed (p. 24). MEMO If you want to erase the performance of a specific part, hold down its part button and press the [ ] (Rec) button. 3. Press the [ The [ 4 5 3 ] (Rec) button. ] (Rec) button will light, and the LX-15 will enter recording-standby mode.
Practicing By converting a song recorded in the form of an SMF to audio, you’ll be able to listen to it on your computer. You can also use your computer to burn the song to a music CD, or upload it to the Internet. Copying an audio recording of a song to your computer page 36 Panel Descriptions If you save an audio recording of a song on a USB flash drive, you'll be able to listen to it on your computer.
Practicing Audio Recording Here’s how to record what you play on the LX-15 as audio data. The recorded song can be used on your computer. * Thanks to its multiple number of speakers, each of which can be used to play a different portion of the overall sound, the LX-15 is capable of producing piano sounds that possess great depth and seem to have three-dimensional presence. Such effects are produced when you play something on the keyboard, or when you play back a song that’s been recorded as an SMF.
Practicing An audio recording of a song, or a song from a digital audio player connected to the Input jacks can be transposed to make it play back in a different key. You can play the keyboard while listening to the transposed sound. 1. Press the [Transpose] button. Operation Guide Transposing a Song for Easier Performance (Audio Transpose) The [Transpose] button will light. While holding down the [Transpose] button, press the [–] [+] buttons. The display will indicate the amount of transposition.
Practicing Burning an Audio Recording of a Song (WAV file) to a CD After an audio recording of a song has been saved to a USB flash drive, you can copy it to your computer and burn it to a CD. If you want to burn a CD from a song that you recorded as an SMF, you must first convert it to audio (WAV file) (p. 33). In order to burn a CD on your computer, you’ll need software such as “iTunes.” For details, refer to the owner’s manual or the online help of your software.
Practicing Operation Guide Saving an Internal Song Here’s how to save an internal song to Favorite (internal memory) or a USB flash drive (sold separately). 5 12 3 7 6 8 10 4 Panel Descriptions 2 11 Before You Play Getting ready to save 1. Select the internal song that you want to save (p. 24). 2. While holding down the [Key Touch] button, press the [Transpose] button. The [Key Touch] button and [Transpose] button will light, and the LX-15 will enter Function mode.
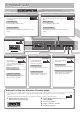
&& Personalizing Your Piano Sound (Piano Designer) What is Piano Designer? The LX-15 lets you adjust the piano sound to your taste by modifying various aspects of a grand piano’s sound, such as its strings and pedal, as well as the keyboard resonances. Hammer Noise String Resonance This function is called “Piano Designer.” Adjusting the piano sound to your taste Temperament Making Detailed Adjustments to the Piano Sound 1 1.
Personalizing Your Piano Sound (Piano Designer) Value Description String Resonance Off, 1–10 This adjusts the string resonance of the acoustic piano sound (the sympathetic vibrations of strings for previously played notes that occur when you play another note). Key Off Resonance Off, 1–10 Cabinet Resonance Off, 1–10 Adjusts the body resonance of the grand piano itself. (default: 4) Higher values will produce a larger body resonance.
&& Convenient Functions Adjusting the Brightness of the Display (Display Contrast) Retaining the Settings Even After Power-off (Memory Backup) You can adjust the brightness of the LX-15’s display. 1. 2. 3. 4. The settings of the LX-15 will return to their factory-set state when you turn off the power. However, you can store the settings so that they will be retained even after the power is turned off. While holding down the [Key Touch] button, press the [Transpose] button. Use the [ ] [ Contrast.
Convenient Functions Settings that you’ve stored using the Memory Backup function (p. 40) can be returned to their factory-set state. This is called the “factory reset” function. When you execute “Factory Reset,” all stored settings will be erased and returned to the factory settings. Press the [Song] button. The Copy Song screen will appear. 4. 5. Use the [–] [+] buttons to select the copy-source and copydestination memory locations. Press the [ ] (Fast) button. MEMO 1. 2.
Convenient Functions Deleting a Saved Song (Delete Song) Here’s how to delete a song that you saved on an Favorite (internal memory) or USB flash drive (sold separately). Initializing the Memory (Format Media) Here’s how you can completely erase all songs that were saved in Favorite (internal memory) or USB flash drive (sold separately). MEMO If you want to delete all songs that have been saved to Favorite, initialize the memory. 1. 2.
Convenient Functions Disabling the Buttons (Panel Lock) • Never turn off the power while “Executing...” is shown in the display. • If the screen indicates “Error,” please refer to “Error Messages” (p. 60). When you activate Panel Lock, all buttons will be disabled. This prevents the tones or settings from being changed if you inadvertently press a button. 1. Hold down the [AB Repeat] button for a while. Panel Lock will be activated.
&& Various Settings (Function Mode) The same procedure is used for all settings in Function mode. 1. While holding down the [Key Touch] button, press the [Transpose] button. 3. 4. Press the [–] [+] button to edit the value of the setting. Press the [Key Touch] button or the [Transpose] button to exit Function mode. The [Key Touch] button and [Transpose] button will light; the LX-15 will be in Function mode. 2.
Various Settings (Function Mode) Value Explanation Operation Guide Indication Playing Back an Audio File with Its Central Sound Minimized (Center Cancel) Center Cancel You can minimize the playback of sounds located in the center of the sound field (e.g., vocals or melody instruments) of the selected audio file or music from a digital audio player connected to the Input jacks.
Various Settings (Function Mode) Indication Value Explanation Changing How the Pedals Work (Center Pedal) When you turn on the power, the center pedal functions as the sostenuto pedal (p. 10). You can change the function of the pedal to a variety of other operations. Center Pedal Sostenuto Play/Stop Layer Octave Sets function to sostenuto pedal. * Selectable only for the center pedal. The pedal will have the same function as the [ ] (Play/Stop) button.
Various Settings (Function Mode) Value Explanation Operation Guide Indication Setting the Type of CD To be Played Back (CD/Audio Type) CD/Audio Type The LX-15 may be unable to correctly recognize the type of CD being used. In such instances, you can specify the type of CD manually. When the unit left the factory, this was set to “Stereo.” Normally, there is no need to make this setting. MEMO Panel Descriptions This setting is automatically saved in the LX-15.
Various Settings (Function Mode) Indication Value Explanation Changing the USB flash drive Setting (USB Memory Mode) USB Memory Mode In some cases, when USB flash drive is connected to the USB memory connector, it may take longer for data to be loaded, or data may fail to be loaded successfully. If this occurs, you may be able to solve the problem by changing the USB flash drive setting. When the unit left the factory, this was set to “Mode 2” Normally, there is no need to make this setting.
Various Settings (Function Mode) Value Explanation Operation Guide Indication Adjusting the Brightness of the Display (Display Contrast) (p. 40) Display Contrast You can adjust the brightness of the LX-15’s display. MEMO This setting is automatically saved in the LX-15. Storing Your Settings (Memory Backup) (p.
&& Troubleshooting Symptom Cause/Action Even though you’re using headphones and the sound is muted, a thumping sound is heard when you play the keyboard LX-15 uses a hammer action keyboard in order to simulate an acoustic piano’s playing touch as realistically as possible. For this reason, you’ll hear the hammers thump when you play the keyboard, just as you would when playing an acoustic piano.
Troubleshooting Cause/Action The wrong instrument is selected when you press the [E. Piano], [Strings], or [Other] button Tone buttons [E. Piano] [Strings] [Other] also operate as buttons that select “Recommended Tones.” Connecting a commercially-available CD-ROM drive to the USB flash drive connector and selecting a song from a CD-ROM produced for the VIMA (VIMA TUNES) will automatically cause sounds appropriate for that song to be assigned to the [E.
&& Tone List Piano–Grand No. 1 Tone Name Explanation ConcertPiano The sound of a splendid concert grand piano. This piano sound has our highest recommendation, and can be used for any style of music. 2 BalladePiano A mellow grand piano sound, recommended for quiet songs. 3 Bright Piano A brilliant grand piano sound, recommended when you want the piano to stand out in an ensemble. 4 MagicalPiano A charming sound that layers synth bells with ConcertPiano. 5 Piano + Str.
&& Internal Song List Song Tittle Composer MASTERPIECE No. Song Tittle Composer 56 Venezianisches Gondellied Felix Mendelsshon 2 Sonate für Klavier Nr.23 2 Ludwig van Beethoven 57 Alpenabendröte Theodor Oesten 3 Sonate für Klavier Nr.
&& Main Specifications Roland LX-15: Digital Piano Keyboard Internal Memory (Favorite) Keyboard 88 keys (PHA III Ivory Feel Keyboard with Escapement) Songs Max.
About && USING THE UNIT SAFELY WARNING and CAUTION Notices Used for instructions intended to alert the user to the risk of injury or material damage should the unit be used improperly. The symbol alerts the user to items that must never be carried out (are forbidden). The specific thing that must not be done is indicated by the design contained within the circle. In the case of the symbol at left, it means that the unit must never be disassembled.
&& IMPORTANT NOTES Power Supply • Do not connect this unit to same electrical outlet that is being used by an electrical appliance that is controlled by an inverter (such as a refrigerator, washing machine, microwave oven, or air conditioner), or that contains a motor. Depending on the way in which the electrical appliance is used, power supply noise may cause this unit to malfunction or may produce audible noise.
IMPORTANT NOTES Handling CDs / DVDs (Using Optional USB flash drive) • Do not connect or disconnect USB flash drive while it is being read from, or written to (i.e., while the USB flash drive access indicator will blink). • Carefully insert the USB flash drives all the way in— until it is firmly in place. (Using Optional CD-Drive) • Avoid touching or scratching the shiny underside (encoded surface) of the disc. Damaged or dirty discs may not be read properly.
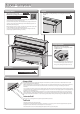
&& Assembling Assembling the LX-15 * To assure that assembly is carried out properly, make sure to read these instructions before you begin the assembly. Please keep these instructions close at hand, so you can refer to them whenever you need. * To move the piano, lift it carefully—all the while keeping it level. * Be very careful, when you assemble and move the piano, to make sure that you do not drop it on your hands or feet.
7. Securely tighten the two side board screws and four pedal board screws . * When attaching the front board, before tightening the screws, adjust things as necessary at all the points where there are screws so as to assure that the front board is aligned in parallel with the pedal board. 4. Loosen the two thumbscrews C that are attached at the locations shown in the figure . As illustrated, you should create gaps that are about 10 mm in size . Rear view Operation Guide 8.
&& Index A AB Repeat . . . . . . . . . . . . . . . . . . . . . 9, 27 Accompaniment part . . . . . . . . . . . . . 26 AC In (AC Inlet). . . . . . . . . . . . . . . . . . . . 11 All Songs Play. . . . . . . . . . . . . . . . . . . . . 25 Ambience . . . . . . . . . . . . . . . . . . . . . 6, 18 [Ambience] button. . . . . . . . . . . . . . . . 18 Assembling. . . . . . . . . . . . . . . . . . . . . . . 58 Audio Recording. . . . . . . . . . . . . . . . . . 34 Audio Transpose. . . . . . . . . . . . . .
Operation Guide For EU Countries Panel Descriptions Before You Play Performing Practicing For China Piano Designer Convenient Functions Function Mode Appendix 61
For EU Countries This product complies with the requirements of EMCD 2004/108/EC and LVD 2006/95/EC. FEDERAL COMMUNICATIONS COMMISSION RADIO FREQUENCY INTERFERENCE STATEMENT For the USA This equipment has been tested and found to comply with the limits for a Class B digital device, pursuant to Part 15 of the FCC Rules. These limits are designed to provide reasonable protection against harmful interference in a residential installation.
Information EGYPT REUNION MARCEL FO-YAM Sarl 25 Rue Jules Hermann, Chaudron - BP79 97 491 Ste Clotilde Cedex, REUNION ISLAND TEL: (0262) 218-429 SOUTH AFRICA Paul Bothner(PTY)Ltd. Royal Cape Park, Unit 24 Londonderry Road, Ottery 7800 Cape Town, SOUTH AFRICA TEL: (021) 799 4900 CHINA Roland Shanghai Electronics Co.,Ltd. 5F. No.1500 Pingliang Road Shanghai 200090, CHINA TEL: (021) 5580-0800 HONG KONG Parsons Music Ltd. 8th Floor, Railway Plaza, 39 Chatham Road South, T.S.
* 5 1 0 0 0 2 1 5 9 8 - 0 1 *