Before using this unit, carefully read “IMPORTANT SAFETY INSTRUCTIONS” (Inside front cover), “USING THE UNIT SAFELY” (p. 2), and “IMPORTANT NOTES” (p. 4). After reading, keep the document(s) where it will be available for immediate reference.
USING THE UNIT SAFELY About WARNING and CAUTION Notices About the Symbols The symbol alerts the user to important instructions or warnings.The specific meaning of the symbol is determined by the design contained within the triangle. In the case of the symbol at left, it is used for general cautions, warnings, or alerts to danger. Used for instructions intended to alert the user to the risk of death or severe injury should the unit be used improperly.
USING THE UNIT SAFELY CAUTION When disconnecting the power cord, grasp it by the plug To prevent conductor damage, always grasp the power cord by its plug when disconnecting it. Periodically clean the power plug CAUTION Handle the ground terminal carefully If you remove the screw from the ground terminal, be sure to replace it; don’t leave it lying around where it could accidentally be swallowed by small children. When refastening the screw, make that it is firmly fastened, so it won’t come loose.
IMPORTANT NOTES Power Supply • Do not connect this unit to same electrical outlet that is being used by an electrical appliance that is controlled by an inverter or a motor (such as a refrigerator, washing machine, microwave oven, or air conditioner). Depending on the way in which the electrical appliance is used, power supply noise may cause this unit to malfunction or may produce audible noise.
INTRODUCTION Thank you very much for purchasing DJ-99. Welcome to the DJ-99, a brand new 2-channel DJ Scratch Mixer with integrated mini innoFADER. Premium quality contactless mini innoFADER integrated The DJ-99 features the mini innoFADER from Audio Innovate as the crossfader. Inherited from the original innoFADER, it provides smooth and robust feeling to the Scratch DJs. The contactless design gives a long life of over 4,000,000 cycles.
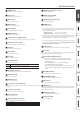
A.
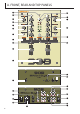
A. FRONT, REAR AND TOP PANELS 1 POWER indicator LED will be lit when the unit is POWER ON 2 Input selector Assign the input source of CH1 & CH2. 3 MIC level knob Adjust the microphone input level. 4 TRIM level knob Adjust the input level for CH1 & CH2. 5 Channel EQ knob Adjust the EQ (HI/MID/LOW) for CH1 & CH2. 6 PHONES level knob Adjust the headphones output level. 7 Channel Fader curve adjustment knob 20 PHONES output jack (1/4” + 3.5 mm) Connect to your headphones.
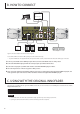
B. HOW TO CONNECT Outputs DVS Audio Interface Inputs PC/MAC Turntable Turntable Power Supply Active Monitor Active Speaker CD player Typical connection example is shown in the above diagram. To use the DJ-99 DVS connection for DVS system, please refer to the below steps: * To prevent malfunction and equipment failure, always turn down the volume, and turn off all the units before making any connections. 1.
For EU Countries
FEDERAL COMMUNICATIONS COMMISSION RADIO FREQUENCY INTERFERENCE STATEMENT For the USA This equipment has been tested and found to comply with the limits for a Class B digital device, pursuant to Part 15 of the FCC Rules. These limits are designed to provide reasonable protection against harmful interference in a residential installation.