Owner’s Manual Before using this unit, carefully read “USING THE UNIT SAFELY” and “IMPORTANT NOTES” (leaflet “USING THE UNIT SAFELY” and Startup Guide). After reading, keep the document(s) where it will be available for immediate reference.
Contents Installing the Software . . . . . . . . . . . . . . . . . . . . . . . . . . . . . . . . . . System Requirements . . . . . . . . . . . . . . . . . . . . . . . . . . . . . . . . . . . . Downloading the Software . . . . . . . . . . . . . . . . . . . . . . . . . . . . . . . . Downloading the DJ-808 USB Driver. . . . . . . . . . . . . . . . . . . Downloading the Serato DJ Software . . . . . . . . . . . . . . . . . . Installing the Software . . . . . . . . . . . . . . . . . . . . . . . . . . . . . . . .
Installing the Software System Requirements Windows users Verify that your computer meets the system requirements before you proceed with installing the software. 1. Start a browser and access the following Serato DJ webpage. Operating System Mac OS Mac OS X 10.11 Mac OS X 10.10 Mac OS X 10.9 CPU/Clock Screen Resolution Memory Free HDD Space USB Windows Windows 10 Windows 8.1 Windows 7 SP1 Intel® Core™ i7/1.07 GHz Intel® Core™ i5/1.07 GHz Intel® Core™ i3/1.07 GHz 1280 x 720 4 GB 5 GB Available USB 2.
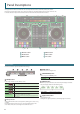
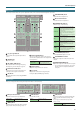
Panel Descriptions The top panel of the DJ-808 is divided into six sections by function: browser, deck mixer, effects, TR-S, and VT. Cross fader assign and input assign are located on the front side, and input/output jacks are located on the rear side. For details about each part, refer to the DJ-808 owner’s manual and the Serato DJ owner’s manual.
Panel Descriptions Deck Section The deck sections located at the left and right control four decks (left: decks 1 and 3, right: decks 2 and 4). 4 17 2 16 14 15 1 4 13 3 7 12 9 5 10 6 11 8 1 Jog dial 2 Tempo slider Controls scratch and pitch bend (playback speed adjustment). Adjusts the playback speed of the song. If the key lock function is on: Changes the playback speed. Top surface Outer edge “–” side “+” side 5 LOOP area Lowers the playback speed. Raises the playback speed.
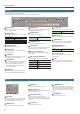
Panel Descriptions Deck Section 4 2 17 16 14 15 1 4 13 3 7 12 9 5 10 6 11 8 7 Pad Mode select 8 Performance pads 13 [DECK] buttons Here you can select the control mode of the performance pads. The illumination color of the buttons changes according to the mode. Use these for pad modes such as Hot Cue, Roll, Slicer, TR, Sampler etc. Switch the deck to be operated. [HOT CUE] button Selects hot cue mode (p. 13).
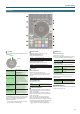
Panel Descriptions Mixer Section This is a four-channel mixer. Here you can adjust the sound, connect sounds, and turn headphone cue on/off. 9 [MASTER LEVEL] knob 14 1 Adjusts the master output level. 1 10 Master level indicator 9 2 3 4 3 Indicates the master output level. 2 10 4 3 11 [CHANNEL FX] buttons 3 4 Select the type of channel effect. 4 11 [DUB ECHO] 5 5 12 6 6 [JET] 13 7 7 [NOISE] [FILTER] 8 Adds a delayed sound several times while attenuating it.
Panel Descriptions TR-S Section This is a 16-step sequencer. It lets you create a rhythm track using the sounds of the Roland TR-909/TR-808/TR-707/TR-606 rhythm machines, or perform rhythms by striking the performance pads. * For details on how to use the TR-S section, refer to “TR-S Operations” (p. 18). 2 1 5 6 9 3 10 4 11 7 8 12 13 14 17 15 16 19 18 1 [VALUE] knob 8 [DECAY] knob 14 [1]–[8] buttons Changes the value of settings such as tempo, pattern scale, or shuffle.
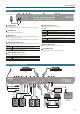
Panel Descriptions Front Panel 1 Headphones 2 3 4 5 7 8 6 1 [PHONES] jacks 6 [INPUT SELECT] switches Connect headphones here. Stereo 1/4” (Ø 6.3 mm) and stereo 1/8” (Ø 3.5 mm) plugs are supported. Select the input source for each channel. CH1, CH2 2 [VOLUME] knob PC Adjusts the volume of the headphones. LINE PHONO 3 [MIXING] knob CH3, CH4 Adjusts the monitor volume balance of the channel whose Channel [CUE] button is lit and the master output.
Panel Descriptions Rear Panel (Connecting Your Equipment) To prevent malfunction and equipment failure, always turn down the volume, and turn off all the units before making any connections. 1 DC IN jack 7 INPUT (CH 1–CH 4) jacks Connect the included AC adaptor here. * Place the AC adaptor so the side with the indicator (see illustration) faces upwards and the side with textual information faces downwards. The indicator will light when you plug the AC adaptor into an AC outlet.
Using Serato DJ This document explains basic use of Serato DJ. For details on the functions and use of the software, refer to the Serato DJ owner’s manual. Starting Serato DJ * Once everything is properly connected (p. 9), be sure to follow the procedure below to turn on their power. If you turn on equipment in the wrong order, you risk causing malfunction or equipment failure. * Before turning the unit on/off, always be sure to turn the volume down.
Using Serato DJ Playing a Song Monitoring Through Headphones 1. Set the DJ-808’s knobs and switches as follows. [MASTER LEVEL] knob [TRIM] knobs [HI], [MID], [LOW] knobs [FX] knobs Channel faders [CROSS FADER ASSIGN] switches [INPUT SELECT] switches Turned all the way to the left [MIXING] knob [VOLUME] knob Turned all the way to the left Center Lowest position “THRU” position “PC” position 2. Press the [r] button to play back the loaded song. 3.
Operating the DJ-808 Performance Pad Operations Hot Cue Operations (HOT CUE) By specifying a hot cue, you can instantly play back from the specified location. You can specify up to eight hot cues for each song. 1. Press a [HOT CUE] to make the button light in white. Hot cue mode is selected. 2. During playback or while paused, press a performance pad that is unlit. A hot cue is assigned to the pad that you pressed. Hot cues (1–8) are assigned to the performance pads as follows.
Operating the DJ-808 Slicer loop mode Slicer Operations (SLICER) Slicer divides the specified region into eight, and assigns the divided regions to the performance pads. While you hold down a performance pad, the sound of the region assigned to that pad plays as a loop. The song continues progressing in the background even while looping. When you cancel loop playback, song playback resumes from the location to which the song had progressed during loop playback.
Operating the DJ-808 Pattern Operations (PATTERN) You can press the performance pads to switch TR-S patterns (p. 18). Slot 1 Slot 2 Slot 3 Slot 4 Slot 5 Slot 6 Slot 7 Slot 8 1. Hold down the [SHIFT] button and press the [TR] button to make the button light in green. Pattern mode is selected. Patterns are assigned to the performance pads as follows. Pattern 1 Pattern 2 Pattern 3 Pattern 4 Pattern 5 Pattern 6 Pattern 7 Pattern 8 Press the [SHIFT] button to select patterns 9–16.
Operating the DJ-808 Dual Deck Mode Operations Effect Operations Dual deck mode is a function that lets you simultaneously control both decks when using decks 1/3 or decks 2/4 to mix two songs. Serato DJ has two effect units (FX1, FX2) which you can use with the selected deck. 1. Hold down the [DECK 1] ([DECK 2]) button and press the [DECK 3] ([DECK 4]) button. * The order in which you press the buttons does not matter.
Operating the DJ-808 MEMO By tapping the [TAP] button at the desired interval, you can set the value that is the basis for the time at which the effect is applied. Single FX Mode Operations 1. Hold down the [SHIFT] button and press the [TAP] button to select single FX mode. Each time you press the button, you alternate between single FX mode and multi FX mode. 2. Press the [1] or [2] button of the deck (channel) that you want to operate, to select the effect unit that will be used.
Operating the DJ-808 Inputting Sound from a Mic 1. Connect your mic to the MIC IN jack. 2. Set the VT section’s mic switch to “ON” or “DUCK.” 3. Use the rear panel [MIC SENS] knob to adjust the mic input sensitivity. 4. Use the VT section’s [LEVEL] knob to adjust the audio output level of the mic. 55 You can use the VT section’s [HI] and [LOW] knobs to adjust the volume of the high and low-frequency regions. 55 You can operate the VT section to apply a voice effect.
Operating the DJ-808 Clearing an instrument TR-REC (Step Recording) You can clear just a specified instrument from a pattern. 1. Hold down the [CLEAR] button and press the button for the instrument that you want to clear (one of the [BD]–[OH] buttons). In this method of recording, you create a pattern by specifying the steps at which each instrument is sounded. You can also create a pattern while it plays. 1. Press the [PATTERN] button to make it light. 2.
Operating the DJ-808 Inputting velocity Clearing a recorded instrument/accent from the pattern For each step, you can specify the velocity with which each instrument is sounded. 1. Press the button ([BD]–[OH] button or [1]–[8] button) of the instrument whose velocity you want to specify, making the button light. 2. Hold down the lit TR-S pad and turn the [VALUE] knob to specify the velocity.
Operating the DJ-808 Using the DJ-808 in Stand-Alone Mode You can use the DJ-808 when it is not connected to Serato DJ (when Serato DJ is not running). In stand-alone mode, you can use the following functions in each section of the DJ-808. Section Mixer section Front panel TR-S section Available functions [TRIM] knobs * Does not work if the [INPUT SELECT] switch is set to “PC.
System Settings 1. While holding down the [PANEL] button, press the [POWER] switch to turn on the power. The DJ-808 is in system setting mode, and the [START/STOP] button of the TR-S section is blinking. 2. Press the TR-S pad or button that corresponds with the setting you want to make. The display shows the current value. 3. Use the [VALUE] knob to change the value of the setting. 4. When you’ve finished making settings, press the blinking [START/STOP] button.
System Settings Returning to the Factory Settings (Factory Reset) The system settings and TR-S patterns stored in the DJ-808 can be returned to their factory-set state (factory reset). 1. Hold down the [BACK] button of the browser section, and press the [POWER] switch to turn on the power. The display indicates “rst,” and the [START/STOP] button of the TR-S section blinks. * If you decide to cancel the operation, turn off the power. 2. Press the blinking [START/STOP] button. Factory reset begins.
Using Serato Flip 7. In the my serato screen, click the “EXPANSION PACKS” tab. If you purchase the separately sold Serato Flip Expansion Pack, hot cue operations and [CENSOR] button operations can be recorded and recalled in Serato DJ. * For support information on Serato Flip Expansion Pack, refer to the Serato website. https://support.serato.com/hc/en-us Purchasing Serato Flip Expansion Pack From Serato DJ’s my serato screen, purchase “Serato Flip Expansion Pack.
Using Serato Flip * If “Flip” is not shown, double-click the [MY PRODUCTS] tab in the my serato screen, and check whether “Serato Flip” is activated. If the following screen appears, click [ACTIVATE]. Flip Display in the Serato DJ Screen Virtual deck screen 5. Make sure that “Enable Serato Flip” has a check mark. 1 If it does not have a check mark, add a check mark. 6. Close Serato DJ. 7. Turn off the power of the DJ-808, wait about one minute, and then turn the power on again. 8. Restart Serato DJ.
Using Serato Flip Saving the Flip Flip Operations Here we explain the procedure for using Serato Flip to create a song that has a different structure than the original song. Original song Intro Verse 1 Verse 2 1. In the virtual deck screen, click a Flip slot to select the savedestination for the Flip. 2. In the Flip panel, click [Save]. Ending Recalling and Playing a Flip Verse 1 Verse 1 Verse 2 Ending 1. In the virtual desk screen, click a Flip slot to select a Flip slot. 2.
Using Serato DVS 7. In the my serato screen, click the “EXPANSION PACKS” tab. If you purchase the separately sold Serato DVS Expansion Pack, you can control a Serato DJ deck from a DJ player or turntable (analog) that’s connected to the DJ-808. * For support information on Serato DVS Expansion Pack, refer to the Serato website. https://support.serato.com/hc/en-us Purchasing Serato DVS Expansion Pack From Serato DJ’s my serato screen, purchase “Serato DVS Expansion Pack.
Using Serato DVS * If “Vinyl/CDJ Control” is not shown, double-click the [MY PRODUCTS] tab in the my serato screen, and check whether “DVS EXPANSION” is activated. If the following screen appears, click [ACTIVATE]. 8. Restart Serato DJ. Wait until the virtual deck with a VINYL control mode button appears. * It may take some time until you see the virtual deck with the VINYL control mode button. 5. Make sure that “Enable Vinyl/CDJ Control” has a check mark.
Using Serato DVS About the Virtual Deck Screen Settings for Using DVS In REL mode Turntable/DJ Player Connections REL mode This mode detects only the forward/backward movements of the control record/CD. NOTE When using DVS, you cannot combine a turntable with a DJ player. You must use either two turntables or two DJ players. 1. Turn off the power of the DJ-808. 2. Connect your turntables or DJ players as described in “Rear 1 2 3 4 Panel (Connecting Your Equipment).
Using Serato DVS * If the calibration deck is not shown, go to the SETUP screen’s “EXPANSION PACKS” tab, select [Vinyl/CDJ Control], and make sure that there is a check mark on “Enable Vinyl/CDJ control.” * If the green circle is not shown on the scope, check the following items. 55 The turntable/DJ player is correctly connected with the DJ-808. 55 The ground wire of the turntable is connected to the DJ-808’s PHONO GROUND terminal. 5. Make adjustments so that the green circle is a perfect circle.
Appendix Troubleshooting If the DJ-808 does not function in the way you expect, first check the following points. If this does not resolve the problem, consult your dealer or a nearby Roland service center.
Appendix Main Specifications Roland DJ-808: DJ Controller Signal processing Nominal input level Nominal output level Head room Input impedance Output impedance Frequency response Residual noise level Dynamic range Connectors Power supply Current draw Dimensions Weight Accessories Sampling Frequency: 96 kHz, 48 kHz, 44.