
User Manual


14
Operating the DJ-808
Slicer Operations (SLICER)
Slicer divides the specied region into eight, and assigns the divided
regions to the performance pads. While you hold down a performance pad,
the sound of the region assigned to that pad plays as a loop.
The song continues progressing in the background even while looping.
When you cancel loop playback, song playback resumes from the location
to which the song had progressed during loop playback.
NOTE
5 Slicer can only be used during the song playback.
5 You can’t use the slicer on a song for which the beat grid is not
specied. For details on the beat grid, refer to the Serato DJ owner’s
manual.
* You can also use the [ADJ] button or [SLIDE] button to specify the
beat grid (p. 6).
1. Hold down the [SHIFT] button and press the [ROLL] button to
make the button light in red.
Slicer mode is selected.
MEMO
If you hold down the [SHIFT] button and press the [ROLL] button twice
to make the button light in blue, slicer loop mode is selected.
2. Hold down the [SHIFT] button and use the PARAMETER [−] [+]
buttons to select the length (beats) of the specied region.
The setting changes each time you press the button.
The length of the specied region can be set to 2 beats, 4 beats, 8 beats,
16 beats, 32 beats, or 64 beats.
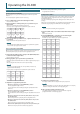
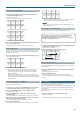
The eight divided regions are assigned to the performance pads as
follows.
1 8765432
Region 1 Region 2 Region 3 Region 4
Region 5 Region 6 Region 7 Region 8
3. Use the PARAMETER [−] [+] buttons to specify the slicer’s
quantize setting.
The quantize setting changes the length of loop playback that occurs
when you hold down a pad.
The quantize setting can be 1/8, 1/4, 1/2, or 1.
Example:
If quantize is set to 1:
The entire region assigned to the pad you press is played as a loop.
If quantize is set to 1/2:
The rst 1/2 of the region assigned to the pad you press is played as a
loop.
4. Hold down a performance pad.
While you hold down the pad, the length that you specied by the
quantize setting is continuously played as a loop.
5. Release the performance pad.
Song playback resumes from the location to which the song had
progressed during loop playback.
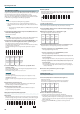
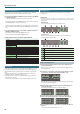
Using slicer mode and slicer loop mode
Slicer mode
When the playback location progresses to the end of the region that was
divided into eight, the region on the screen shifts to show the next eight
divisions, and that region divided into eight is assigned to the pads.
1 8765432 1 8765432
Slicer loop mode
When the playback location progresses to the end of the region that was
divided into eight, the playback location returns to the beginning of the
currently-specied region.
1 8765432 1 8765432
Saved Loop Operations
You can save loops in Serato DJ’s loop slots, and recall a saved loop.
1. Press the [ROLL] button twice to make the button light green.
Saved loop mode is selected.
2. During loop playback, press a performance pad.
The loop is assigned to Serato DJ’s loop slot.
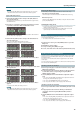
Slot 1 Slot 2 Slot 3 Slot 4
Slot 5 Slot 6 Slot 7 Slot 8
3. Hold down the [SHIFT] button and press a performance pad.
Playback returns to the beginning of the loop and continues.
5 During loop playback, press the PARAMETER [−] button
The loop playback length is halved.
5 During loop playback, press the PARAMETER [+] button
The loop playback length is doubled.
5 During loop playback, hold down the [SHIFT] button and press the
LOOP [1/2X] button
The loop length remains the same, and you move to the previous loop.
5 During loop playback, hold down the [SHIFT] button and press the
LOOP [2X] button
The loop length remains the same, and you move to the next loop.
* If you change the length of the recalled loop, the loop settings are
saved (overwritten).
4. Press the same performance pad once again.
Loop playback is cancelled.
TR Operations (TR)
You can play TR instruments.
1. Press the [TR] button to make the button light red.
TR mode is selected.
Instruments are assigned to the performance pads as follows.
The lower row of pads lets you play a roll on the instrument.
BD SD CH OH
BD
Roll
SD
Roll
CH
Roll
OH
Roll
2. Press or hold down a performance pad.
5 Pressing a pad in the upper row plays the instrument.
5 Holding down a pad in the lower row plays a roll on the instrument.
The spacing of the roll depends on how strongly you press the pad.
The more strongly you press the pad, the shorter the spacing between
strikes of the roll.
5 You can use the PARAMETER [−] [+] buttons to change the roll
variation.