
User Manual


6
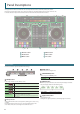
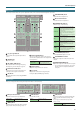
Panel Descriptions
1
2
3
4
5
6
8
9
10
11
12
13
14
15
17
4
16
7
7
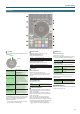
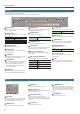
Pad Mode select
Here you can select the control mode of the
performance pads.
The illumination color of the buttons changes
according to the mode.
[HOT CUE] button
Selects hot cue mode (p. 13).
Button illumination: White
[SHIFT] + [HOT CUE]
Button illumination: Blue
Selects cue loop mode (p. 13).
Press [HOT CUE] twice
Button illumination: Orange
Selects saved ip mode (p. 26).
[ROLL] button
Selects roll mode (p. 13).
Button illumination: Light blue
[SHIFT] + [ROLL]
Button illumination: Red
Selects slicer mode (p. 14).
Press [ROLL] twice
Button illumination: Green
Selects saved loop mode (p. 14).
Press [SHIFT] + [ROLL]
twice
Button illumination: Blue
Selects slicer loop mode (p. 14).
[TR] button
Selects TR mode (p. 14).
Button illumination: Red
[SHIFT] + [TR]
Button illumination: Green
Selects pattern mode (p. 15).
Switches the TR-S pattern.
Press [TR] twice
Button illumination: Orange
Selects TR velocity mode (p. 15).
[SAMPLER] button
Selects sampler mode (p. 15).
Button illumination: Magenta
[SHIFT] + [SAMPLER]
Button illumination: Green
Selects pitch play mode (p. 15).
Press [SAMPLER] twice
Button illumination: Purple
Selects velocity sampler mode
(p. 15).
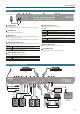
8
Performance pads
Use these for pad modes such as Hot Cue, Roll,
Slicer, TR, Sampler etc.
9
[SYNC] button
Automatically matches the tempo (pitch) or beat
grid of multiple songs.
When you press this button, the tempo (BPM)
changes to match the tempo of the song on
a deck other than the deck whose button was
pressed.
[SHIFT] + [SYNC] Cancels SYNC.
10
[CUE
u
] button
Species, plays, or recalls a temporary cue point.
The rst time that you press the [CUE
u
] button
after switching the playback song, the cue point
is set.
After the cue point has been set, pressing the
[
CUE
u
] button moves the cue point to the
location at which you pressed the button.
If playback is in progress, pressing this button
moves to the temporary cue point and stops
playback.
[SHIFT] + [CUE
u
]
If you press the buttons during the
song, the location returns to the
beginning of the song.
If you press the buttons at the
beginning of the song, the previous
song in the song list is loaded.
11
[
r
] button
Plays or pauses the song.
[SHIFT] + [
r
]
Returns to the temporary cue point,
and plays.
12
[SHIFT] button
You can recall other functions by holding down
this button and pressing another button.
13
[DECK] buttons
Switch the deck to be operated.
[DECK 1] + [DECK 3]
[DECK 2] + [DECK 4]
DUAL DECK mode (p. 16) is selected,
allowing you to control two decks
simultaneously.
[SHIFT] + [DECK]
You can specify the tempo of the
track by the interval at which you
repeatedly press the [DECK] button
(Tap Tempo function).
14
[ADJ] button
By holding down this button and turning the jog
dial you can adjust the beat grid interval.
[SHIFT] + [ADJ] Species a beat marker.
15
[SLIDE] button
By holding down this button and turning the jog
dial you can move the entire beat grid.
[SHIFT] + [SLIDE] Deletes a beat marker.
16
[CENSOR] button
While this button is held down, the song plays
backward. Release the button to return to
normal playback.
[SHIFT] + [CENSOR]
The song plays backward until you
once again press the [SHIFT] button
and [CENSOR] button.
17
[SLIP] button
Turns slip mode (p. 15) on/o.
If this is on, the button is lit.
[SHIFT] + [SLIP]
Turns VINYL mode on/o.
If this is on, the button is lit while
you hold down the [SHIFT] button.
Deck Section