
User's Manual


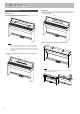
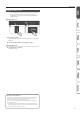
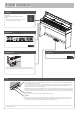
Table Of Contents
- Easy Quick Guide
- Contents
- Main Specifications
- Before You Play
- Panel Descriptions
- Connecting Your Equipment
- Operation Guide
- Selecting a Tone
- Adjusting the Overall Volume
- Adding Reverberation to the Sound (Ambience)
- Adjusting the Brightness of the Sound (Brilliance)
- Making Various Settings (Function Mode)
- Changing the Playing Feel of the Keyboard (Key Touch)
- Transposing the Pitch (Transpose)
- Dividing the Keyboard for Two People (Twin Piano)
- Saving Your Performance Settings (Registration)
- Playing Different Tones with the Left and Right Hands
- Creating Your Own Piano Tone (Piano Designer)
- Layering Two Sounds (Dual Play)
- Display
- Using the Bluetooth Function
- Selecting an Item/Editing a Value
- Sounding the Metronome
- Selecting a Song
- Playing Back or Recording
- Disabling the Buttons (Panel Lock)
- Selecting the Part(s) to Play (Part Mute)
- Advanced Operation
- Recording Your Performance
- SMF Recording
- Recording Audio
- Renaming a Song (Rename Song)
- Copying a Saved Song (Copy Song)
- Deleting a Saved Song (Delete Song)
- Personalizing Your Piano Sound (Piano Designer)
- Saving Your Performance Settings (Registration)
- Recalling a Registration
- Saving Current Settings into a Registration
- Saving a Registration Set (Registration Export)
- Loading a Saved Registration Set (Registration Import)
- Loading/Saving Piano Setups
- Saving Piano Settings (Piano Setup Export)
- Loading Piano Settings (Piano Setup Import)
- Convenient Functions
- Initializing the Memory (Format Media)
- Restoring the Factory Settings (Factory Reset)
- Various Settings (Function Mode)
- Basic Operations in Function Mode
- Matching the Pitch with Other Instruments (Master Tuning)
- Changing the Tuning Method (Temperament)
- Specifying the Tonic Note (Temperament Key)
- Adjusting the Song (SMF) Volume (Song Volume SMF)
- Adjusting the Song (Audio) Volume (Song Volume Audio)
- Adjusting the Volume of an Audio Playback Device (Input Volume)
- Specifying the Song (SMF) Playback Mode (SMF Play Mode)
- Selecting the Format for Recording (Recording Mode)
- Changing How the Pedal Effects Are Applied (Damper Pedal Part)
- Changing How the Pedals Work (Center Pedal)
- Changing the Effect of the Pedal (Left Pedal)
- Using a Pedal to Switch Registrations (Reg. Pedal Shift)
- Adjusting the Brightness of the Display (Display Contrast)
- Specifying a Maximum Volume (Volume Limit)
- Preventing Doubled Notes When Connected to a Sequencer (Local Control)
- MIDI Transmit Channel Settings (MIDI Transmit Ch)
- Changing the Language Displayed in the Screen (Language)
- Making the Power Automatically Turn off After a Time (Auto Off)
- Saving Settings Automatically (Auto Memory Backup)
- Using the Bluetooth® Functionality
- Here’s What You Can Do
- Using Bluetooth Audio
- Using the Pedal to Turn Pages on a Music Score App
- Transferring MIDI Data
- Troubleshooting
- Error Messages
- USING THE UNIT SAFELY
- IMPORTANT NOTES
- Tone List
- Internal Song List

7
°
Connecting Your Equipment
Phones Jacks
Here you can connect stereo headphones.
This unit has two headphone jacks,
two people can also use headphones
simultaneously.
A Headphones 3D Ambience eect will be
applied, producing the sensation that the
sound is emanating from the piano itself
even when using headphones.
* The Headphones 3D Ambience eect applies only to piano sounds;
it does not apply to other sounds.
* You can also turn the Headphones 3D Ambience eect o (p. 8).
* You can use the [Ambience] button to adjust the Headphones 3D
Ambience eect.
Input Jack
By connecting an audio player or other audio playback device here,
you can play back the sound of the audio playback device via the unit.
Use the Input Volume (p. 20) to adjust the volume of the device that’s
connected to the Input jack.
Output Jacks
If you connect these jacks to amplied speakers, the sound of the unit
will be heard through them.
* Before turning o the power of the unit, you
must rst turn o the power of the devices that
are connected to the Output jacks.
* To prevent malfunction and equipment failure, always turn down the volume, and turn o all the units before making any connections.
USB Memory Port
You can do the following things using a USB ash
drive.
5 WAVE les or MIDI les (SMF) data copied from your
computer can be played back by the unit.
5 You can make audio recordings of your performances on
the unit.
5 The audio recordings of songs that you’ve made can be
played on your computer.
* Never turn o the power or disconnect a USB ash drive or the
power cord while the USB memory access indicator is blinking.
* Use a commercially available USB ash drive or a USB ash drive
sold by Roland. However, we cannot guarantee that all commercially
available USB ash drives will work with this unit.
USB Computer Port
If you use a commercially available USB
cable to connect the unit’s USB Computer
port to your computer’s USB connector,
you’ll be able to do the following things.
5 SMF data played back by MIDI-compatible
software can be sounded by the unit.
5 MIDI data can be transferred between the unit and your sequencer
software, opening up a wide range of possibilities for music
production and editing.