To resize thickness, move all items on the front cover and center registration marks to left or right Ow ner ´ s Ma nu a l * 0 4 0 1 6 6 8 9 - 0 4 * 04016689 07-02-4N
To resize thickness, move all items on the front cover and center registration marks to left or right. Thank you, and congratulations on your choice of the Roland Digital Piano DP-970. Assembling the DP-970 ☞ p. 8 Before You Start Playing ☞ p. 12 Enjoying the Internal Songs Playing the Keyboard ☞ ☞ p. 15 p. 19 Contents ☞ p. 6 Index ☞ p. 56 For EU Countries This product complies with the requirements of European Directive 89/336/EEC.
DP-970_e.book 3 ページ 2007年1月16日 火曜日 午後1時42分 USING THE UNIT SAFELY The symbol alerts the user to important instructions or warnings.The specific meaning of the symbol is determined by the design contained within the triangle. In the case of the symbol at left, it is used for general cautions, warnings, or alerts to danger. Used for instructions intended to alert the user to the risk of death or severe injury should the unit be used improperly.
DP-970_e.book 4 ページ 2007年1月16日 火曜日 午後1時42分 014 • 101b Protect the unit from strong impact. (Do not drop it!) .......................................................................................................... 015 • Do not force the unit’s power-supply cord to share an outlet with an unreasonable number of other devices.
DP-970_e.book 5 ページ 2007年1月16日 火曜日 午後1時42分 IMPORTANT NOTES 291a In addition to the items listed under “USING THE UNIT SAFELY” on pages 3–4, please read and observe the following: Power Supply Maintenance 301 401b • Do not connect this unit to same electrical outlet that is being used by an electrical appliance that is controlled by an inverter (such as a refrigerator, washing machine, microwave oven, or air conditioner), or that contains a motor.
DP-970_e.book 6 ページ 2007年1月16日 火曜日 午後1時42分 Contents USING THE UNIT SAFELY.......................................3 IMPORTANT NOTES.................................................5 Chapter 3. Playing Along with the Internal Songs ......... 31 Introduction....................................................... 7 Changing the Tempo ................................................31 Adding a Count-in to Match the Timing (Count-In)..............................................................
DP-970_e.book 7 ページ 2007年1月16日 火曜日 午後1時42分 Introduction Congratulations on your choice of the Roland Digital Piano DP-970. In order to enjoy reliable performance of your new keyboard for many years to come, please take the time to read through this manual in its entirety. Main Features Refined Wood Grain Finish, Compact Design The simple design and light wood grain finish is at home both in the living room as well as in the children’s room.
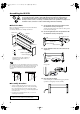
DP-970_e.book 8 ページ 2007年1月16日 火曜日 午後1時42分 Assembling the DP-970 Make sure that another person is on hand to help with the assembly and setup. To move the piano, lift it carefully—all the while keeping it level. Be very careful, when you assemble and move the piano, to make sure that you do not drop it on your hands or feet. Should you remove screws, cord clamps, or stabilizer, make sure to put them in a safe place out of children’s reach, so there is no chance of them being swallowed accidentally.
DP-970_e.book 9 ページ 2007年1月16日 火曜日 午後1時42分 5. Put the Pedal Board on the stabilizer. When putting the Pedal Board on the stabilizer, first loosen the attachment screws securing the speaker box to the side boards. 9. Connect the speaker cord extending from the rear of the speaker box to the DP-970’s speaker connector. Press the speaker cord completely into the connector so that it is securely fastened. fig.st5.e fig.st8.e Loosen the screws (in four places).
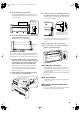
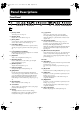
DP-970_e.book 10 ページ 2007年1月16日 火曜日 午後1時42分 Panel Descriptions Front Panel 2 3 4 5 6 7 8 9 10 11 12 13 14 15 16 17 18 19 20 21 1 1 [Power] switch Turns the power on/off (p. 14). 2 [Volume] knob Adjusts the overall volume level (p. 14). 3 [Demo] button You can listen to a demo of the instrument’s tones as well as a demo of the various functions (p. 17). 4 [Twin Piano] button You can divide the keyboard into two separate sections, allowing two people to perform in the same registers (p. 25).
DP-970_e.book 11 ページ 2007年1月16日 火曜日 午後1時42分 Panel Descriptions Rear Panel 1 3 2 1 Pedal jack Connect the pedal cord of the pedal board to this jack (p. 12). 2 MIDI Out/In connectors Connect to external MIDI devices to exchange performance data (p. 46). 3 Input jacks These jacks can be connected to another sound generating device or an audio device, so that the sound of that device will be output from the DP-970’s speakers (p. 45).
DP-970_e.book 12 ページ 2007年1月16日 火曜日 午後1時42分 Before You Start Playing Connecting the Pedal Cord 1. Connect the pedal cord to the Pedal jack on the rear panel of DP-970, at the rear. fig.00-01 Connecting the AC Adaptor 927 NOTE Depending on the circumstances of a particular setup, you may experience a discomforting sensation, or perceive that the surface feels gritty to the touch when you touch this device or the metal portions of other objects connected to it.
DP-970_e.book 13 ページ 2007年1月16日 火曜日 午後1時42分 Before You Start Playing ■ Closing the Lid Connecting Headphones 1. When closing the lid, be sure to close the music rest and open the blind. fig.lidclose1 Blind Music Rest The DP-970 has two jacks for plugging in headphones. This allows two people to listen through headphones simultaneously, making it very useful for lessons and when performing piano pieces for four hands.
DP-970_e.book 14 ページ 2007年1月16日 火曜日 午後1時42分 Before You Start Playing ■ Using the Headphones Hook Whenever you are not using the headphones, you can hang them on the headphones hook at the lower left of the DP-970. Attaching the Headphones Hook Press and twist the headphones hook included with the DP970 into the hole in the bottom of the DP-970 (refer to the figure below). Turn the wing nut of headphones hook to secure the headphone hook.
DP-970_e.book 15 ページ 2007年1月16日 火曜日 午後1時42分 Chapter 1. Enjoying the Internal Songs and Demo Listening to Internal Songs The DP-970 comes with 66 piano songs onboard. “Chapter 3. Playing Along with the Internal Songs” (p. 31) ■ Playing Back All Songs Continuously (All Song Play) “Internal Song List” (p. 51) The internal songs can be played back consecutively. fig.panel1-1 1 2 1 Hold down the [Song/Tempo] button, and press the [Play] button.
DP-970_e.book 16 ページ 2007年1月16日 火曜日 午後1時42分 Chapter 1. Enjoying the Internal Songs and Demo Playing back 3 Press the [Play] button. The button’s indicator will light, and the selected song will play. Stopping the playback 4 Press the [Play] button. The button’s indicator goes out, and playback stops. The next time you press the [Play] button, the song that was stopped is played from the beginning. ■ About the display for the internal songs Display Descriptions S.
DP-970_e.book 17 ページ 2007年1月16日 火曜日 午後1時42分 Chapter 1. Enjoying the Internal Songs and Demo Listening to the Demo Songs You can listen to various demo songs, including those demonstrating the piano and other tones, as well as the function applied to the piano tones. ■ Playing Back the Tone Demo Songs fig.panel1-3 1, 2 1 Press the [Demo] button. The button’s indicator flashes, and playback of the tone demo songs starts.
DP-970_e.book 18 ページ 2007年1月16日 火曜日 午後1時42分 Chapter 1. Enjoying the Internal Songs and Demo ■ Listening to a Demo of the Functions You can listen to the demo of the functions that can be applied to the piano tones. fig.panel1-3 1, 3 1 2 Press the [Demo] button. The button’s indicator flashes, and playback of the demo of the function starts. 2 Press any of the following buttons. Button assigned function demo Demo content Page [3D] 3D demo p. 21 [Dynamics] Dynamic Emphasis demo p.
DP-970_e.book 19 ページ 2007年1月16日 火曜日 午後1時42分 Chapter 2. Performance Performing with a Variety of Sounds The DP-970 contains 20 different internal tones. The tones are organized into five tone groups, which are assigned to the Tone buttons. fig.panel2-1 1 2 Selecting a tone group 1 For more details, refer to Press any Tone button. “Tone List” (p. 50). The indicator of the button you pressed will light. When you play the keyboard, you will hear a sound in the selected tone group.
DP-970_e.book 20 ページ 2007年1月16日 火曜日 午後1時42分 Chapter 2. Performance Adjusting the Keyboard Touch (Key Touch) You can adjust the touch (playing feel) of the keyboard. fig.panel2-7 1 1 Press the [Key Touch] button. The button’s indicator will light, and the feel of the keyboard will change. Each time you press the [Key Touch] button, the button’s indicator will change color, and the feel of the keyboard will change. Indicator Medium This allows you to play using the most natural touch.
DP-970_e.book 21 ページ 2007年1月16日 火曜日 午後1時42分 Chapter 2. Performance Adding a Sense of Depth to the Sound (3D) The DP-970 includes a “3D” function that allows you to get sounds that have a sense of depth like you get by playing an acoustic grand piano. This feature creates an ambience that makes it seem you are seated in front of a grand piano as you perform. fig.panel2-8 1 1 2 Press the [3D] button, getting its indicator to light.
DP-970_e.book 22 ページ 2007年1月16日 火曜日 午後1時42分 Chapter 2. Performance Adding Liveliness to the Sound (Dynamic Emphasis) You can add liveliness to the sound to give it superb clarity and distinctness. 1 1 2 Press the [Dynamics] button, getting its indicator to light. The Dynamic Emphasis function is switched on, enlivening the sound. To cancel the Dynamic Emphasis function, press the [Dynamics] button once more so its illumination is turned off.
DP-970_e.book 23 ページ 2007年1月16日 火曜日 午後1時42分 Chapter 2. Performance Applying Effects to the Sound fig.panel2-5 1 2 ■ Adding Reverberation to the Sound (Reverb) By applying the reverb effect you can produce a pleasant reverberation, making it sound as though you were performing in a concert hall. 1 Press the [Reverb] button. The button’s indicator will light, and a reverb effect will be applied to the sound.
DP-970_e.book 24 ページ 2007年1月16日 火曜日 午後1時42分 Chapter 2. Performance Transposing the Key of the Keyboard (Transpose) By using the “Transpose function,” you can transpose your performance without changing the notes you play. For example, even if the song is in a difficult key with numerous sharps ( ) or flats ( ), you can transpose it to a key that is easier for you to play.
DP-970_e.book 25 ページ 2007年1月16日 火曜日 午後1時42分 Chapter 2. Performance Splitting the Keyboard Into Two Sections for Four-Hand Performances (Twin Piano Mode) You can divide the keyboard into two separate sections, allowing two people to perform in the same registers. Middle C C1 C2 C3 C4 C5 C6 C5 C6 C7 C8 Twin Piano Mode C3 C4 C3 C4 Middle C 1 C5 C6 Middle C Press the [Twin Piano] button. The [Twin Piano] button and the [Split] button’s indicator will blink. fig.
DP-970_e.book 26 ページ 2007年1月16日 火曜日 午後1時42分 Chapter 2. Performance Playing Two Sounds Together (Dual Play) Simultaneously playing two tones when one key is pressed is called “Dual play.” 1 When Dual play is used, the [Variation] button’s indicator Simultaneously press the two Tone buttons that you want to play will light to indicate the together. selection of the right button of The indicator of the button you pressed will light. the two selected tones.
DP-970_e.book 27 ページ 2007年1月16日 火曜日 午後1時42分 Chapter 2. Performance Playing Different Tones with the Left and Right Hands (Split Play) The split point key is included in the left-hand keyboard area. Dividing the keyboard into right-hand and left-hand areas, then playing different sounds in each is called “Split play.” The boundary key is called the “split point.” fig.splitpoint.e Split Point (set to F 3, when the power is turned on.
DP-970_e.book 28 ページ 2007年1月16日 火曜日 午後1時42分 Chapter 2. Performance ■ Changing the Keyboard’s Split Point 1 You can change the location where the keyboard is divided (the split point) within The setting is at “F#3” when the range of B1 through B6. the piano is powered up. While continuing to hold the [Split] button, press the key that you want The split point key is to specify as the split point. displayed as follows.
DP-970_e.book 29 ページ 2007年1月16日 火曜日 午後1時42分 Chapter 2. Performance Using Metronome ■ Sounding the Metronome The DP-970 features a built-in metronome. While a song plays back, the metronome will sound at the tempo and time signature (Beat) of that song. fig.panel2-4 3, 4 2, 4 1, 5 Sounding the metronome 1 Press the [Metronome/Count In] button. The metronome will sound. The button flashes in red and green in time with the beat selected at that time.
DP-970_e.book 30 ページ 2007年1月16日 火曜日 午後1時42分 Chapter 2. Performance Stopping the metronome 5 Once again press the [Metronome/Count In] button, getting the button to go dark. The metronome will stop. ■ Changing the Metronome Volume The volume of the metronome can be adjusted, with nine volume levels available. 1 This is set to “4” when the Hold down the [Metronome/Count In] button and press the [-] or [+] instrument is turned on. button. The currently specified volume will be displayed.
DP-970_e.book 31 ページ 2007年1月16日 火曜日 午後1時42分 Chapter 3. Playing Along with the Internal Songs Here’s how you can play along with the internal songs. You can slow down the playback tempo of the song, or play back each hand separately. If you turn on the metronome while the song plays back, the metronome will sound at the beat and tempo of the song. Before you try playing the song, listen to it several times to get a general feel for the song.
DP-970_e.book 32 ページ 2007年1月16日 火曜日 午後1時42分 Chapter 3. Playing Along with the Internal Songs Playing Each Hand Separately The internal songs have different parts recorded to the left-hand and right-hand performances. When playing back internal songs, you can select the parts to be played. Left-hand performances are assigned to the [Left] button, and right-hand performances are assigned to the [Right] button. fig.trackbuttons.
DP-970_e.book 33 ページ 2007年1月16日 火曜日 午後1時42分 Chapter 4. Recording Your Performance You can easily record your performances. A recorded performance can be played back to hear your own playing, or to add additional parts. The following types of recording can be done using the DP-970. • Recording just your own keyboard performance (→ “Recording a New Song” p. 34) • Recording along with an internal song (→ “Recording Along with a Song” p.
DP-970_e.book 34 ページ 2007年1月16日 火曜日 午後1時42分 Chapter 4. Recording Your Performance Recording a New Song Record only the keyboard performance without playing along with an internal song. fig.panel4-1 3 2 1 4 6,7,8 5,7 Recording settings (select “USr”) 1 NOTE Press the [Song/Tempo] button, getting its indicator to light in red. The song number appears in the display for several seconds. 2 Press [-] and [+] buttons simultaneously. “USr” appears in the display.
DP-970_e.book 35 ページ 2007年1月16日 火曜日 午後1時42分 Chapter 4. Recording Your Performance Recording Along with a Song You can record a performance that you play along with an internal song. Using the [Left] or [Right] buttons, you can perform and record just the right-hand part of a song while listening to the left-hand playback of an internal song. fig.panel4-3 3 2 1 3 6,7,8 4,7 5 Selecting the song to record 1 Press the [Song/Tempo] button, getting its indicator to light in red.
DP-970_e.book 36 ページ 2007年1月16日 火曜日 午後1時42分 Chapter 4. Recording Your Performance Recording the Right-Hand and Left-Hand Parts Separately You can use the DP-970’s recorder to record the right-hand and left-hand parts separately. You can also specify individual parts to record to when you want to do a recording over again. Press the [Left] or [Right] button to specify the part to be recorded. fig.trackbuttons.e Left-hand Right-hand Part Part fig.
DP-970_e.book 37 ページ 2007年1月16日 火曜日 午後1時42分 Chapter 4. Recording Your Performance Stop recording 5 Press the [Play] or [Rec] button. Recording stops, and the indicators for the [Play] and [Rec] buttons go out. The performance of the specified part has been recorded. To record the performance of the other part, go back to Step 2 and repeat the procedure from there. You can listen to the performance you recorded already while you record. Play back the recorded performance 6 Press the [Play] button.
DP-970_e.book 38 ページ 2007年1月16日 火曜日 午後1時42分 Chapter 4. Recording Your Performance Erasing Recorded Performances You can erase a recorded performance. ■ Erasing a Performance from the Specified Track You can select a recorded track and erase it. 1 1 Hold down either the [Left] or [Right] button and press the [Rec] button. The indicator of the button you pressed will go dark, and the performance of the selected track will be erased. ■ Erasing a Song You can erase a song you’ve recorded.
DP-970_e.book 39 ページ 2007年1月16日 火曜日 午後1時42分 Chapter 4. Recording Your Performance Saving Recorded Songs Even with the Power Turned Off (Song Backup) Normally, any songs you have recorded are deleted when you turn off the power to the DP-970. However, if you wish, you can have such recorded songs be saved even while the power is turned off. This function is called “Song Backup.” 1 1 2 3 Hold down the [Split] button, and press the [Reverb] button. The DP-970 switches to the function mode.
DP-970_e.book 40 ページ 2007年1月16日 火曜日 午後1時42分 Chapter 5. Changing Various Settings Changing the Damper Pedal’s Resonance Making Detailed Settings (Function) On an acoustic piano, depressing the damper pedal makes the notes you play resonate with other strings, adding rich reverberations and fatness to the sound. The damper pedal on the DP-970 recreates this resonance (damper resonance) when depressed. You can make performance-related settings such as tuning and temperament.
DP-970_e.book 41 ページ 2007年1月16日 火曜日 午後1時42分 Chapter 5. Changing Various Settings Button Function Page Local Control p. 47 [Variation] ■ Tuning to Other Instruments’ Pitches (Master Tuning) In situations such as when playing ensemble with other instruments, you can tune the DP-970’s standard pitch to the pitch of another instrument. The standard pitch generally refers to the pitch of the note that’s played when you finger the middle A key. Song Backup 1.
DP-970_e.book 42 ページ 2007年1月16日 火曜日 午後1時42分 Chapter 5. Changing Various Settings Display 1 2 Temperament Qualities Equal In this tuning, each octave is divided into twelve equal steps. Every interval produces about the same amount of slight dissonance. Pythagorean This tuning, devised by the philosopher Pythagoras, eliminates dissonance in fourths and fifths. Dissonance is produced by thirdinterval chords, but melodies are euphonious.
DP-970_e.book 43 ページ 2007年1月16日 火曜日 午後1時42分 Chapter 5. Changing Various Settings Display Descriptions On The damper pedal effect will be applied to the sound of the left and right hand keyboard area. OFF The damper pedal effect will not be applied to the sound of the left-hand keyboard area. Power-up default setting OFF ■ Changing How 3D is Applied (3D Mode) The method used in applying the 3D function’s sense of depth changes according to whether or not headphones are connected.
DP-970_e.book 44 ページ 2007年1月16日 火曜日 午後1時42分 Chapter 5. Changing Various Settings Getting the Master Tune Setting To Be Remembered While the Power Is Turned Off Normally, the Master Tune setting reverts to the default value when the power is turned off. However, you can set the DP-970 so that the Master Tune value is retained even while the power is turned off. 1.
DP-970_e.book 45 ページ 2007年1月16日 火曜日 午後1時42分 Chapter 6. Connecting External Devices Connecting to Audio Equipment 926a * When connection cables with resistors are used, the volume level of equipment connected to the inputs (input jacks) may below. If this happens, use connection cables that do not contain resistors. You can connect audio devices to play the sound of the DP970 through the speakers of your audio system, or to record your performance on a tape recorder or other recording device.
DP-970_e.book 46 ページ 2007年1月16日 火曜日 午後1時42分 Chapter 6. Connecting External Devices Connecting MIDI Devices Making MIDI-related Settings By connecting an external MIDI device and exchanging performance data, you can control the performances on one device from the other. For instance, you can output sound from the other instrument or switch tones on the other instrument. Here’s how you can set the transmit channel and other MIDIrelated settings.
DP-970_e.book 47 ページ 2007年1月16日 火曜日 午後1時42分 Chapter 6. Connecting External Devices ■ Switching Local Control on and Off fig.disp-on When connecting a MIDI sequencer, set Local Control to “OFF.” As illustrated, information describing what has been played on the keyboard is passed to the internal sound generator over two different routes, (1) and (2). As a result, you hear overlapping or intermittent sounds.
DP-970_e.book 48 ページ 2007年1月16日 火曜日 午後1時42分 Appendices Troubleshooting If you think there’s a problem, read this first. Case Case Cause/Remedy The power doesn’t come on Is the AC adaptor connected and plugged in correctly? (p. 12) The button doesn’t work Is the panel locked? (p. 43) Is the Tone locked? (p. 43) Turn the power off, then back on. Is the volume level of the DP-970 turned all the way down? (p. 14) Are headphones plugged in and headphones indicator lights up? (p.
DP-970_e.book 49 ページ 2007年1月16日 火曜日 午後1時42分 Error Messages/Other Messages Case In the upper range, the sound changes abruptly beyond a certain key A High-pitched whine is produced Case Cause/Remedy On an acoustic piano, notes in the upper one and a half octaves of the keyboard continue to sound until they decay naturally, regardless of the damper pedal. There is a difference in the timbre as well. Roland pianos faithfully simulate such characteristics of the acoustic piano.
DP-970_e.book 50 ページ 2007年1月16日 火曜日 午後1時42分 Tone List [Split] On [Split] Off Button name [Piano] [E.
DP-970_e.book 51 ページ 2007年1月16日 火曜日 午後1時42分 Internal Song List Song No. Song Name Composer Copyright S. 1 La Fille aux Cheveux de Lin C. Debussy © 2004 Roland Corporation S. 2 Late Night Chopin F. Chopin/ Arranged by John Maul © 2002 Roland Corporation S. 3 Fly Free John Maul © 1998 Roland Corporation S. 4 L’éveil del l’amour Masashi & Kazuko Hirashita © 2000 Roland Corporation S. 5 Sonate für Klavier No. 15 W. A. Mozart © 1996 Roland Corporation S. 6 Liebesträume III F.
DP-970_e.book 52 ページ 2007年1月16日 火曜日 午後1時42分 Internal Song List Song No. Song Name Composer Copyright S. 42 Blumenlied G. Lange © 1996 Roland Corporation S. 43 Alpenglöckchen T. Oesten © 1996 Roland Corporation S. 44 Menuett G dur L. v. Beethoven © 1996 Roland Corporation S. 45 Venezianisches Gondellied F. Mendelsshon © 1996 Roland Corporation S. 46 Alpenabendröte T. Oesten © 1996 Roland Corporation S. 47 Farewell to the Piano L. v. Beethoven © 1996 Roland Corporation S.
DP-970_e.book 53 ページ 2007年1月16日 火曜日 午後1時42分 Easy Operation List 2 1 6 5 4 No. 1 3 4 5 6 7 3 You want to 8 9 2 1 10 Buttons 11 Page Press the [Split] and [Reverb] buttons simultaneously, and press the [●] button. 1 3D Mode [Split]+ [Reverb] → [3D] p. 43 2 Master Tuning [Split]+ [Reverb] → [Piano] p. 41 3 4 5 Selecting a temperament [Split]+ [Reverb] → [E. Piano] Specifying the keynote → [E. Piano] + key Stretch tuning [Split]+ [Reverb] → [Harpsi] p.
DP-970_e.book 54 ページ 2007年1月16日 火曜日 午後1時42分 MIDI Implementation Chart DIGITAL PIANO Date : Sep. 1, 2005 MIDI Implementation Chart Model DP-970 Transmitted Function... Recognized Basic Channel Default Changed 1 1–16 1 1–16 Mode Default Messages Altered Mode 3 x ************** Mode 3 x Note Number : True Voice 15–113 ************** 0–127 15–113 Velocity Note ON Note OFF O x 8n v=64 O x After Touch Key’s Ch’s x x x x x x O x x O O O O O O O O O O O O O O (0...
DP-970_e.book 55 ページ 2007年1月16日 火曜日 午後1時42分 Main Specifications Keyboard Keyboard 88 keys (Progressive Hammer Action Keyboard) Touch Sensitivity Touch: Light, Medium, Heavy, Fixed Keyboard Modes Whole, Dual (volume balance adjustable), Split (split point adjustable), Twin Piano Sound Source Max. Polyphony 64 voices Tones 5 groups 20 variations Temperament 7 types, tonic selectable Stretched Tuning 2 types Master Tuning 415.3 Hz–466.2 Hz (adjustable in increments of 0.
DP-970_e.book 56 ページ 2007年1月16日 火曜日 午後1時42分 Index Numerics I 3D ......................................................................................21 [3D] button ....................................................10, 21, 40, 43 Internal Song ...................................................................15 A AC Adaptor .....................................................................12 All Song Play ...................................................................15 Assemble ...........
DP-970_e.book 57 ページ 2007年1月16日 火曜日 午後1時42分 S Soft pedal .........................................................................14 Song Backup ....................................................................39 [Song/ Tempo] button ..................................................41 [Song/Tempo] button ...........................10, 15, 31, 34–35 Songs Starting with Pickup Beats ................................33 Sostenuto pedal ..............................................................
DP-970_e.book 58 ページ 2007年1月16日 Information AFRICA EGYPT Al Fanny Trading Office 9, EBN Hagar A1 Askalany Street, ARD E1 Golf, Heliopolis, Cairo 11341, EGYPT TEL: 20-2-417-1828 REUNION Maison FO - YAM Marcel 25 Rue Jules Hermann, Chaudron - BP79 97 491 Ste Clotilde Cedex, REUNION ISLAND TEL: (0262) 218-429 SOUTH AFRICA T.O.M.S. Sound & Music (Pty)Ltd. 2 ASTRON ROAD DENVER JOHANNESBURG ZA 2195, SOUTH AFRICA TEL: (011)417 3400 FAX: (011)417 3462 Paul Bothner(PTY)Ltd.
To resize thickness, move all items on the front cover and center registration marks to left or right. Thank you, and congratulations on your choice of the Roland Digital Piano DP-970. Assembling the DP-970 ☞ p. 8 Before You Start Playing ☞ p. 12 Enjoying the Internal Songs Playing the Keyboard ☞ ☞ p. 15 p. 19 Contents ☞ p. 6 Index ☞ p. 56 For EU Countries This product complies with the requirements of European Directive 89/336/EEC.
To resize thickness, move all items on the front cover and center registration marks to left or right Ow ner ´ s Ma nu a l * 0 4 0 1 6 6 8 9 - 0 4 * 04016689 07-02-4N