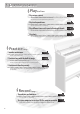
&& Look What You Can Do! && Play the Piano ee Play various sounds page 14 The unit contains a wide variety of tones (sounds). You can freely select and perform using these tones. ee Play two layered tones page 15 You can layer two tones on a single key. ee Play different tones with your left and right hands page 16 You can divide the keyboard into left and right zones, and select a different tone for each zone.
Adjust Your Piano ee Adjust the keyboard touch Operation Guide && page 19 You can adjust the touch sensitivity of the keyboard to match your own playing style. ee Add reverberation to the sound Panel Descriptions page 18 You can add reverberation (ambience) to create the sensation of performing in a concert hall. ee Adjust the brightness of the sound page 18 You can adjust the tone quality of the sound, ranging from a brilliant timbre to a mellow tone.
Before using this unit, carefully read the sections entitled: “USING THE UNIT SAFELY” (p. 56), and “IMPORTANT NOTES” (p. 58). These sections provide important information concerning the proper operation of the unit. Additionally, in order to feel assured that you have gained a good grasp of every feature provided by your new unit, Owner’s Manual should be read in its entirety. The manual should be saved and kept on hand as a convenient reference. Copyright © 2012 ROLAND CORPORATION All rights reserved.
&& Contents Operation Guide. . . . . . . . . . . . . . . . . . . . . . . . . . . . . . . . . . . . . . . . . . . . . . . . . . . . 6 Panel Descriptions. . . . . . . . . . . . . . . . . . . . . . . . . . . . . . . . . . . . . . . . . . . . . . . . . 10 Before You Play. . . . . . . . . . . . . . . . . . . . . . . . . . . . . . . . . . . . . . . . . . . . . . . . . .
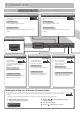
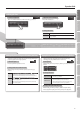
&& Operation Guide Adding Reverberation (Ambience) Adjusting the Brightness of the Sound (Brilliance) You can add a pleasant reverberation to the sounds, producing the impression that you are performing in page 18 a concert hall. You can adjust the brightness of the sound you play from the keyboard or the sounds of a song you play page 18 back. To turn ambience on To turn brilliance on Press the [Ambience] button so it’s lit. Press the [Brilliance] button so it’s lit.
Operation Guide Operation Guide Selecting the Tone To select a single tone page 14 Press one of the tone buttons, and then use the [–] [+] buttons. To layer two tones (dual play) page 15 Press two tone buttons. Panel Descriptions Press two Press one To change the tones Press the [–] [+] buttons. Tone 2 Hold down the right-most of the lit tone button, and then use the [–] [+] buttons.
Operation Guide Using the Metronome Changing the Tempo or Time Signature Here’s how to sound the metronome. page 22 To turn the metronome on You can adjust the tempo of the metronome or song. page 22 To change the tempo Press the [Metronome] button so it’s lit. Use the [ To adjust the metronome’s volume While holding down the [Metronome] button, use the [–] [+] buttons. Display ][ ] (Slow/Fast) buttons.
Operation Guide Here’s how to select the parts that will play. Operation Guide Selecting the Parts that will Play (Part Mute) Repeatedly Practicing a Portion of a Song (AB Repeat) page 26 Press the [Right] button so it’s lit. To select the left-hand part Press the [Left] button so it’s lit. To select the other parts Press the [Accomp] button so it’s lit. To adjust the mute volume of a part Hold down the button of the part whose volume you want to adjust, and use the [–] [+] buttons. 1. 2. 3.
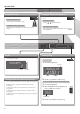
&& Panel Descriptions USB Memory Port [Power] Switch This turns the power on/off. page 13 * With the factory settings, the unit’s power will automatically be switched off 30 minutes after you stop playing or operating the unit. If the unit’s power has been turned off automatically, you can use the [Power] switch to turn the unit back on again.
Panel Descriptions Input Jacks You can connect these to external MIDI devices (p. 47). If you connect these jacks to amplified speakers, the sound of unit will be heard through them. Rear side Ground Terminal • Water pipes (may result in shock or electrocution) Pedal Connector DC In Jack Connect the page 55 included AC adaptor here. * Before making this connection, you must make sure that the [Power] switch is off. Connect page 55 the pedal cord of the dedicated stand to this connector.
&& Before You Play Opening the Lid Closing the Lid 1. NOTE • Always use two hands to open and close the lid. Although the unit’s lid is designed to close slowly and gently when it is released, the lid immediately closes if it has been opened only slightly. Take care not to allow your fingers to become pinched by the lid. When closing the lid, be sure to close the music rest and open the blind. Blind Music Rest • If small children will be using the unit, adult supervision should be provided.
Before You Play Once everything is properly connected (p. 11), be sure to follow the procedure below to turn on their power. If you turn on equipment in the wrong order, you risk causing malfunction or equipment failure. NOTE With the factory settings, the unit’s power will automatically be switched off 30 minutes after you stop playing or operating the unit. If the unit’s power has been turned off automatically, you can use the [Power] switch to turn the unit back on again.
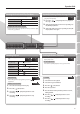
&& Performing Performing with Various Sounds In addition to piano sounds, the unit lets you enjoy performing with many other sounds (347 types). These sounds are called Tones. The Tones are categorized into five groups, each of which is assigned to a different Tone button. Selecting Tones Let’s start by performing with a piano tone. When you turn on the power, the Concert (Concert Piano) tone is selected. 2 1 1. Press a tone button to select the tone group.
Performing Operation Guide Performing with Two Layered Tones (Dual Play) You can play two tones simultaneously from each note of the keyboard. This feature is called Dual Play. As an example, here’s how to layer piano and strings tones. Panel Descriptions 2 1 Before You Play 1. While holding down the Piano [Grand] button, press the [Strings] button. Both buttons will light. When you play the keyboard, you’ll hear both the piano and the strings tones. * Dual play is not available if Split Play (p.
Performing Playing Different Tones with the Right and Left Hands (Split Play) You can play different tones in the left and right sides of the keyboard, divided at a certain key. This feature is called Split Play, and the key at which the keyboard is divided is called the Split Point. 1 1. 2 While holding down the [Transpose] button, press the [Twin Piano] button. The display will indicate SPLIT. Name of the right-hand tone When Split is turned on, the keyboard settings will be as follows.
Performing Operation Guide Changing the left-hand tone Panel Descriptions 1 2 Before You Play 1. While holding down the [Transpose] button and [Twin Piano] button, press a tone button. The number and name of the tone currently selected for the left-hand zone are shown. Performing 2. While holding down the [Transpose] button and [Twin Piano] button, press the [–] [+] buttons. A different tone is selected.
Performing Adjusting the Sound to Your Taste The unit lets you add reverberation or modify the brightness of the sound. Adding Reverberation to the Sound (Ambience) You can add a pleasant reverberation to the sounds of the unit, producing the impression that you are performing in a concert hall. This effect is called Ambience. 1 3 2 1. Saving your settings Press the [Ambience] button. The [Ambience] button will light. 2. While holding down the [Ambience] button, press the [–] [+] buttons.
Performing While holding down the [Brilliance] button, press the [–] [+] buttons. The display will indicate the depth of the brilliance effect values. Value -10–0–10 (default: 5) Explanation Positive (+) values make the sound brighter; negative (-) values make the sound more mellow. To turn off the brilliance effect, press the [Brilliance] button once again. Before You Play 3.
Performing Dividing the Keyboard for Two-person Performance (Twin Piano) You can divide the keyboard into left and right zones so that two people can play the same range of pitches, just as though there were two pianos. This function is called Twin Piano. For example, you could use Twin Piano to allow a student to play along with their teacher. Conventional keyboard 1 1. 3 Twin Piano divide point Press the [Twin Piano] button.
Performing Operation Guide Shifting the Pitch (Transpose) Transpose means to shift the pitches of songs and the keyboard. The Transpose function makes it easy to do the following. • You can use unchanged fingering to accompany a singer who is singing in a key different than the original music. • A song written in a difficult key with numerous sharps ( ) or flats ( ) can be performed in a key that’s easier for you to play.
&& Practicing Practicing with the Metronome You can sound the metronome while you practice. While the song selects, the metronome will sound at the tempo and time signature of the song. 1. Press the [Metronome] button. The [Metronome] button will blink, and the metronome will sound. The [Metronome] button will blink red and green according to the currently selected time signature; red indicates the strong beats, and green indicates the weak beats. 2.
Practicing While holding down the [Metronome] button, press the [–] [+] buttons. Panel Descriptions 1. Operation Guide Adjusting the Metronome’s Volume The display will indicate the metronome’s volume. 1 Screen Explanation 0–10 When the volume of the metronome is set to “0,” the metronome won’t sound, but the [Metronome] button will blink.
Practicing Practicing with a Song You can practice by playing along with a song. Selecting and Playing a Song Here’s how to listen to the built-in songs. You can also play back songs stored on a separately sold USB flash drive. 1. 2. Press the [Song] button. While holding down the [Song] button, use the [–] [+] buttons to select the category.
Practicing Operation Guide Song formats that can be played by the unit The unit can play back data in the following formats. • SMF formats 0/1 • Roland Piano Digital format (i-format) • Audio files: WAV format, 44.1 kHz, 16-bit linear Panel Descriptions Playing Songs Consecutively (All Songs Play) You can consecutively play back the built-in songs or the songs saved in the internal memory or on the USB flash drive repetitively. This function is called “All Songs Play.
Practicing Adjusting a Song’s Tempo for Easier Practicing You can change the tempo at which a song plays back. When you’re practicing along with a song, this allows you to slow down the tempo of a difficult song in order to play it more comfortably. 1. Press the [ ][ ] (Slow/Fast) buttons. The tempo will be indicated. MEMO If an audio file is selected, you can adjust the tempo in the range of 75–100–125%. 2.
Practicing Operation Guide Using the sound of a specific part as a “guide” (mute volume) If desired, you can specify that the sound of a part will play at a reduced volume rather than going completely silent when you press a part button and turn off its indicator. This setting lets you play a specific part at a reduced volume and use it as a “guide” for your playing. Panel Descriptions 1. While holding down the part button, press the [–] [+] buttons.
Practicing Repeatedly Practicing a Portion of a Song (AB Repeat) Here’s how you can repeatedly play back a specified portion of the song. You can use this function to repeatedly practice that portion. Section to repeat Time 1. Press the [ 2 1 B (Repeat End) A (Repeat Start) ] (Play/Stop) button. The song will play back. 2. Press the [AB Repeat] button at the point where you want to start repeating (point A). The [AB Repeat] button will blink. 3.
Practicing Operation Guide Recording the Song You’re Practicing It’s easy to record your own performances. You can play back a recorded performance to check your playing, or perform along with a recorded performance. The unit lets you record in the following ways. Type of recording Explanation Panel Descriptions Parts will be separate. You can re-record a specific portion of the song. SMF recording You can overdub. * Normally, you should use SMF recording.
Practicing Saving a performance you’ve recorded * If you want to save to the USB flash drive (sold separately), connect your USB flash drive to the USB memory port before you continue. 1. Press the [ ] (Play/Stop) button to stop recording (p. 29). Recording will stop, and a message will ask whether you want to save your performance. 2. To save your performance, press the [ ] (Fast) button to select “Y.” The performance will be saved.
Practicing 1. Operation Guide Recording the left hand Press the [Right] button and the [Accomp] button so their illumination is turned off. 2 3 1 * If you don’t specify a part at this time, the recorded performance will be recorded in this order: [Right] button [Left] button 1 [Accomp] button. 2. Press the [ ] (Play/Stop) button. A two-measure count will sound (the measure number in the lower right of the display will indicate “-2,” then “-1”), and then recording will start.
Practicing Recording a performance you play along with a song Here’s how you can record a performance that you play along with a song. Getting ready to record 1. Select the tone that you want record (p. 14). 2. Select the song to be dubbed (p. 24). 3. Press the [ ] (Rec) button. The [ ] (Rec) button will light, and the unit will enter recording-standby mode. At this time, New Song will be selected. If you decide not to record, press the [ (Rec) button once again. 4.
Practicing By converting a song recorded in the form of an SMF to audio, you’ll be able to listen to it on your computer. You can also use your computer to burn the song to a music CD, or upload it to the Internet. Copying an audio recording of a song to your computer page 36 Panel Descriptions If you save an audio recording of a song on the USB flash drive, you'll be able to listen to it on your computer.
Practicing Audio Recording Here’s how to record what you play on the unit as audio data. The recorded song can be used on your computer. Preparing to record 1. Connect a USB flash drive (sold separately) to the USB memory port (p. 10). * Audio data cannot be saved in the unit itself. 2. Select the tone that you want perform (p. 14). 4 3 3. While holding down the [ 4. Press the [ The [ ] (Rec) button, press the [–] [+] buttons to select “Audio.” ] (Rec) button.
Practicing Operation Guide Transposing a Song for Easier Performance (Audio Transpose) You can change the key when playing back an audio file. You can play the keyboard while listening to the transposed sound. 1. Press the [Transpose] button. The [Transpose] button will light. While holding down the [Transpose] button, press the [–] [+] buttons. The display will indicate the amount of transposition.
Practicing Burning an Audio Recording of a Song (WAV file) to a CD After an audio recording of a song has been saved to the USB flash drive, you can copy it to your computer and burn it to a CD. If you want to burn a CD from a song that you recorded as an SMF, you must first convert it to audio (WAV file) (p. 33). In order to burn a CD on your computer, you’ll need software such as “iTunes.” For details, refer to the owner’s manual or the online help of your software.
Practicing Operation Guide Saving a Song with the Name You Specify Immediately after you’ve finished recording, you can save the song to the memory, song number, and song name that you specify. * If you want to save to the USB flash drive (sold separately), connect your USB flash drive to the USB memory port before you continue. 7. 6 7 2 8 Edit the name using the buttons shown in the illustration below. Press the [Song] button. Performing 2.
Practicing Renaming a Song Here’s how to rename a song you’ve saved. * You can’t rename an audio file. 2 1. 2. 11 5 7 3 9 6 8 9 Select the song that you want to rename (p. 24). While holding down the [Key Touch] button, press the [Transpose] button. The [Key Touch] button and [Transpose] button will light, and the unit will enter Function mode. 3. 4. Use the [ ][ ] (Slow/Fast) buttons to select “SaveSong.” Press the [Song] button. The media select screen will appear.
&& Convenient Functions 2. The settings of the unit will return to their factory-set state when you turn off the power. However, you can store the settings so that they will be retained even after the power is turned off. If you don’t need the power to turn off automatically, set “Auto Off” to the “OFF” setting as described below. This is called the “memory backup” function. Split Point p. 17 Ambience (on/off, depth) p. 18 Brilliance (on/off, depth) p. 18 Key Touch (on/off, value) p.
Convenient Functions Restoring the Factory Settings (Factory Reset) Copying a Saved Song (Copy Song) Songs that have been saved in the internal memory can be copied to USB flash drive (sold separately). Alternatively, songs stored on the USB flash drive can be copied to the internal memory. Settings that you’ve stored using the Memory Backup function (p. 39) can be returned to their factory-set state. This is called the “factory reset” function.
Convenient Functions Press the [Song] button to copy the song. If you decide not to copy, press the [Metronome] button. Deleting a Saved Song (Delete Song) Once the song has been copied, you’ll be returned to the screen of step 2. Here’s how to delete a song that you saved on the internal memory or the USB flash drive (sold separately). NOTE MEMO Never turn off the power or disconnect the USB flash drive while the screen indicates “Working...” 10.
Convenient Functions Initializing the Memory (Format Media) Caution when initializing the memory • Never turn off the power while “Working...” is shown in the display. Here’s how you can completely erase all songs that were saved in the internal memory or the USB flash drive (sold separately). NOTE • Once an initialization is performed, all songs that have been saved in the internal memory or the USB flash drive will be erased.
Convenient Functions Operation Guide Disabling the Buttons (Panel Lock) When you activate Panel Lock, all buttons will be disabled. This prevents the tones or settings from being changed if you inadvertently press a button. 1. Panel Descriptions Hold down the [AB Repeat] button until the following display appears. Panel Lock will be activated. All button operations will be disabled. Before You Play 2. To cancel Panel Lock, once again hold down the [AB Repeat] button for a while.
&& Various Settings (Function Mode) The same procedure is used for all settings in Function mode. 1. While holding down the [Key Touch] button, press the [Transpose] button. The [Key Touch] button and [Transpose] button will light; the unit will be in Function mode. Indication Dual Bal (*1) Value 2. 3. 4. Press the [ ][ ] (Slow/Fast) buttons to select the function setting that you want to change. Press the [–] [+] button to edit the value of the setting.
Various Settings (Function Mode) Value Strg Res (*1) Explanation Producing the Resonance of the Strings When the Keys Are Played (String Resonance) This adjusts the string resonance of the acoustic piano sound (the sympathetic vibrations of strings for previously played notes that occur when you play another note). Panel Descriptions Higher settings will make the sympathetic vibration louder.
Various Settings (Function Mode) Indication Value Explanation Changing How the Pedals Work (Center Pedal) When you turn on the power, the center pedal functions as the sostenuto pedal (p. 10). You can change the function of the pedal to a variety of other operations. CPdl Fnc SOST PLAY LAYR OCT Sets function to sostenuto pedal. The pedal will have the same function as the [ ] (Play/Stop) button. Pressing the pedal will layer on Tone 2, used for Dual play.
Various Settings (Function Mode) Value Explanation Operation Guide Indication Changing the USB Driver Settings (USB Driver) Normally, you don’t need to install a driver in order to connect the unit to your computer. However, if some problem occurs, or if the performance is poor, using the Roland original driver may solve the problem. In this case, set the unit’s “USB Driver” setting to “ORG,” and then install the driver in your computer.
Various Settings (Function Mode) Indication Value Explanation Making the Power Automatically Turn Off After a Time (Auto Off) Auto Off With the factory settings, the unit’s power will automatically be switched off 30 minutes after you stop playing or operating the unit. If you don’t want the power to turn off automatically, change the “Auto Off” setting to “OFF” as follows. (p. 39) MEMO This setting is automatically saved in the unit.
&& Troubleshooting Cause/Action Even though you’re using headphones and the sound is muted, a thumping sound is heard when you play the keyboard The unit uses a hammer action keyboard in order to simulate an acoustic piano’s playing touch as realistically as possible. For this reason, you’ll hear the hammers thump when you play the keyboard, just as you would when playing an acoustic piano.
Troubleshooting Symptom Cause/Action The wrong instrument is selected when you press the [E. Piano], [Strings], or [Other] button Tone buttons [E. Piano] [Strings] [Other] also operate as buttons that select “Recommended Tones.” Connecting a commercially-available CD-ROM drive to the USB memory port and selecting a song from a CD-ROM produced for the VIMA (VIMA TUNES) will automatically cause sounds appropriate for that song to be assigned to the [E.
&& Error Messages Meaning Error 1 You can only read the music file. It can not be saved. Error 2 An error occurred during writing. The external media may be corrupted. Insert other external media and try again. Alternatively, you can initialize the external media. The external media’s protect tab may be in the “Protect” (writing prohibited) position may not yet be initialized. Error 10 No external media is inserted. Insert the external media and try again.
&& Tone List Piano–Grand No. 1 Tone Name Explanation Concert The sound of a splendid concert grand piano. This piano sound has our highest recommendation, and can be used for any style of music. 2 Ballade A mellow grand piano sound, recommended for quiet songs. 3 Bright A brilliant grand piano sound, recommended when you want the piano to stand out in an ensemble. 4 Magical A charming sound that layers synth bells with Concert. 5 Pno+Str Strings layered with Concert.
&& Main Specifications Keyboard External Memory DP90: 88 keys (Ivory Feel-S Keyboard with Escapement) Keyboard Touch Sensitivity DP90S: 88 keys (PHA III Ivory Feel Keyboard with Escapement) Key Touch: 5 levels, Fixed Touch External Storage Song Save Format Soft (capable of continuous detection) Internal Songs Sostenuto (function assignable) Sound Generator SuperNATURAL Piano Sound Sound Generator Conforms to GM2/GS/XG Lite Max.
&Assembling & Assembling the DP90/DP90S * To ensure that you assemble this unit correctly, please read this manual carefully before you begin assembly. Keep this manual nearby for reference when needed. * Keep this unit horizontal when lifting it during assembly or transport. * Be careful not to pinch your hands or drop this unit on your foot during assembly or transport. * You must obtain the assistance of at least one additional person when assembling or transporting this unit.
5. Hand-tighten the screws (large) the pedal board 8 to provisionally fasten to the side boards 2 , 3 (two locations) . 5 10. Connect the speaker cord extending from the rear of the speaker box to the piano main unit’s speaker connector . Rear DP90/DP90S 3 Speaker connector Screws (large): use two screws 8 Clip portion Speaker cord 2 Operation Guide 5 6. Firmly tighten each of the side board screws (four locations) that you provisionally tightened in step 1, making sure that they are secure .
&& USING THE UNIT SAFELY About WARNING and CAUTION Notices Used for instructions intended to alert the user to the risk of death or severe injury should the unit be used improperly. Used for instructions intended to alert the user to the risk of injury or material damage should the unit be used improperly. * Material damage refers to damage or other adverse effects caused with respect to the home and all its furnishings, as well to domestic animals or pets.
USING THE UNIT SAFELY Place in a well ventilated location The unit and the AC adaptor should be located so their location or position does not interfere with their proper ventilation. Always grasp only the plug on the AC adaptor cord when plugging into, or unplugging from, an outlet or this unit. Periodically clean the AC adaptor’s plug Manage cables for safety Take care so as not to get fingers pinched by lid Be careful when opening/closing the lid so you do not get your fingers pinched (p. 12).
&& IMPORTANT NOTES Power Supply • Do not connect this unit to same electrical outlet that is being used by an electrical appliance that is controlled by an inverter or a motor (such as a refrigerator, washing machine, microwave oven, or air conditioner). Depending on the way in which the electrical appliance is used, power supply noise may cause this unit to malfunction or may produce audible noise.
IMPORTANT NOTES Before Using External Memories (Using Optional USB flash drive) • Carefully insert the USB flash drive all the way in— until it is firmly in place. Copyrights / Licenses / Trademarks • Never touch the terminals of the USB flash drives. Also, avoid getting the terminals dirty.
&& Index A L T a . . . . . . . . . . . . . . . . . . . . . . . . . . . . 24 A. . . . . . . . . . . . . . . . . . . . . . . . . . . . 24 AB Repeat . . . . . . . . . . . . . . . . . 9, 28 Accompaniment part . . . . . . . . 26 All Songs Play. . . . . . . . . . . . . . . . 25 Ambience . . . . . . . . . . . . . . . . . 6, 18 [Ambience] button. . . . . . . . . . . 18 Audio Recording. . . . . . . . . . . . . 34 Audio Transpose. . . . . . . . . . . . . 35 Auto Off. . . . . . . . . . . . . . . . .
Information EGYPT REUNION MARCEL FO-YAM Sarl 25 Rue Jules Hermann, Chaudron - BP79 97 491 Ste Clotilde Cedex, REUNION ISLAND TEL: (0262) 218-429 SOUTH AFRICA Paul Bothner(PTY)Ltd. Royal Cape Park, Unit 24 Londonderry Road, Ottery 7800 Cape Town, SOUTH AFRICA TEL: (021) 799 4900 CHINA Roland Shanghai Electronics Co.,Ltd. 5F. No.1500 Pingliang Road Shanghai 200090, CHINA TEL: (021) 5580-0800 HONG KONG Parsons Music Ltd. 8th Floor, Railway Plaza, 39 Chatham Road South, T.S.
For EU Countries For China 62
Operation Guide For the U.K. IMPORTANT: THE WIRES IN THIS MAINS LEAD ARE COLOURED IN ACCORDANCE WITH THE FOLLOWING CODE. BLUE: NEUTRAL BROWN: LIVE Panel Descriptions As the colours of the wires in the mains lead of this apparatus may not correspond with the coloured markings identifying the terminals in your plug, proceed as follows: The wire which is coloured BLUE must be connected to the terminal which is marked with the letter N or coloured BLACK.
* 5 1 0 0 0 2 8 3 7 9 - 0 3 *