
Owner`s manual


16
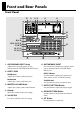
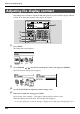
Front and Rear Panels
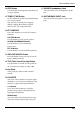
Rear Panel
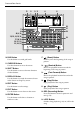
fig.001-020
1. AC IN (AC adaptor) Jack
Connect the included BRC-series AC adaptor
to this jack.
Never connect any AC adaptor other than the BRC-
series; doing so will cause malfunctions.
2. POWER Switch
This is the power switch that turns the DR-
880 on/off.
3. USB Connector
This connector lets you use a USB cable to
connect the DR-880 to your computer.
4. MIDI Connectors (IN/OUT)
These connectors receive (IN) and transmit
(OUT) MIDI data.
Use MIDI cables to connect them to your
MIDI sequencer or MIDI sound module.
5. DIGITAL OUT Connector
This is a coaxial-type connector that outputs
digital audio signals.
It outputs the same sound as the MASTER
OUT jacks.
Connect it to your digital recorder.
6. CTL 1, 2 Jack
You can connect foot switches (FS-6 or FS-5U;
sold separately) here and use them to control
various functions of the DR-880.
7. CTL 3, 4/EXP PEDAL Jack
You can connect foot switches (FS-6 or FS-5U;
sold separately) or an expression pedal
(Roland EV-5; sold separately) here and use
them to control various functions of the DR-
880.
8. INDIVIDUAL A, B Jacks
These jacks output only the sounds you
specify.
9. MASTER OUT Jacks R/L (MONO)
These are the audio signal output jacks. Both
phone jacks and RCA phono jacks are
provided.
If you’re using the phone jacks, connect your
equipment to the L (MONO) output if you’re
listening in monaural.
10.Cord Hook
Loop the cord from the supplied AC adaptor
around this hook. In the event that the cord
gets tugged on accidentally, this will prevent
the plug from coming out and causing the
power to fail, and will prevent excessive
strain from being placed on the AC adaptor
jack.
11.
Security Slot ( SECURITY LOCK)
http://www.kensington.com/
1 2 3 5 7 64 8
9
10
11