For the following languages, a PDF version of the Owner’s Manual can be found on the CD-ROM.
Preparing Your DUO-CAPTURE EX Install the USB Driver p. 12 Configure the Input/Output Device p. 17 Connect a Guitar or Microphone p. 18, p. 19 Before using this unit, carefully read the sections entitled: “USING THE UNIT SAFELY” (p. 37) and “IMPORTANT NOTES” (p. 41). These sections provide important information concerning the proper operation of the unit.
Contents Introduction. . . . . . . . . . . . . . . . . . . . . . . . . . . . . 4 Appendix . . . . . . . . . . . . . . . . . . . . . . . . . . . . . . 20 Main Features. . . . . . . . . . . . . . . . . . . . . . . . . . 4 Troubleshooting. . . . . . . . . . . . . . . . . . . . . 20 Confirming Package Contents. . . . . . . . . . 4 USB Driver Installation . . . . . . . . . 20 Panel Descriptions. . . . . . . . . . . . . . . . . . . . .
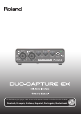
Introduction Main Features Two microphone preamps for recording high-quality audio Features two VS PREAMPs—the same preamps used in our acclaimed OCTA‑CAPTURE. Allows you to capture all the inherent characteristics of your instruments and microphones in high-quality audio, while enjoying the convenience of a compact design. Supports connection of a wide variety of audio sources, including guitars. Confirming Package Contents After you open the package, please check that all items are present.
Introduction USB cable Use this cable to connect the DUO-CAPTURE EX to the USB port of your computer. * Please use only the included USB cable. If you require a replacement due to loss or damage, please contact the nearest Roland Service center or an authorized Roland distributor (p. 45). Alkaline battery (AA, LR6) ×3 * The life of the supplied batteries may be limited, since their primary purpose was to enable testing.
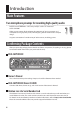
Introduction Panel Descriptions Front Panel 2 1 1 3 4 5 6 INPUT 1, 2 jacks (combo jacks) These are analog audio input jacks with microphone preamps. They accommodate both XLR connectors and 1/4‑inch phone type jacks, and support both balanced and unbalanced connections.
Introduction 2 [SENS 1] knob, [SENS 2] knob Adjust the volume of the audio signal that is input via the INPUT 1 jack and the INPUT 2 jack. 3 PEAK indicator Lights up when the input signal level is too high. Use the [SENS 1] knob and the [SENS 2] knob to adjust the input level so that the PEAK indicator does not light. 4 [OUTPUT] knob Adjusts the volume that is output from the PHONES jack, OUTPUT L jack, and OUTPUT R jack. 5 PHONES jack Used to connect headphones.
Introduction Rear Panel 7 8 9 10 11 12 13 14 7 DC IN jack Accepts connection of the AC adaptor (sold separately). MEMO • Even if batteries are installed, the unit will turn off if you connect or disconnect the power cord from the AC outlet while the unit is turned on, or if you connect or disconnect the AC adaptor from the unit. You must turn off the power before you connect or disconnect the power cord or AC adaptor.
Introduction 11 [PHANTOM] switch Determines whether the DUO-CAPTURE EX supplies phantom power to the XLR connectors of the INPUT 1 and INPUT 2 jacks. Switch position Connected equipment Condenser microphone that requires phantom power +48V * Phantom power supplied by this unit: DC 48 V; maximum 6 mA (for INPUT 1 and INPUT 2 combined). OFF Other equipment NOTE You must leave the [PHANTOM] switch set to “OFF” unless condenser microphones requiring phantom power are connected to the XLR connectors.
Introduction 15 15 16 [COMPUTER/TAB] switch Determines the operating mode and sampling frequency of the DUO-CAPTURE EX. MEMO For details, refer to the “Read Me First” leaflet. Switch position Explanation Select when connecting to a computer (Windows or Mac OS X). COMPUTER 48/44.1 The included USB driver allows you to record, play, and edit high-quality audio with stable timing. Set the switch to the sampling rate you want to use. Select when connecting to a tablet device.
Introduction Using Batteries When using the DUO-CAPTURE EX with the [COMPUTER/TAB] switch (p. 10) set to “TAB,” three alkaline batteries or commercially available rechargeable Ni-MH batteries (AA, LR6) are required. Inserting the Batteries (Bottom Panel) 1. Remove the battery case cover on the bottom panel of the DUO-CAPTURE EX. Tab While pressing the tab, lift the cover. 2. Insert the batteries into the battery case.
USB Driver Installation A USB driver is software installed on your computer that handles data sent between your computer’s software and the DUO-CAPTURE EX. In order to use the DUO-CAPTURE EX with a computer, the USB driver must be installed. NOTE Do not connect the DUO-CAPTURE EX to the computer until you are directed to do so. MEMO Refer to the Roland website for the latest USB drivers and information about compatibility with the latest operating system versions. http://www.roland.
USB Driver Installation 6. When “Ready to install the driver.” appears, connect the DUO-CAPTURE EX to the computer using the USB cable and set the [POWER] switch to the “on” position. MEMO • Do not connect any cables to the DUO-CAPTURE EX other than the USB cable. • If a message appears, follow the instructions on the screen. Windows XP If using Windows XP, follow the instructions on the screen and continue the installation. 6-1.
USB Driver Installation Install the USB Driver (Mac OS X) 1. Set the DUO-CAPTURE EX’s [COMPUTER/TAB] switch to “COMPUTER” (“44.1” or “48”). 2. Start up the computer without the DUO-CAPTURE EX connected. Exit all applications that are running. 3. Insert the included “DUO-CAPTURE EX Driver CD-ROM” into the CD-ROM drive. 4. Double-click the [DuoCaptureEX_USBDriver] icon in the [MacDriver] folder on the CD-ROM. The installer starts.
USB Driver Installation Confirm that Sound Can Be Heard Configure the computer so that audio played from a program that uses the computer’s audio features, such as Windows Media Player or iTunes, can be heard. 1. Connect the headphones or amplified speakers as shown in the figure. Headphones Front panel Amplified speakers Rear panel * To prevent malfunction and equipment failure, always turn down the volume and turn off all devices (except the computer) before making any connections. 2.
USB Driver Installation Windows XP 2-1. Open the “Control Panel,” click the [Sounds, Speech, and Audio Devices] icon, and then double-click the [Sounds and Audio Devices] icon. If you have selected Classic view, double-click the [Sounds and Audio Devices] icon. 2-2. Click the [Audio] tab and select [OUT (DUO-CAPTURE EX)] in the [Sound playback] area. When connecting the external MIDI sound module, select [DUO-CAPTURE EX] in the [MIDI music playback] area. 2-3. Click the [OK] button. Mac OS X 2-1.
Connections and Settings This section explains how to connect and configure the DUO-CAPTURE EX. Refer also to the block diagram at the end of this document. Precautions Concerning the Use of DAW Software • Connect the DUO-CAPTURE EX to the computer before starting the DAW software. • Do not disconnect the DUO-CAPTURE EX from the computer while the DAW software is running. After exiting the DAW software, disconnect the DUO-CAPTURE EX. • Select the DUO-CAPTURE EX for the DAW software’s audio device setting.
Connections and Settings Playing Back Connect the DUO-CAPTURE EX to the computer using the USB cable. By connecting headphones or amplified speakers as shown in the illustration, you can monitor the playback from your DAW software or the sound from an instrument or audio device connected to the DUO-CAPTURE EX. * To prevent malfunction and equipment failure, always turn down the volume and turn all devices (except the computer) off before making any connections.
Connections and Settings Recording You can use your DAW software to record audio from the INPUT 1 jack and INPUT 2 jack. When a device is connected to the INPUT 1 jack or to the INPUT 2 jack, set the [PHANTOM] switch (p. 9) and the [INST] switch (p. 9) accordingly. Guitar Condenser microphone Computer Front panel Rear panel Example When a guitar is connected to the INPUT 1 jack, set the [INST] switch to “Hi-Z.
Appendix Troubleshooting If you experience problems, read this chapter first. It contains tips for solving most problems. Additional information is available in the “Win (Mac) Driver/Readme.htm” file on the DUO-CAPTURE EX Driver CD-ROM. If this chapter doesn’t help you solve a problem, please refer to the support section of our website. If the problem is not resolved, refer to the contact information (p. 45) and contact the nearest Roland Service center or an authorized Roland distributor.
Appendix Problem Items to Check Windows XP Did you connect the The “Found New DUO-CAPTURE EX to a different USB Hardware Wizard” port of the computer than the one appears again after the you used when installing the driver? USB driver is installed Windows 8.1 /. Windows 8 /. Windows 7 /.
Appendix Problem Items to Check Windows 8.1 / Windows 8 /. Windows 7 / Windows Vista I cannot select or use the DUO-CAPTURE EX device Are you using the Media Player included with Windows? Mac OS X Action Use different software. MIDI devices cannot be selected in Media Player. Configure Audio MIDI Setup (p. 26). Have you configured “Audio MIDI Setup”? No sound is heard from the computer’s speakers This is not a malfunction.
Appendix Problem Items to Check Action My microphone is too quiet Does the sensitivity of the microphone match the input level of the DUO-CAPTURE EX? The DUO-CAPTURE EX’s microphone input level is -60 dBu for the XLR connector, and -46 dBu for the TRS phone type jack. If the sensitivity of the microphone is low, the sound will be quiet.
Appendix Problem Items to Check Action Windows Is the power management setting in Windows set to economy mode? Windows Refer to the “Win (Mac) Driver/Readme. htm” file on the DUO-CAPTURE EX Driver CD-ROM. Have you set the system’s “Performance” setting? Is the DUO-CAPTURE EX connected to a USB hub? Sound is interrupted during playback or recording Connect the DUO-CAPTURE EX directly to one of the computer’s USB ports. You must use the included USB cable.
Appendix Problem Recordings are too loud or too quiet I cannot play back or record Items to Check Action Is the input level appropriate? Use the [SENS 1] or [SENS 2] knob to adjust the input level of the DUO-CAPTURE EX. If your software has an input level adjustment, check the input level setting. Does the sensitivity of the microphone match the input level of the DUO-CAPTURE EX? The DUO-CAPTURE EX’s microphone input level is -60 dBu for the XLR connector, and -46 dBu for the TRS phone type jack.
Appendix Mac OS X MIDI Settings Here’s how to configure the MIDI settings for Mac OS X. 1. In the Mac OS X Finder, open the [Applications] folder and then the [Utilities] folder, and then double-click [Audio MIDI Setup]. 2. Use the following procedure to display the “MIDI Studio” window or the “Audio MIDI Setup” window. Mac OS X 10.6 or later 2-1. Click [Show MIDI Window] in the [Window] menu. Mac OS X 10.5 or earlier 2-1. Click the [MIDI Devices] tab. 3.
Appendix 4 5 8, 10 3 9 7 New Device 8. Click the [Test Setup] icon. The [Test Setup] icon turns on (blue). MEMO If you have a sound module connected to the DUO-CAPTURE EX’s MIDI OUT connector, a fairly loud sound will be heard when you perform the next step. Reduce the volume of your sound module before continuing. 9. Click the DUO-CAPTURE EX’s [ ] button. A confirmation sound is played from the sound module. 10. Click the [Test Setup] icon. The [Test Setup] icon turns off (gray). 11.
Appendix Changing Computer Settings to Avoid Problems This section explains how to solve problems discussed in “USB Driver Installation” (p. 20) and “Using the DUO-CAPTURE EX” (p. 21). For details about configuring your operating system’s settings or deleting the USB driver, refer to the “Win (Mac) Driver/Readme.htm” file on the DUO-CAPTURE EX Driver CD-ROM. Setting the System Volume If the playback volume is too loud or too low, try adjusting the system volume. Windows 8.1 / Windows 8 / Windows 7 1.
Appendix Windows XP 1. Open the “Control Panel,” click the [Sounds, Speech, and Audio Devices] icon, and then click the [Sounds and Audio Devices] icon. If you have selected Classic view, double-click the [Sounds and Audio Devices] icon. 2. Click the [Audio] tab. 3. In the “Sound playback” area, make sure that [OUT (DUO-CAPTURE EX)] is selected as the “Default device,” and click the [Volume] button. 4. When the volume control appears, adjust the “Wave” volume.
Appendix Voice Communication Software Settings Windows 8.1 / Windows 8 / Windows 7 If you are using voice communication software, the volume of the audio device may be adjusted automatically to suit the characteristics of the conversation. Use the following procedure to disable automatic volume adjustment. 1. Open the “Control Panel,” click the [Hardware and Sound] icon, and then click the [Sound] icon. If you have selected Icon view, click the [Sound]. 2.
Appendix Advanced USB Driver Settings You can set the input and output audio buffer size settings. Windows When using Windows 7, USB driver settings cannot be changed while the monitoring function of Windows is enabled. Turn off the monitoring function (p. 30). 1. Exit all programs that are using the DUO-CAPTURE EX. 2. Open the “Control Panel” and set the display mode as follows. • Windows 8.1 / Windows 8 / Windows 7 : Icon view • 3.
Appendix Mac OS X 1. Open “System Preferences” and click the [DUO-CAPTURE EX] icon. The “Driver Settings” panel appears. Setting Explanation You can adjust the USB driver’s input and output audio buffer size. Audio Buffer Size Recording Margin Decrease the buffer size to decrease latency. Increase the buffer size if audio drops out. * After adjusting the buffer size, make sure to restart all programs that are using the DUO-CAPTURE EX.
Appendix Main Specifications Roland DUO-CAPTURE EX UA-22: USB Audio Interface Number of Audio Recording/ Recording: 2 channels Playback Channels Playback: 2 channels Signal Processing Sampling Frequency Nominal Input Level PC interface: 24 bits AD/DA Conversion: 24 bits AD/DA Conversion: 48 kHz, 44.
Appendix USB bus power [COMPUTER/TAB] switch = COMPUTER (44.1, 48) Power Supply AC adaptor (Sold separately) [COMPUTER/TAB] switch = TAB Current Draw 240 mA Expected Battery Life Under Continuous Use Alkaline batteries [COMPUTER/TAB] switch = TAB (These figures will vary depending on the specifications of the batteries and the actual conditions of use.
MEMO 35
MEMO 36
USING THE UNIT SAFELY About WARNING and CAUTION Notices Used for instructions intended to alert the user to the risk of death or severe injury should the unit be used improperly. Used for instructions intended to alert the user to the risk of injury or material damage should the unit be used improperly. * Material damage refers to damage or other adverse effects caused with respect to the home and all its furnishings, as well to domestic animals or pets.
USING THE UNIT SAFELY WARNING WARNING Avoid extended use at high volume Do not drop or subject to strong impact This unit, either alone or in combination with an amplifier and headphones or speakers, may be capable of producing sound levels that could cause permanent hearing loss. Do not operate for a long period of time at a high volume level, or at a level that is uncomfortable.
USING THE UNIT SAFELY CAUTION Place in a well ventilated location The unit and the AC adaptor should be located so their location or position does not interfere with their proper ventilation. Grasp the plug when connecting or disconnecting the AC adaptor Always grasp only the plug on the AC adaptor cord when plugging into, or unplugging from, an outlet or this unit.
USING THE UNIT SAFELY CAUTION Handle the ground terminal carefully If you remove the screw from the ground terminal, be sure to replace it; don’t leave it lying around where it could accidently be swallowed by small children. When refastening the screw, make that it is firmly fastened, so it won’t come loose.
IMPORTANT NOTES Power Supply Placement • Do not connect this unit to same electrical outlet that is being used by an electrical appliance that is controlled by an inverter or a motor (such as a refrigerator, washing machine, microwave oven, or air conditioner). Depending on the way in which the electrical appliance is used, power supply noise may cause this unit to malfunction or may produce audible noise.
IMPORTANT NOTES Maintenance Grounding • For everyday cleaning wipe the unit with a soft, dry cloth or one that has been slightly dampened with water. To remove stubborn dirt, use a cloth impregnated with a mild, non-abrasive detergent. Afterwards, be sure to wipe the unit thoroughly with a soft, dry cloth.
IMPORTANT NOTES Copyrights, licenses, and trademarks • Do not use this product for purposes that could infringe on a copyright held by a third party. We assume no responsibility whatsoever with regard to any infringements of third-party copyrights arising through your use of this product. • Before you open the included CD-ROM, you must read the “license agreement.” Opening the CD-ROM will be taken to mean your acceptance of the license agreement.
Index A R Ableton Live Lite Serial Number Card. . . . . . . . . . . . . . . . 4 ASIO. . . . . . . . . . . . . . . . . . . . . . . . . . . . . . . . . . . . . . . . . . . . . . . 17 Audio MIDI Setup (Mac OS X). . . . . . . . . . . . . . . . . . . . . . . 26 Record settings. . . . . . . . . . . . . . . . . . . . . . . . . . . . . . . . . . . . 19 S B Sampling frequency . . . . . . . . . . . . . . . . . . . . . . . . . . . 10, 33 [SENS 1], [SENS 2] knobs. . . . . . . . . . . . . . . . . . . . . . . . .
Information
For EU Countries For China 46
For the U.K. IMPORTANT: THE WIRES IN THIS MAINS LEAD ARE COLOURED IN ACCORDANCE WITH THE FOLLOWING CODE. BLUE: NEUTRAL BROWN: LIVE As the colours of the wires in the mains lead of this apparatus may not correspond with the coloured markings identifying the terminals in your plug, proceed as follows: The wire which is coloured BLUE must be connected to the terminal which is marked with the letter N or coloured BLACK.
[PHANTOM] (XLR ONLY) +48V [INST] (TRS ONLY) Hi-Z/Lo-Z [DIRECT MONITOR] PEAK * 5 1 0 0 0 4 2 3 8 1 - 0 4 *