Owner’s Manual Bedienungsanleitung Mode d’emploi Manuale dell'utente Manual del usuario Manual do proprietário Provision of Bluetooth functionality Please be aware that depending on the country in which you purchased the unit, Bluetooth functionality might not be included. If Bluetooth functionality is included The Bluetooth logo blinks when you turn on the power.
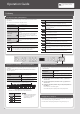
Owner’s Manual Contents Specifying How the Bass Part Behaves (Leading Bass). . . . . . Chord Recognition When Split Is On. . . . . . . . . . . . . . . . . . . . . . Preventing Doubled Notes When Connected to a Sequencer (Local Control) . . . . . . . . . . . . . . . . . . . . . . . . . . . . . . . Copying a Song (Copy Song). . . . . . . . . . . . . . . . . . . . . . . . . . . . . Bluetooth Function. . . . . . . . . .
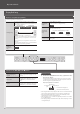
Operation Guide Settings for items with this icon are saved by Memory Backup (p. 11). Performing Selecting Tones ([Piano] [Other] Buttons) This digital piano lets you enjoy playing a variety of piano tones (sounds) and other types of tones. Display You can select a tone and adjust the way that it sounds. 2 Selecting a piano tone Press the [Piano] button. Selecting other tones Press the [Other] button.
Using the Metronome ([Metronome] Button) You can perform while the metronome sounds. You can adjust the tempo or beat of the metronome. If a song is playing, the metronome will sound at the tempo and beat of that song. Using the Metronome Changing the Tempo Press the [Metronome] button so it blinks. Turn on the [Metronome] button to display the tempo, and then use the [-] [+] buttons. 108 Hold down the [Metronome] button and press the [-] [+] buttons.
Operation Guide Playing Back Songs How to Use Song Mode ([Song] Button) Press the [Song] button to select Song mode. Press the [Song] button, and then use the [-] [+] buttons. In the middle of a song, pressing the [-] button will return you to the beginning of the song. Recorded songs N.01 – Changing the Tempo Press the [Metronome] button. Use the [-] [+] buttons to change the tempo. 108 Internal songs U.10 a.01 – c.
Using Automatic Accompaniment (Rhythm) That Matches Your Chords How to Use Rhythm Mode ([Rhythm] Button) Press the [Rhythm] button to select Rhythm mode. Split is turned on. Rhythms include not only drum sounds, but also accompaniments featuring instruments such as piano, guitar, bass, and strings. While the rhythm is playing, the left-hand part will not sound, since that section is dedicated to the recognition of chords.
Operation Guide Recording Performances You can record your performance, including accompaniment. You can play back a recorded performance to check your playing, or to play along with it. Stopping Recording 6. By pressing the [s] button once again, you can hear the song that you just recorded. Getting Ready to Record 1. 2. Select the tone that you want to play on the keyboard (p. 2). Start the metronome if desired. Press the [Metronome] button.
Playing Songs from a USB Flash Drive (Sold Separately) Connecting a USB Flash Drive NOTE • If the USB flash drive contains a large number of song files, it may take some time for the data to be read. Playing Songs 1. 2. Press the [Song] button. Use the [-] [+] buttons to select a song. N.01 • Use only single-byte alphanumeric characters in the file names. 1. Using your computer, copy your favorite songs onto your USB flash drive (sold separately).
Panel Descriptions Settings for items with this icon are saved by Memory Backup (p. 11). Front Panel Adjusting the Volume and Balance (Volume Buttons) This indicates the tone number, song number, measure number, tempo, selected function, or value. Overall Volume Use the Volume buttons to adjust the volume. Volume Balance Between Song/Rhythm and the Keyboard (Song Balance) While holding down the [Song] button or [Rhythm] button, use the Volume buttons to adjust the balance.
Disabling the Buttons ( Panel Lock) Adjusting a Value ([-] [+] Buttons) When you activate Panel Lock, all buttons will be disabled. This prevents the tones or settings from being changed if you inadvertently press a button. Use the [-] [+] buttons to adjust a value. Changing a value continuously Hold down the [+] button or [−] button. Changing a value rapidly While holding down the [+] button, press the [-] button to rapidly increase the value.
Before You Play Opening/Closing the Lid Turning the Power On/Off You must use both hands to open or close the lid. Once everything is properly connected (p. 9), be sure to follow the procedure below to turn on their power. If you turn on equipment in the wrong order, you risk causing malfunction or equipment failure. Opening the Lid 1. Use both hands to lift the edge of the lid, and push it away from yourself. Turning the Power On 1. Turn the [L] switch ON. Edge of lid 2.
°° Various Settings (Function Mode) Basic Operation in Function Mode 1. Hold down the [Metronome] button and press the [Split] button. Memory backup Function mode is selected. 2. Use the [-] [+] buttons to select the function that you want to set, and press the [s] button to display the setting screen. 3. Use the [-] [+] buttons to adjust the setting. Press the [s] button to return to the previous screen.
Various Settings (Function Mode) Display F08 F0g F10 Value Explanation Changing the Tuning Method (Stretch Tuning) 1, 2 1 (Sostenuto, Soft), 2 (Start/Stop), 3 (Intro/Ending), 4 (Variation), 5 (Fill-in), 6 (Leading Bass) This setting changes the type of stretch tuning, a tuning method that is used specifically for pianos, in which the high notes are tuned slightly sharper and the low notes are tuned slightly flatter. Normally, you should use the “1” setting (standard tuning curve).
Restoring the Factory Settings (Factory Reset) Display F18 Value Explanation Making the Power Automatically Turn Off After a Time (Auto Off) OFF, 10, 30, 240 [min.] This specifies the auto-off setting. The remaining time blinks before the power turns off. When there is less than one minute remaining, the countdown will be in seconds. * This setting is saved automatically when you change it.
°° Using the Bluetooth® Functionality Here’s What You Can Do Bluetooth functionality creates a wireless connection between a mobile device such as a smartphone or tablet (subsequently referred to as the “mobile device”) and this unit, allowing you to do the following. Page-turning A music score display app on the mobile device can be controlled from this unit. MIDI data transmission and reception MIDI data can be exchanged between this unit and the mobile device.
Using the Bluetooth® Functionality Transferring MIDI Data Here’s how to make settings for transmitting and receiving MIDI data between this unit and the mobile device. MEMO The page turning function and the MIDI transmit/receive function cannot be used simultaneously.
°° Troubleshooting Problem Cause/Action This unit uses a hammer action keyboard in order to simulate an Even though acoustic piano’s playing touch as realistically as possible. For this you’re using reason, you’ll hear the hammers thump when you play the keyboard, headphones just as you would when playing an acoustic piano.
°° Message List Indication Meaning E.01 The music file you attempted to save is read-only. It cannot be saved. E.02 An error occurred while writing. It may be that the protect tab of the external media is in the “Protect (write prohibit)” position, or that the external media has not been formatted. E.10 No USB flash drive connected. Connect a USB flash drive and try the operation again. E.11 There is insufficient free space at the save destination.
°° USING THE UNIT SAFELY WARNING To completely turn off power to the unit, pull out the plug from the outlet Even with the power switch turned off, this unit is not completely separated from its main source of power. When the power needs to be completely turned off, turn off the power switch on the unit, then pull out the plug from the outlet. For this reason, the outlet into which you choose to connect the power cord’s plug should be one that is within easy reach and readily accessible.
°° Tone List [Piano] button No. Name No. Name No. Name No. Name 1 Concert Piano 4 Magical Piano 7 Piano + Choir 10 Harpsichord 2 Ballade Piano 5 Piano + Strings 8 Rock Piano 11 Coupled Harpsichord 3 Bright Piano 6 Piano + Pad g Ragtime Piano [Other] button No. Name No. Name No. Name No. Name 1 Trem. TineEP 12 Mallet Isle 23 Ballad Organ 34 Dcy ChoirPad 2 Pop E.Piano 13 Morning Lite 24 Full Stops 35 Nylon-str.
°° Chord Fingering List C C# D E E F CM7 C#M7 DM7 E M7 EM7 FM7 C7 C#7 D7 E 7 E7 F7 Cm C#m Dm E m Em Fm Cm7 C#m7 Dm7 E m7 Em7 Fm7 CmM7 C#mM7 DmM7 E mM7 EmM7 FmM7 Cdim C#dim Ddim E dim Edim Fdim Cm7 ( 5 ) C#m7 ( 5 ) Dm7 ( 5 ) E m7 ( 5 ) Em7 ( 5 ) Fm7 ( 5 ) Caug C#aug Daug E aug Eaug Faug Csus4 C#sus4 Dsus4 E sus4 Esus4 Fsus4 C7sus4 C#7sus4 D7sus4 E 7sus4 E7sus4 F7sus4 C7/13 C#7/13 D7/13 E 7/13 E7/13 F7/13
F# G A A B B F#M7 GM7 A M7 AM7 B M7 BM7 F#7 G7 A 7 A7 B 7 B7 F#m Gm A m Am B m Bm F#m7 Gm7 A m7 Am7 B m7 Bm7 F#mM7 GmM7 A mM7 AmM7 B mM7 BmM7 F#dim Gdim A dim Adim B dim Bdim F#m7 ( 5 ) Gm7 ( 5 ) A m7 ( 5 ) Am7 ( 5 ) B m7 ( 5 ) Bm7 ( 5 ) F#aug Gaug A aug Aaug B aug Baug F#sus4 Gsus4 A sus4 Asus4 B sus4 Bsus4 F#7sus4 G7sus4 A 7sus4 A7sus4 B 7sus4 B7sus4 F#7/13 G7/13 A 7/13 A7/13 B 7/13 B7/13
°° Internal Song List No. a.01 a.02 a.03 a.04 a.05 a.06 a.07 a.08 a.0g a.10 a.11 a.12 a.13 a.14 a.15 a.16 a.17 a.18 a.1g a.20 a.21 a.22 a.23 a.24 a.25 a.26 a.27 a.28 a.2g a.30 a.31 a.32 a.33 a.34 a.35 a.36 a.37 a.38 a.3g a.40 a.41 a.42 a.43 a.44 a.45 a.46 a.47 a.48 a.4g a.50 a.51 a.52 a.53 a.54 a.55 a.56 a.57 a.58 a.5g a.60 Song Name Composer Valse, op.34-1 Fryderyk Franciszek Chopin Polonaise op.53 Fryderyk Franciszek Chopin Nocturne No.
For EU Countries For China
For the U.K. IMPORTANT: THE WIRES IN THIS MAINS LEAD ARE COLOURED IN ACCORDANCE WITH THE FOLLOWING CODE. BLUE: NEUTRAL BROWN: LIVE As the colours of the wires in the mains lead of this apparatus may not correspond with the coloured markings identifying the terminals in your plug, proceed as follows: The wire which is coloured BLUE must be connected to the terminal which is marked with the letter N or coloured BLACK.
For the USA This transmitter must not be co-located or operated in conjunction with any other antenna or transmitter. (FCC Part15 Subpart C §15.247, 15.253, 15.255) This equipment complies with FCC radiation exposure limits set forth for an uncontrolled environment and meets the FCC radio frequency (RF) Exposure Guidelines. This equipment has very low levels of RF energy that it deemed to comply without maximum permissive exposure evaluation (MPE). (FCC Part15 Subpart C §15.247, 15.253, 15.
* 5 1 0 0 0 4 7 2 6 4 - 0 1 *