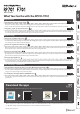
Owner’s Manual What You Can Do with the RP701/F701 Play the Piano ˙˙Play the piano sounds of your dream page 12 This piano contains a variety of piano tones ranging from concert grand piano to upright piano. It also contains the sound of a harpsichord, which is the ancestor of the piano. You’ll be sure to find piano sounds to your taste. ˙˙Play string, organ, and percussion tones page 12 You can also choose tones of instruments other than piano.
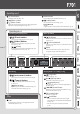
Contents Restoring the Factory Settings (Factory Reset) . . . . . . . . . . . . . . 30 Disabling the Buttons (Panel Lock) . . . . . . . . . . . . . . . . . . . . . . . . . 30 Quick Operation . . . . . . . . . . . . . . . . . . . . . . . . . . . . . . . . . . . . . . . . . 3 Panel Descriptions (RP701) . . . . . . . . . . . . . . . . . . . . . . . . . . . . . . 4 Before You Play (RP701). . . . .
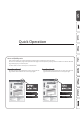
Quick Operation How to read Quick Operation Here we explain what you need to know before using this piano, and basic ways to use the piano. This section is divided into pages with explanations that apply to models separately and pages that are common to all models. Read the pages that apply to your model of piano. For more details on how to use the piano, read “Reference.
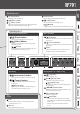
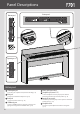
Panel Descriptions Bottom panel Bottom panel 19 18 20 22 23 21 24 25 27 Operating area 1 1 2 4 3 5 26 Bottom panel 18 19 USB Computer port 22 Connect this to your computer for music production and editing. (p. 18) 23 DC In jack Connect headphones here to play the piano without producing sound from the internal speakers. (p. 7) Connect the included AC adaptor here. (p.
Operating area 1 1 [L] (Power) button Volume indicator 4 Turns the power on/off. (p. 6) 2 3 Lit according to the specified volume. (p. 6) [ ] (Volume+) button [ ] (Volume-) button [ ] (settings) button 5 Lets you make various settings. (p. 31) Adjust the overall volume of the piano when playing the keyboard or when playing back songs. (p. 6) [ ] (Bluetooth) Long-press this to connect with your mobile device. (p.
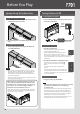
Before You Play Opening/Closing the Keyboard Cover You must use both hands to open or close the keyboard cover. Turning the Power On/Off Connecting the AC adaptor Opening the Keyboard Cover 1. Use both hands to lift the edge of the keyboard cover, and push it away from yourself. 1. Connect the AC adaptor to the DC In jack located on the bottom of the piano. Bottom panel NOTE If you have any objects (papers, metal objects, etc.) placed on top of the keyboard cover, do not open the cover.
Using the Headphones Basic Operations of Functions Use headphones if you want to perform without the sound being heard nearby. This piano has two headphone jacks, two people can also use headphones simultaneously. To operate the functions of this piano, you use the [ ] (select/confirm) knob and the [ ] (back) button. 1. Connect headphones to the headphone jacks located on the bottom panel.
Panel Descriptions Bottom panel Bottom panel 19 18 20 22 23 21 24 25 Operating area 1 1 2 4 3 5 26 Bottom panel 18 19 USB Computer port 22 Connect this to your computer for music production and editing. (p. 18) 23 DC In jack Connect headphones here to play the piano without producing sound from the internal speakers. (p. 11) Connect the included AC adaptor here. (p.
Operating area 1 1 [L] (Power) button Volume indicator 4 Turns the power on/off. (p. 10) 2 3 Lit according to the specified volume. (p. 10) [ ] (Volume+) button [ ] (Volume-) button [ ] (settings) button 5 Lets you make various settings. (p. 31) Adjust the overall volume of the piano when playing the keyboard or when playing back songs. (p. 10) [ ] (Bluetooth) Long-press this to connect with your mobile device. (p.
Before You Play Opening/Closing the Keyboard Cover You must use both hands to open or close the keyboard cover. Opening the Keyboard Cover 1. Use both hands to lift the edge of the keyboard cover, and push it away from yourself. Turning the Power On/Off Connecting the AC adaptor 1. Connect the AC adaptor to the DC In jack located on the bottom of the piano. Bottom panel 2. Push the keyboard cover away from yourself until it stops. Closing the Keyboard Cover 1.
Using the Headphones Basic Operations of Functions Use headphones if you want to perform without the sound being heard nearby. This piano has two headphone jacks, two people can also use headphones simultaneously. To operate the functions of this piano, you use the [ ] (select/confirm) knob and the [ ] (back) button. 1. Connect headphones to the headphone jacks located on the bottom panel.
Playing Selecting a Tone This piano lets you enjoy performing piano tones and a variety of tones other than piano. The tones are organized into two groups, “piano” and “other”; press a tone button to select the corresponding group. Selecting piano tones Press the [ ] (Piano) button to select various types of piano tone. 1. Press the [ ] button. Selecting a category 1. Press the [ ] knob to move the “-” “+” symbols to the upper line of the screen. Tone name “-” “+” symbols A piano tone is selected.
Listening to Songs Playing Back a Song Here’s how you can listen to the built-in songs. You can listen to these internal songs as models for your own playing, or practice one hand at a time along with them. The internal songs are organized into several categories. 1. Press the [ Category list Category Explanation Listening Piano songs recommended for listening Ensemble Famous songs, mainly classical pieces. These include piano concertos, duets, and jazz arrangements of classical pieces.
Practicing/Recording Practicing with the Metronome Here’s how to perform along with the metronome. You can also change the metronome’s tempo and time signature. 1. Press the [ ] button. The button blinks, and you hear the metronome. 2. Practice along with the metronome. 3. To stop the metronome, press the [ ] button once again. The button goes dark. Changing the time signature 1. Press the [ ] button and [ ] button simultaneously. The Metronome setting screen appears. 2.
Connecting a Mobile Device via Bluetooth Here’s What You Can Do By using the Bluetooth function, you can wirelessly connect the piano with a mobile device such as your smartphone or tablet, allowing you to do the following things. Music played back by the mobile device can be heard through the piano’s speakers. You can play back music data that’s saved on your iPhone or other mobile device, and wirelessly listen to it through the piano’s speakers. Speakers You can use apps to expand your piano enjoyment.
Connecting a Mobile Device via Bluetooth Listening to Music Through the Piano’s Speakers Using the Piano with an App Here’s how to make settings so that music data saved on your mobile device can be wirelessly played back through the piano’s speakers. Here’s how to make settings so that you can use the piano with an app that’s installed on your mobile device. Making Initial Settings (Pairing) As an example, we explain how to make settings for an iPad.
Reference How to read the Reference section This section explains more advanced ways to use the piano and how to deal with problems. For basic use, refer to “Quick Operation.” Lists of the tones and the internal songs are provided at the end of this section. This content is common to both the RP701 model and the F701 model.
°° Connecting the Equipment Bottom Panel * To prevent malfunction and equipment failure, always turn down the volume, and turn off all the units before making any connections. DC In jack USB Computer port Pedal jack Connect the included AC adaptor here. Connect a computer here. Use a USB cable (commercially available) to make this connection. This lets the piano exchange performance data with sequencer software (commercially available) on your computer, allowing you to produce and edit music.
°° Playing Playing Different Tones with the Left and Right Hand Playing Two Tones Layered on Each Key You can perform using different tones in the left and right regions of the keyboard, divided at a specific note. This setting is called “Split Play,” and the point at which the keyboard is divided is called the “split point.” 1. Press the [ ] button. 1. Press the [ ] button. The [ ] button is lit, and the piano is in function mode. 2. Turn the [ ] knob to access the “Keyboard Mode” screen. 3.
Playing Adjusting the Sound’s Ambience and Brightness Practicing with the Metronome You can add reverberant ambience to the sound as though you were performing in a concert hall. You can also adjust the tonal brightness of your keyboard performance or the song playback. You can practice while hearing a metronome. 1. Press the [ ] button. The button is lit, and the piano is in function mode. 2. Turn the [ ] knob to select the screen of the item that you want to set. 3.
°° Listening to Songs Playing Back a Song Operating the Unit 1. Press the [x/y] button. Here’s how you can listen to the built-in songs. You can listen to these internal songs as models for your own playing, or practice one hand at a time along with them. && “Internal Song List” (p. 42) The measure screen appears. && “Song Categories” (p. 13) Selecting the measure to play back 1. Press the [ ] button. 3. Press the [s] button. The song plays from the specified measure. The Song screen appears.
°° Recording Your Performance Recording Your Keyboard Performance You can record your own keyboard performance, and then play back to check it. Getting Ready to Record 4. Turn the [ ] knob to select the media that contains the song you want to delete, and press the [ ] knob to confirm. 5. Turn the [ ] knob to select the song that you want to delete, and press the [ ] knob to confirm. A confirmation message appears. 1. Select the tone that you want to play. 2. You can sound the metronome if you like.
Recording Your Performance Copying a Recorded Song Advanced Recording Methods Songs that have been saved in internal memory can be copied to USB flash drive. Alternatively, songs stored on a USB flash drive can be copied to internal memory. Recording Your Performance One Hand at a Time 1. Press the [ ] button. By recording your left-hand performance to the Left part and your right-hand performance to the Right part, you can record each hand of your performance separately.
Recording Your Performance Overdubbing a Recorded Performance Recording Audio to USB Flash Drive After recording one hand of your performance, you can overdubrecord the performance of the other hand. If you audio-record your performance, you’ll be able to listen to it on your computer or audio player, use it to create a music CD, or publish it on the internet. You can also overdub-record onto a built-in song. Left (or right) part Right (or left) part Getting ready to record 1. Press the [ ] button.
°° Creating Your Own Piano Tone (Piano Designer) This piano lets you adjust various elements of the sound, so you can personalize the piano tone to your taste. This function is called “Piano Designer.” MEMO The process of creating your own piano tone can also be done using touch operations on the dedicated app. && “Using the Piano with an App” (p. 27) App “Piano Designer” Adjusting the Sound of the Overall Piano 1. Press the [ ] button. The button is lit, and the piano is in function mode. 2.
Creating Your Own Piano Tone (Piano Designer) Editing the Grand Piano Tone You can adjust various aspects of the grand piano’s tone, including the string and pedal resonances, and the sound of the hammers striking the strings. * These adjustments are possible only for the grand piano tone category of the [ ] button. 1. Press the [ ] button. The button is lit, and the piano is in function mode. 2. Turn the [ ] knob to access the “piano designer” screen. 6.
°° Connecting the Piano and a Mobile Device via Bluetooth By using the Bluetooth function, you can wirelessly connect the piano with a mobile device such as your smartphone or tablet, allowing you to do the following things. && Together with this section, you should also read the Quick Operation section’s “Connecting a Mobile Device via Bluetooth” (p. 15).
Connecting the Piano and a Mobile Device via Bluetooth 2. Start the app that you installed on your mobile device. 3 3. Tap the menu located in the lower right of the app screen, and then in the menu screen tap “Bluetooth.” I f already paired, cancel pairing, and turn off the Bluetooth function. Clearing the pairing 1. In the mobile device’s screen, tap the “i” located beside “Connected,” and tap “Forget This Device.” The screen of your mobile device shows “RP701 MIDI” or “F701 MIDI.” 4.
°° Convenient Functions Loading/Saving Piano Setups You can save your own piano settings in a USB flash drive, or load them into the other digital piano. * Settings can be loaded only into another piano of the same model. NOTE Never turn off the power or remove the USB flash drive while the screen indicates “Executing...” 6. Press the [ ] button to exit function mode. The button goes dark. Loading Piano Settings (Piano Setup Import) Settings that are saved Setting Page Speaker volume p. 6, p.
Convenient Functions Initializing the Memory (Format Media) Here’s how to erase all of the files that you saved in internal memory or on a USB flash drive (commercially available). NOTE 55 When you initialize, all registrations or files that you saved in internal memory or on a USB flash drive are lost. 55 If you want settings other than the memory settings to be returned to their factory-set state, execute a Factory Reset (p. 30). 1.
°° Making Various Settings (Function Mode) Basic Settings in Function Mode 1. Press the [ ] button. The button is lit, and the piano is in function mode. 2. Turn the [ ] knob to access the screen of the item you want to set. 3. Press the [ ] knob to confirm. * Depending on the item you select, there might be another screen for selecting additional items. 4. Turn the [ ] knob to change the value. 5. Press the [ ] button to exit function mode. The button goes dark.
Convenient Functions Indication Value Whole Explanation This is the same keyboard setting as a conventional acoustic piano. Playing Different Tones with the Left and Right Hand (p. 19) Split Keyboard Mode Right Tone Selects the right-hand tone. Left Tone Selects the left-hand tone. Point Selects the location (key) at which the left and right tones are divided. Balance Selects the volume balance between the left-hand tone and right-hand tone.
Convenient Functions Indication Input/ Bluetooth Vol. Value Explanation Adjusting the Volume of an Audio Playback Device (Input/Bluetooth Vol.) This setting adjusts the volume of your keyboard performance while a song plays back. You can adjust the volume of an audio playback device that’s connected to the Input jacks. 0–10 USB Audio Input Vol.
Convenient Functions Indication Value Explanation Changing the Effect of the Pedal (Left Pedal) Left Pedal When you turn on the power, the left pedal functions as a soft pedal (p. 7, p. 11). You can change the function of the pedal to a variety of other operations. By assigning a function to the pedal, you can instantly change a setting by pressing the pedal while you perform. Sostenuto The pedal functions as a sostenuto pedal. Play/Stop The pedal has the same function as the [s] button.
Convenient Functions Indication Value Explanation Making the Power Automatically Turn off After a Time (Auto Off) Auto Off With the factory settings, the unit’s power will automatically be switched off 30 minutes after you stop playing or operating the unit. If you don’t want the power to turn off automatically, change the “Auto Off” setting to “Off” as follows.
°° Troubleshooting Problem Items to check Cause/Action Page Problems with the piano’s sound No sound Is the volume turned down? Raise the volume. Could headphones or an adaptor plug be inserted in the Phones jack? If headphones or an adaptor plug are inserted in the headphones jack, sound is not output from the speakers. Reverberation remains even if you defeat the Ambience effect p. 7, p.
Troubleshooting Problem Items to check Cause/Action Page Could the adjuster located under the pedal not be in contact with the floor? (RP701) The adjuster may have loosened as you used the pedal. Lower the adjuster so that it contacts the floor. If you are using the piano on carpet, lower the adjuster so that it presses strongly against the floor. p. 7 Is the pedal connected correctly? Check the pedal jack located on the bottom of the piano. p.
°° Error Messages Indication Meaning An error occurred during writing. The USB flash drive may be corrupted. Error 2 Insert other USB flash drive and try again. Alternatively, you can initialize the USB flash drive (p. 30). The internal memory might be damaged. Format the internal memory (p. 30). Error 3 Error 10 Error 11 The same file already exists. No USB flash drive is inserted. Insert the USB flash drive and try again. The internal memory might be damaged. Format the internal memory (p. 30).
Main Specifications RP701 F701 Sound generator Piano Sound: SuperNATURAL Piano Keyboard PHA-4 Standard Keyboard: with Escapement and Ivory Feel (88 keys) Bluetooth Power Supply Audio: Bluetooth Ver. 3.0 (Supports SCMS-T content protection) MIDI: Bluetooth Ver. 4.
°° Tone List Piano Other No. Tone Name No. No. No. 50 Honky-tonk 106 Clean Guitar 51 Honky-tonk w 107 Chorus Gt 1 52 E.Piano 1 108 Mid Tone Gt 53 Detuned EP 1 109 Muted Guitar 54 Vintage EP 110 Funk Guitar1 55 60’s E.Piano 111 Funk Guitar2 56 E.Piano 2 112 Chorus Gt 2 57 Detuned EP 2 113 Overdrive Gt 58 St.FM EP 114 Guitar Pinch 59 EP Legend 115 DistortionGt 60 EP Phaser 116 Gt Feedback1 61 Harpsi. 117 Dist.Rhy Gt 62 Coupled Hps. 118 Gt Harmonics 63 Harpsi.
Tone List No. Tone Name No. Tone Name No.
°° Internal Song List No. Song Name Composer Listening No. Song Name Composer Entertainment Valse, op.34-1 Fryderyk Franciszek Chopin 1 Polovtsian Dances Alexander Borodin Ombra mai fù George Frideric Handel 2 Polonaise op.53 Fryderyk Franciszek Chopin 2 3 Lascia ch’io pianga George Frideric Handel Twinkle Twinkle Little Star French Folk Song Nocturne No.
Internal Song List No. Song Name Composer 1–15 Training No.
°° USING THE UNIT SAFELY About WARNING and CAUTION Notices About the Symbols The symbol alerts the user to important instructions or warnings.The specific meaning of the symbol is determined by the design contained within the triangle. In the case of the symbol at left, it is used for general cautions, warnings, or alerts to danger. Used for instructions intended to alert the user to the risk of death or severe injury should the unit be used improperly.
°° IMPORTANT NOTES Power Supply Additional Precautions • Place the AC adaptor so the side with the indicator faces upwards. The indicator will light when you plug the AC adaptor into an AC outlet. • Any data stored within the unit can be lost as the result of equipment failure, incorrect operation, etc. To protect yourself against the irretrievable loss of data, try to make a habit of creating regular backups of the data you’ve stored in the unit.
°° Index Volume Limit . . . . . . . . . . . . . . . . . . . . . . . . . . 34 A O Ambience . . . . . . . . . . . . . . . . . . . . . . . . . . . . . 20 [ Auto Memory Backup. . . . . . . . . . . . . . . . . . 35 overdub-record. . . . . . . . . . . . . . . . . . . . . . . . 24 ](other) button. . . . . . . . . . . . . . . . 5, 9, 12 Auto Off. . . . . . . . . . . . . . . . . . . . . . . . . 6, 10, 35 P B Pairing. . . . . . . . . . . . . . . . . . . . . . . . . . . . . 15, 27 [ ] (back) button. . .