
User Manual


Editing a Sample
82
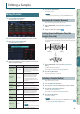
Zooming the Sample Display (Zoom)
You can change the magnication at which the sample is displayed.
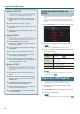
1. In the SAMPLE EDIT screen (p. 81), press the [5] (Zoom)
button.
2. Use the cursor buttons to change the display zoom.
Auditioning the Edited Result (Preview)
Here’s how to audition the result of your sample editing.
1. In the SAMPLE EDIT screen (p. 81), press the [6] (Preview)
button.
The sample plays.
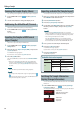
Exporting the Sample in WAV Format
(Export Sample)
Here’s how to export the sample in WAV format.
1. In the SAMPLE EDIT screen (p. 81), press the [4] (Sample
Utility) button.
2. Move the cursor to “Export Sample (WAV),” and press the
[7] (Select) button.
A conrmation message appears.
If you decide to cancel, press the [7] (Cancel) button.
3. Press the [6] (OK) button.
The exported WAV le is saved in the SD card’s “EXPORT SAMPLE”
folder.
* If there is an identically-named le in the export-destination,
a message asks “Overwrite?” Press the [6] (OK) button if you
want to overwrite, or press the [7] (Cancel) button if you decide
to cancel.
NOTE
Never turn o the power while data is being exported.
MEMO
• You can export all samples of the song in a single operation (p.
76).
• If you execute Truncate before you export, the WAV between the
start point and end point is exported.
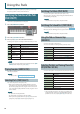
Importing an Audio File (Sample Import)
You can import an audio le and play it as one of the FA’s samples.
1. Before you continue, place the audio le to be imported in
the “IMPORT” folder of the SD card.
2. Press the [PAD UTILITY] button.
3. Press the [5] (Sample Import) button.
4. Use the dial or the [DEC] [INC] buttons to select the audio
le that you want to import, and press the [7] (Select)
button.
MEMO
• By pressing the [4] (Auto Import) button you can import
samples to multiple vacant pads in a single operation. Proceed
to step 6. If there are no vacant pads, importing is not possible.
• You can change the import-source folder.
Press the [2] (Folder) button to access the Change Folder
window. When you select the import-source folder, the les in
the selected folder are shown in the SAMPLE IMPORT screen.
5. Press a pad to select the import-destination pad.
6. Press the [7] (Execute) button.
A conrmation message appears.
If you decide to cancel, press the [7] (Cancel) button.
7. Press the [6] (OK) button.
The WAV le is imported.
Audio les that can be imported
WAV/AIFF
Sampling frequency 44.1/48/96 kHz
Bit rate 8/16/24 bit
MP3
Format MPEG-1 audio layer 3
Sampling frequency 44.1 kHz
Bit rate
64/80/96/112/128/160/192/
224/256/320 kbps,
VBR (Variable Bit Rate)
Switching the Sample Information
Display (Change Information)
You can switch the sample information that is shown in the SAMPLE
PAD screen.
1. In the SAMPLE PAD screen (p. 81), press the [3] (Change
Information) button.
The displayed information changes each time you press the button.
• Sample name
• GATE and LOOP on/o status
• EFFECT SW on/o status
• Sample name
• Stereo/mono
• Sample size