
User Manual


97
Performance
Functions
Editing
Sequencer
(Creating Songs)
Sampler Pads DAW
Appendix
Overview Performing Settings
Settings
These settings apply to the FA as a whole
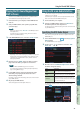
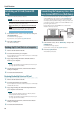
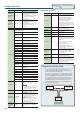
Basic Procedure for System Settings
1. Press the [MENU] button.
The MENU screen appears.
2. Move the cursor to “System” and press the [ENTER]
button.
The SYSTEM SETUP screen appears.
3. Use the cursor buttons to select a parameter, and use the
dial to change the value.
MEMO
You can make system eect settings by pressing the [3] (System
Eects) button.
For details on the system eect parameters, refer to “Parameter
Guide” (PDF).
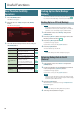
Saving the System Settings
System settings will return to their previous state when you turn
o the unit. If you want these settings to be retained even after the
unit is turned o, you must save the system settings.
1. In the SYSTEM SETUP screen, press the [6] (System Write)
button.
The settings will be saved.
NOTE
Never turn o the unit while data is being saved.
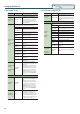
System Parameter
The operations of the system parameters are explained below,
organized according to the structure of the parameters.
General settings (General)
Parameter Value Explanation
Auto O
OFF,
30 [min] ,
240 [min]
Species whether the unit will turn o
automatically after a certain time has
elapsed.
If you don’t want the unit to turn o
automatically, choose “OFF” setting.
LCD Brightness 1–20
Adjusts the brightness of the display.
The brightness will increase as the
value is raised.
Parameter Value Explanation
Screen Saver
Time
OFF, 30 [sec] ,
1–60 [min]
The screen saver starts after a certain
time has elapsed.
If you don’t want the screen saver to
start, turn this “OFF.”
MEMO
You can view the displayed screen
by pressing the [5] (Scrn Saver)
button.
USB Driver
VENDOR
(MIDI+AUDIO)
The dedicated driver provided by
Roland specically for the FA is used.
MIDI and audio are both available.
GENERIC
(MIDI only)
The generic driver provided by the
operating system is used.
Only MIDI is available.
Startup
Startup Studio
Set
SONG, (Studio set
number)
Species the studio set that will be
loaded when the unit is turned on.
Choose “SONG” if you want to use the
studio set that is selected by the song.
Startup Song
LAST-SAVED,
(Song name)
Species the song that will be loaded
when the unit is turned on.
If you want the most recently saved
song to be loaded, choose “LAST-
SAVED.”
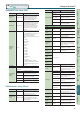
Keyboard settings (Keyboard)
Parameter Value Explanation
Keyboard
Velocity
Species the velocity transmitted when a key is played.
REAL
The transmitted velocity value will
correspond to the force with which
you strike the key.
1–127
The transmitted velocity value will
be xed, regardless of the force with
which you strike the key.
Keyboard
Velocity Curve
LIGHT
The keyboard will have a lighter-
feeling touch. Since you’ll be able
to reach fortissimo () without
having to play as strongly as with the
“MEDIUM” setting, the keyboard
will feel lighter. This setting makes it
easier for people with reduced nger
strength to play the keyboard.
MEDIUM
This is the standard keyboard touch
setting.
HEAVY
The key will have a heavier-feeling
touch. Since you’ll need to play more
strongly than with the “MEDIUM”
setting in order to reach fortissimo
(), the keyboard will feel heavier. This
setting allows you to use your playing
dynamics to add more expression to
your performances.
Keyboard
Velocity Curve
Oset
-10–+9
Adjusts the keyboard velocity curve.
Lower values make the keyboard feel
lighter.
Higher values make the keyboard feel
heavier.
Arpeggio
Arpeggio
Trigger
Quantize
Species how arpeggios will be triggered.
OFF
The arpeggio starts the moment you
play the keyboard.
BEAT
If you play the keyboard while the
sequencer or a rhythm pattern is
playing, the arpeggio automatically
starts at the beginning of the beat.
MEASURE
If you play the keyboard while the
sequencer or a rhythm pattern is
playing, the arpeggio automatically
starts at the beginning of the measure.
Settings for the Entire FA