
User's Manual

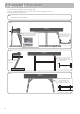


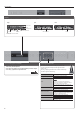


Table Of Contents
- Placing the FP-90 on a Stand
- Main Specifications
- Panel Descriptions
- Operation Guide
- Advanced Operation
- Recording Your Performance
- SMF Recording
- Recording Audio
- Renaming a Song (Rename Song)
- Copying a Saved Song (Copy Song)
- Deleting a Saved Song (Delete Song)
- Personalizing Your Piano Sound (Piano Designer)
- Using the Microphone
- Connecting a Microphone
- Applying an Effect to the Mic (Mic Effects)
- Saving Performance Settings (Registrations)
- What Is a Registration?
- Recalling a Registration
- Saving Current Settings into a Registration
- Saving a Registration Set (Registration Set Export)
- Loading a Saved Registration Set (Registration Set Import)
- Convenient Functions
- Reformatting Memory (Format Media)
- Restoring the Factory Settings (Factory Reset)
- Retaining Settings After Power-Off (Memory Backup)
- Various Settings (Function Mode)
- How to Use Function Mode
- Adjusting the Keyboard Response (Key Touch)
- Matching the Pitch with Other Instruments (Master Tuning)
- Changing the Tuning Method (Temperament)
- Specifying a Song’s Tonic (Temperament Key)
- Editing the Equalizer Settings
- Adjusting the Volume of an Audio Playback Device or Bluetooth Audio (Input/Bluetooth Volume)
- Specifying the Song (SMF) Playback Mode (SMF Play Mode)
- Selecting the Format for Recording (Recording Mode)
- Changing How the Pedal Effects Are Applied (Damper Pedal Part)
- Changing the Function of the Center Pedal (Center Pedal)
- Changing How the Pedal Effects Are Applied (Center Pedal Part)
- Changing the Function of the Left Pedal (Left Pedal)
- Changing How the Pedal Effects Are Applied (Left Pedal Part)
- Using a Pedal to Switch Registrations (Reg. Pedal Shift)
- Sending Tone-Change Information (Transmit MIDI Information)
- Preventing Doubled Notes When Connected to a Sequencer (Local Control)
- MIDI Transmit Channel Settings (MIDI Transmit Ch.)
- Adjusting the Brightness of the Display (Display Contrast)
- Adjusting the Brightness of the Buttons (Panel Brightness)
- Making the Power Automatically Turn Off After a Time (Auto Off)
- Using the Bluetooth® Functionality
- Here’s What You Can Do
- Using Bluetooth Audio
- Transferring MIDI Data
- Using the Pedal to Turn Pages on a Music Score App
- Troubleshooting
- Error Messages
- Tone List
- Saved Settings
- USING THE UNIT SAFELY
- IMPORTANT NOTES

4
°
Panel Descriptions
Damper Pedal
Use this pedal to sustain the sound. While this pedal is held down, notes will be sustained for an extended time even if you
release your ngers from the keyboard.
On an acoustic piano, when you step on the damper pedal, you’ll rst hear the sound of the dampers releasing the strings.
Then, you should also be able to hear the sound of strings adjacent to the ones for the notes actually played resonate
sympathetically, resulting in a rich, resounding tone.
Additionally, when using half-pedaling techniques, the core of the sound disappears rapidly while a rich, spacious
resonance remains, producing a unique form of reverberation. On the unit, the unique, lingering tones produced by the
half-pedaling technique are reproduced in addition to released-string sounds (Damper Noise) and resonating sounds
(Damper Resonance).
With the damper pedal on an acoustic piano, when you step on the pedal it will at rst oer only a slight amount of
resistance, but as you press down further it will start to feel much heavier. On KPD-90, this change in the feeling of resistance
is simulated.
Sostenuto Pedal
The notes you are pressing when this pedal is depressed will be sustained.
Soft Pedal
This pedal is used to make the sound softer. Playing with the soft pedal depressed produces a sound that is not as strong
as when otherwise played with the equivalent strength. This is the same function as the left pedal of a grand piano. The
softness of the tone can be varied subtly by the depth to which you press the pedal.
Pedals (KPD-90/RPU-3: sold separately)
* When operating the pedal, take care not to pinch your ngers between the moving part and the body of the unit. Pay special attention to this when using the unit where
children are present.
Attaching the Music Rest
1
1
2
2
3
3
1.
Loosen the attachment screws.
2. Fit the cut-outs of the music rest onto the attachment screws.
3. Firmly tighten the attachment screws.
RPU-3 (sold separately)
KPD-90 (sold separately)
[L] button
Turning the FP-90 On
* Once everything is properly connected, be sure to follow the
procedure below to turn on their power. If you turn on equipment
in the wrong order, you risk causing malfunction or equipment
failure.
1. Move the [Volume] slider all the way down to minimize the
volume.
Minimize the volume.
2. Hold down the [L] button until the display shows “Roland Digital
Piano.”
The power turns on, and the tone buttons and other buttons
illuminate.
3. Move the [Volume] slider to adjust the volume.
Turning O the Power
1. Move the [Volume] slider all the way down to minimize the
volume.
2. Hold down the [L] button until the display shows “Don’t
disconnect the power.”
The unit is turned o.
Concerning the Auto O function
The power to this unit will be turned o automatically after a predetermined
amount of time has passed since it was last used for playing music, or its buttons
or controls were operated (Auto O function). If you do not want the power to be
turned o automatically, disengage the Auto O function (p. 20).
5 Any settings that you are in the process of editing will be lost when the
power is turned o. If you have any settings that you want to keep, you
should save them beforehand.
5 To restore power, turn the power on again.
Front Panel
This is where you operate the unit.
page
6
Headphone Jacks
Connect headphones (separately sold) here.