
User's Manual

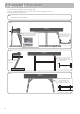


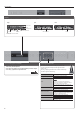


Table Of Contents
- Placing the FP-90 on a Stand
- Main Specifications
- Panel Descriptions
- Operation Guide
- Advanced Operation
- Recording Your Performance
- SMF Recording
- Recording Audio
- Renaming a Song (Rename Song)
- Copying a Saved Song (Copy Song)
- Deleting a Saved Song (Delete Song)
- Personalizing Your Piano Sound (Piano Designer)
- Using the Microphone
- Connecting a Microphone
- Applying an Effect to the Mic (Mic Effects)
- Saving Performance Settings (Registrations)
- What Is a Registration?
- Recalling a Registration
- Saving Current Settings into a Registration
- Saving a Registration Set (Registration Set Export)
- Loading a Saved Registration Set (Registration Set Import)
- Convenient Functions
- Reformatting Memory (Format Media)
- Restoring the Factory Settings (Factory Reset)
- Retaining Settings After Power-Off (Memory Backup)
- Various Settings (Function Mode)
- How to Use Function Mode
- Adjusting the Keyboard Response (Key Touch)
- Matching the Pitch with Other Instruments (Master Tuning)
- Changing the Tuning Method (Temperament)
- Specifying a Song’s Tonic (Temperament Key)
- Editing the Equalizer Settings
- Adjusting the Volume of an Audio Playback Device or Bluetooth Audio (Input/Bluetooth Volume)
- Specifying the Song (SMF) Playback Mode (SMF Play Mode)
- Selecting the Format for Recording (Recording Mode)
- Changing How the Pedal Effects Are Applied (Damper Pedal Part)
- Changing the Function of the Center Pedal (Center Pedal)
- Changing How the Pedal Effects Are Applied (Center Pedal Part)
- Changing the Function of the Left Pedal (Left Pedal)
- Changing How the Pedal Effects Are Applied (Left Pedal Part)
- Using a Pedal to Switch Registrations (Reg. Pedal Shift)
- Sending Tone-Change Information (Transmit MIDI Information)
- Preventing Doubled Notes When Connected to a Sequencer (Local Control)
- MIDI Transmit Channel Settings (MIDI Transmit Ch.)
- Adjusting the Brightness of the Display (Display Contrast)
- Adjusting the Brightness of the Buttons (Panel Brightness)
- Making the Power Automatically Turn Off After a Time (Auto Off)
- Using the Bluetooth® Functionality
- Here’s What You Can Do
- Using Bluetooth Audio
- Transferring MIDI Data
- Using the Pedal to Turn Pages on a Music Score App
- Troubleshooting
- Error Messages
- Tone List
- Saved Settings
- USING THE UNIT SAFELY
- IMPORTANT NOTES

6
°
Operation Guide
Basic operations
Select a setting item
Press the [K] [J] buttons.
Edit a value Press the [-] [+] buttons.
Restore the default value Press the [–] [+] buttons simultaneously.
Cancel an operation Press the [Exit] button.
In addition to piano sounds, the unit lets you enjoy performing with many other sounds.
These sounds are called “Tones.” The Tones are divided into six groups, each of which is
assigned to a dierent Tone button.
To select a tone
1. Press a tone button (e.g., [Piano]) and then use the [–] [+] buttons.
Viewing the display
Tempo
Time signature
Measure
Tone name
Keyboard transposition
Song
transposition
Tone groups
[Piano] button
Allows you to select various historical instruments,
including grand pianos, or harpsichords.
[E. Piano] button
Allows you to select various electric piano sounds
used in pop or rock, as well as the sound of
instruments played using mallets.
[Strings] button
Allows you to select the sounds of string
instruments such as violins, as well as other
instruments used in orchestras, which are
appropriate when used for Dual Play with a piano
sound.
[Organ] button
Allows you to select organ tones.
If you’ve selected a tone to which the rotary eect is
applied, pressing the [Organ] button will switch the
speed of the rotary eect.
[Pad] button Allows you to select synth pad tones.
[Other] button Allows you to select vocal, brass, and GM2 tones.
MEMO
When playing a tone that uses tremolo or has a vibrating quality,
you can adjust the speed of the modulation by holding down
the current TONE button and pressing the Tempo [Slow] [Fast]
buttons.
Auditioning the tones (Tone Demo)
1. Hold down the [Split/Dual] button and press the [Transpose]
button.
2. Press one of the TONE buttons.
The tone used for the demo song depends on which
TONE button you press.
Selecting a Tone (Single)
Single Split
Dual
Transposing Your Performance (Transpose)
The keyboard or song can be transposed in
semitone steps.
For example if a song is in the key of E major
but you want to play it using the ngering
of the C major scale, you would set the
keyboard transpose setting to “4.”
Kbd Transpose
-6–0–+5 (default value: 0)
MEMO
You can also change the keyboard transpose setting by
holding down the [Transpose] button and pressing the note
that will be the tonic (root note) of the transposed key.
Song Transpose -12–0–+12 (default value: 0)
If you play C E G0It will sound E G
B
Adjusting the Overall Volume (Volume)
You can adjust the speaker volume when using the internal
speakers, or the headphone volume when headphones are
connected.
Adjusting the Tone Color (Equalizer)
Use these sliders to boost or cut the sound in the Low, Mid,
and High frequency ranges.
page
19
Adjusting the Ambience (Ambience)
1. Press the [Ambience] button.
2. Press the [-] [+] buttons.
This lets you adjust the acoustical character (ambience) of the
sound.
MEMO
If you press the [J] button, a screen appears in which you can
adjust the acoustical character of the sound that’s heard through
headphones (Headphones 3D Ambience).
Changing the Keyboard Volume Balance (Part Volume)
When using Split Play or Dual Play, you can adjust the keyboard’s volume balance.
[Lower] slider [Upper] slider
When using Normal
(Single) Play
Not used
Adjusts the volume of the
keyboard.
When using Split Play
Adjusts the volume of
the region below the split
point.
Adjusts the volume of
the region above the split
point.
When using Dual Play
Adjusts the volume of
tone 2.
Adjusts the volume of
tone 1.