
User's Manual
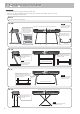


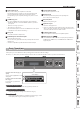
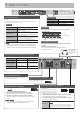

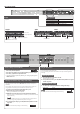
Table Of Contents
- Contents
- Placing This Unit on a Stand
- Main Specifications
- Panel Descriptions
- Operation Guide
- Connecting the Piano and a Mobile Device via Bluetooth
- Advanced Operation
- Playing Various Tones
- Selecting Your Preferred Performance Environment (My Stage)
- Practicing with the Metronome
- Dividing the Keyboard for Two People (Twin Piano)
- Recording Your Performance
- SMF Recording
- Recording Audio
- Convenient Functions for Song Playback
- Renaming a Song (Rename Song)
- Copying a Saved Song (Copy Song)
- Deleting a Saved Song (Delete Song)
- Personalizing Your Piano Sound (Piano Designer)
- Using the Microphone
- Connecting a Microphone
- Applying an Effect to the Mic (Mic Effects)
- Saving Performance Settings (Registrations)
- What Is a Registration?
- Recalling a Registration
- Saving Current Settings into a Registration
- Convenient Functions
- Initializing the Memory (Format Media)
- Returning to the Factory Settings (Factory Reset)
- Retaining Settings After Power-Off (Memory Backup)
- Using USB
- Various Settings (Function Mode)
- Adjusting the Keyboard Response (Key Touch)
- Matching the Pitch with Other Instruments (Master Tuning)
- Changing the Tuning Method (Temperament)
- Specifying a Song’s Tonic (Temperament Key)
- Editing the Equalizer Settings
- Transposing the Pitch of the Song Playback (Song Transpose)
- Adjusting the Song Volume (Song Volume)
- Adjusting the Volume of an Audio Playback Device (Input/Bluetooth Vol.)
- Adjusting the Volume from the Computer (USB Audio Input Volume)
- Setting the Song (SMF) Playback Mode (SMF Play Mode)
- Selecting the Format for Recording (Recording Mode)
- Changing How the Pedal Effects Are Applied (Damper Pedal Part)
- Changing the Function of the Center Pedal (Center Pedal)
- Changing How the Pedal Effects Are Applied (Center Pedal Part)
- Sending Tone-Change Information (Transmit MIDI Information)
- Preventing Doubled Notes When Connected to a Sequencer (Local Control)
- MIDI Transmit Channel Settings (MIDI Transmit Ch.)
- Adjusting the Brightness of the Display (Display Contrast)
- Adjusting the Brightness of the Buttons (Panel Brightness)
- Outputting Sound Both from Headphones and Internal Speakers (Speaker Auto Mute)
- Making the Power Automatically Turn Off After a Time (Auto Off)
- Troubleshooting
- Error Messages
- Saved Settings
- Tone List
- Internal Song List
- USING THE UNIT SAFELY
- IMPORTANT NOTES

9
Operation Guide
Reading the note name (e.g., C4)
The alphabetical indication for settings such as Split Point shows the
name of the note. In solfege, A = la, B = ti, C = do … G = so.
For example, the indication “C4” means “the fourth ‘C’ from the left edge
of the keyboard.”
C4 C5 C6 C7 C8C3C2C1
Playing Dierent Tones with the Right and Left Hands (Split)
You can play dierent tones in the areas at the left and right of a specied key. For
example, you can use your left hand to play a bass tone and use your right hand to
play a piano tone.
This feature is called “Split Play,” and the point at which the keyboard is divided is
called the “split point.”
Turning Split Play on
Press the [Split/Dual] button several times to access
the Split screen.
The following settings can be operated when the Split screen is shown.
Changing the right-hand
tone and left-hand tone
(Right Tone/Left Tone)
1. Use the [K] [J] buttons to select “right-hand
tone” or “left-hand tone.”
2. Press a tone button.
3. Use the [–] [+] buttons.
Changing the sprit point
(Split Point)
1. Use the [K] [J] buttons to select “Split Point.”
2. Use the [–][+] buttons to specify the value.
MEMO
You can also specify the split point by holding
down the [Split/Dual] button and pressing the key
where you want to split the keyboard.
B1–B6 (default value: F#3)
Changing the octave of
the right-hand tone and
left-hand tone
(Right Shift/Left Shift)
1. Use the [K] [J] buttons to select “Right Shift” or
“Left Shift.”
2. Use the [–][+] buttons to specify the value.
-3–0–+3 (default value: 0)
Left-hand tone Right-hand tone
F#3
* Depending on the combination of tones, the eect might not apply to the left-
hand tone, causing the sound to appear dierently than usual.
* If you select a sound from the [Piano] button as the left-hand tone, it might sound
dierent than usual.
Layering two tones (Dual)
You can play two tones simultaneously from a single key. This function is called
“Dual Play.”
Turning Dual Play on
Press the [Split/Dual] button several times to access
the Dual screen.
MEMO
You can also use Dual Play by pressing two tone
buttons simultaneously.
The following settings can be operated when the Dual screen is shown.
Changing tone 1 and
tone 2
(Tone 1/Tone 2)
1. Use the [K] [J] buttons to select “tone 1” or
“tone 2.”
2. Press a tone button.
3. Use the [–] [+] buttons.
Changing the octave of
tone 1 or tone 2
(Tone 1 Shift/Tone 2 Shift)
1. Use the [K] [J] buttons to select “Tone 1 Shift” or
“Tone 2 Shift.”
2. Use the [–][+] buttons to specify the value.
-3–0–+3 (default value: 0)
* Depending on the combination of tones, the eect might not apply to tone 2,
causing the sound to appear dierently than usual.
* If you select a sound from the [Piano] button as tone 2, it might sound dierent
than usual.
Recalling Performance Settings (Registration)
You can use the registration feature to save the current
performance settings into a “registration” that you can recall
whenever you wish.
By switching the registration, you can instantly recall saved settings.
page
23
Recalling a registration
1.
Press the [Registration] button.
2. Press one of the number buttons, from [1] to [5], to select the
registration.
3. Press the [–] [+] buttons to select the registration variation.
Saving current settings into a registration
1.
Set the desired performance settings.
2. While holding down the [Registration] button, press a button from
[1] to [5] to select a registration and then press the [–] [+] buttons to
select a registration variation.
3. Use the [–] [+] buttons and the [K] [J] buttons to give a name to the
registration.
4. Press the [Function] button to save.
MEMO
For details on the settings that can be stored, refer to “Saved Settings” (page 30).
Selecting a Favorite Performance Environment (My Stage)
By selecting My Stage, you can enjoy your favorite piano and performance
environment in your own home. This function reproduces the sound and resonance
that you would experience when playing an ideally-matched grand piano in various
environments such as a concert hall, church, or rehearsal studio.
page
16
Selecting a My Stage
1.
Press the [My Stage] button.
2. Use the [–][+] buttons to select the desired performance
environment.
MEMO
You can save your favorite My Stage settings in a registration (p. 23).