GK-3B_e.book 1 ページ 2004年7月23日 金曜日 午後2時53分 Owner’s Manual Thank you for purchasing the Roland GK-3B divided pickup. Before using this unit, carefully read the sections entitled: • USING THE UNIT SAFELY (page 2–3) • IMPORTANT NOTES (page 3) These sections provide important information concerning the proper operation of the unit. Additionally, in order to feel assured that you have gained a good grasp of every feature provided by your new unit, Owner’s manual should be read in its entirety.
GK-3B_e.book 2 ページ 2004年7月23日 金曜日 午後2時53分 USING THE UNIT SAFELY The symbol alerts the user to important instructions or warnings.The specific meaning of the symbol is determined by the design contained within the triangle. In the case of the symbol at left, it is used for general cautions, warnings, or alerts to danger. Used for instructions intended to alert the user to the risk of death or severe injury should the unit be used improperly.
GK-3B_e.book 3 ページ 2004年7月23日 金曜日 午後2時53分 355b 104 • Try to prevent cords and cables from becoming entangled. Also, all cords and cables should be placed so they are out of the reach of children. ......................................................................................................... 106 • Never climb on top of, nor place heavy objects on the unit. .........................................................................................................
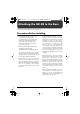
GK-3B_e.book 4 ページ 2004年7月23日 Contents USING THE UNIT SAFELY..........2 IMPORTANT NOTES ...................3 Panel Descriptions ........... 5 Attaching the GK-3B to the Bass ...................... 6 Precautions Before Installing ....6 Adjusting the Divided Pickup ....8 Attaching the Divided Pickup ....9 Attaching the Pickup with DoubleSided Tape ..........................................9 Attaching the Pickup with Screws..12 Attaching the Controller...........13 Adjusting the Length of the Pickup Cable .
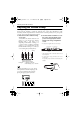
GK-3B_e.book 5 ページ 2004年7月23日 金曜日 午後2時53分 Panel Descriptions fig.0010 Pickup Cable 6. DOWN/S1 Switch 7. UP/S2 Switch 8. Power Indicator Center Marker 2. GK Volume 5. Select Switch 3. GK Connector 4. Normal Pickup Input Jack 1. Divided Pickup Controller Pickup 1. Divided Pickup 5. Select Switch This is a pickup that senses the vibration of the bass strings. Attach it by the bridge of your bass. This switches between the output from the connected GK device and the normal bass output. 2.
GK-3B_e.book 6 ページ 2004年7月23日 金曜日 午後2時53分 Attaching the GK-3B to the Bass The GK-3B can be attached to and used with conventional electric basses. Please read the following precautions before installing the GK-3B. Precautions Before Installing • Do not use the GK-3B on basses with doubled strings or other highly customized basses, piccolo basses and other basses with unusual tunings, or basses with other non-metallic core strings. The pickup may not function properly in such cases.
GK-3B_e.book 7 ページ 2004年7月23日 金曜日 午後2時53分 Attaching the GK-3B to the Bass Confirm that the package contains all of the following parts for installing the GK-3B. fig.
GK-3B_e.book 8 ページ 2004年7月23日 金曜日 午後2時53分 Attaching the GK-3B to the Bass Adjusting the Divided Pickup As string spacings vary with the model of the bass, the spacing between each of the coils in the pickup must be adjusted to match the particular bass. Unless this adjustment is made accurately, the GK-compatible device will not function at its full potential, or may not operate correctly. Please make this adjustment with care. 1. Measure the distance between strings on your bass.
GK-3B_e.book 9 ページ 2004年7月23日 金曜日 午後2時53分 Attaching the GK-3B to the Bass Attaching the Divided Pickup There are two ways to attach the divided pickup. ● Attaching the Pickup with DoubleSided Tape (p. 9) This provides the simplest way to attach the pickup to flat-top basses. * * ● Attaching the Pickup with Screws (p. 12) This method features the benefit of allowing the pickups to be finely adjusted later on, but it is somewhat difficult to carry out.
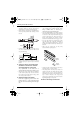
GK-3B_e.book 10 ページ 2004年7月23日 金曜日 午後2時53分 Attaching the GK-3B to the Bass * The divided pickup must be installed in the correct orientation. Make sure that the cable from the divided pickup is extending from the bridge side. * When mounting the pickup on a left-handed bass, orient the pickup with the cable extending towards the neck. There are three types of pickup spacers, “A” (3 mm), “B” (1 mm) and “C” (0.25 mm); combine these as necessary to achieve the proper pickup height.
GK-3B_e.book 11 ページ 2004年7月23日 金曜日 午後2時53分 Attaching the GK-3B to the Bass 5. Remove the backing from the tapes for the pickup cushion, the pickup spacers, and the pickup, and carefully attach the pickup to the bass. * After affixing these items, press them so that the items adhere firmly. * Wipe off any dust that may be on the location to which you're affixing the double-sided tape. If the location is dusty or dirty, the double-sided tape may not adhere sufficiently. 6.
GK-3B_e.book 12 ページ 2004年7月23日 金曜日 午後2時53分 Attaching the GK-3B to the Bass * Afterwards, you will need to adjust the pickup sensitivity when connecting to GK devices. However, you may find that the sensitivity level on the GK device is too high. In such instances, you may be able to correct the problem by widening the clearance between the strings and the pickup. Carry out Steps 1 through 8 again to lower the Pickup height slightly.
GK-3B_e.book 13 ページ 2004年7月23日 金曜日 午後2時53分 Attaching the GK-3B to the Bass 5. Restring and tune the bass. * Afterwards, when connecting to GK devices, you will need to adjust the pickup sensitivity again. However, you may find that the sensitivity level on the GK device is too high. In such instances, you may be able to correct the problem by widening the clearance between the strings and the pickup, so try lowering the Pickup height slightly to see if this approach is effective.
GK-3B_e.book 14 ページ 2004年7月23日 金曜日 午後2時53分 Attaching the GK-3B to the Bass ■ Attaching the Controller with the Holder Refer to the following figures showing examples of ways to mount the controller, then select the most suitable method for the bass at hand. Installation Examples Example 1) Mounting on the Front of the Bass This method is recommended for basses with sufficient space on the bass’s top to mount the controller (p. 15). fig.
GK-3B_e.book 15 ページ 2004年7月23日 金曜日 午後2時53分 Attaching the GK-3B to the Bass Mounting on the Front of the Bass 1. Remove three screws from the underside of the controller, then attach the GK-3B to holder “A.” 3. Tighten holders “A” and “B” using the screw (5 x 20 mm). fig.1220e (Spacer LP) fig.1200e (Attaching to the Holder) Holder A Holder A Holder B Screw 5 x 20 mm GK-3B * Holder A has six screw holes. Refer to the figure to ensure the holder is attached correctly. 2.
GK-3B_e.book 16 ページ 2004年7月23日 金曜日 午後2時53分 Attaching the GK-3B to the Bass Mounting Over the Bridge 1. Attach holders “A” and “B” so that the bass body is sandwiched between the two holders. * Holder A attaches to the back surface of the bass. * Make sure that Holder A is firmly pressed against the side surface of the bass body. 3. Secure Holder “C,” with the controller attached to it, to Holder “B” using the flat washers, spring washers and screw (5 mm x 8 mm). fig.1250e (Spacer LP) fig.
GK-3B_e.book 17 ページ 2004年7月23日 金曜日 午後2時53分 Attaching the GK-3B to the Bass Mounting on the Back of the Bass 1. Remove three screws from the underside of the controller, then attach the GK-3B to holder “A.” 3. Tighten holders “A” and “B” using the screw (5 x 20 mm). fig.1280e (Spacer LP) fig.1260e (Attaching to the Holder) Holder A Screw 5 x 20 mm Holder B Holder A GK-3B * Holder A has six screw holes. Refer to the figure to ensure the holder is attached correctly. 2.
GK-3B_e.book 18 ページ 2004年7月23日 金曜日 午後2時53分 Attaching the GK-3B to the Bass ■ Attaching with Double–sided Tape and a Screw 1. Place the controller in an appropriate position on the bass surface to determine where it is to be attached. Pay attention to the following points at this time. 4. Secure the controller with the supplied flat-head screw (3 x 16 mm). fig.1300e (Securing with the Screw) • Install on a level surface. • Position the controller so it does not interfere with your playing.
GK-3B_e.book 19 ページ 2004年7月23日 金曜日 午後2時53分 How to Connect the GK-3B * To prevent malfunction and/or damage to speakers or other devices, always turn down the volume, and turn off the power on all devices before making any connections. * When all devices are properly connected, turn on the power to the various devices in the order specified below. Turning on devices in the wrong order may result in malfunction and/or damage to speakers and other devices. * The GK cable is a locking cable.
GK-3B_e.book 20 ページ 2004年7月23日 How to Connect the GK-3B 2. Use the included normal guitar cable to connect the output jack on the bass to the GK-3B’s normal pickup input jack. fig.2040e Normal Guitar Cable * Connect using the included normal guitar cable or a commercially available guitar cable. Note that the use of connection cables that introduce additional resistance may result in lower normal bass volume.
GK-3B_e.book 21 ページ 2004年7月23日 金曜日 午後2時53分 Specifications GK-3B: Divided Pickup ● Dimensions fig.3010e 73.6 (2-15/16) ● Indicator Power Indicator ● Connectors GK Connector Normal Pickup Input Jack 87.0 (3-7/16) 22.7 (15/16) ● Weight 70 g / 3 oz ● Accessories Normal Guitar Cable Parts for installation Owner’s Manual Unit : mm (inch) 2.0 (1/8) 8.7 (3/8) 138.0 (5-7/16) 128.0 (5-1/16) 118.0 (4-11/16) ● Options GK Cables: GKC-3, GKC-5, GKC-10 GK Parallel Box: GKP-4 Unit Selector: US-20 Ø 13.0 ( 3.
GK-3B_e.book 22 ページ 2004年7月23日 金曜日 午後2時53分 For EU Countries This product complies with the requirements of European Directive 89/336/EEC.
GK-3B_e.book 23 ページ 2004年7月23日 金曜日 午後2時53分 Information When you need repair service, call your nearest Roland Service Center or authorized Roland distributor in your country as shown below. AFRICA EGYPT Al Fanny Trading Office 9, EBN Hagar A1 Askalany Street, ARD E1 Golf, Heliopolis, Cairo 11341, EGYPT TEL: 20-2-417-1828 REUNION Maison FO - YAM Marcel 25 Rue Jules Hermann, Chaudron - BP79 97 491 Ste Clotilde Cedex, REUNION ISLAND TEL: (0262) 218-429 SOUTH AFRICA That Other Music Shop (PTY) Ltd.
GK-3B_e.