
User Manual

18
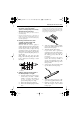
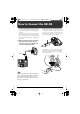
Attaching the GK-3B to the Bass
■
Attaching with Double–sided Tape and a Screw
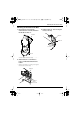
1.
Place the controller in an appropriate
position on the bass surface to determine
where it is to be attached. Pay attention to
the following points at this time.
• Install on a level surface.
• Position the controller so it does not
interfere with your playing.
• Position the controller so you can
comfortably operate the select switch, the
S1 and S2 switches, and other controls.
• Position the controller so that it does not
place undue strain on the normal pickup
input jack, divided pickup, or GK cable.
* Make sure that the plugs connected to the GK
connector and normal pickup input jack do not stick
out, as this may result in damage should undue
strain be placed on the GK connector or normal
pickup input jack.
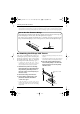
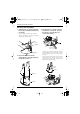
2.
Once the controller position has been
determined, place the controller in
position and carefully drill a pilot hole
in the bass body where the controller’s
attachment hole is located.
* The diameter of the hole should be about 2 mm (0.08”).
* Confirm that there are no other problems in
attaching the controller before drilling the pilot hole.
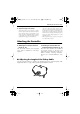
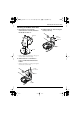
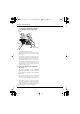
3.
After attaching the double–sided tape
“A” to the underside of the Controller,
attach the controller to the bass.
fig.1290 (Double-Sided Tape)
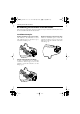
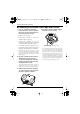
4.
Secure the controller with the supplied
flat-head screw (3 x 16 mm).
fig.1300e (Securing with the Screw)
* If you’d rather not drill a hole in your bass, you can
secure the Controller using only the double-sided
tape or the holders. However, if only the double-
sided tape is used to secure the unit, shocks from
rough handling during performances and from use
over an extended period will cause the tape to
deteriorate, with the GK-3B shifting out of position
as a result. Furthermore, if the finish on your bass is
less than perfect, you may discover that the finish is
also removed when you later remove the tape.
Put the flat-head screw (3x16 mm)
through this hole.
GK-3B_e.book 18 ページ 2004年7月23日 金曜日 午後2時53分